DTC P1456: EVAP Control System
- Ensure fuel filler cap is fully tightened and seal is okay. Replace as necessary. If fuel filler cap is okay, go to next step.
- Turn ignition off. Disconnect vacuum hose coming from EVAP purge control solenoid valve. Connect vacuum pump to disconnected hose. Turn ignition on. Apply vacuum to hose. If valve does not hold vacuum, go to next step. If valve holds vacuum, EVAP purge control solenoid valve is okay. Go to step 5.
- Turn ignition off. Disconnect EVAP purge control solenoid valve 2-pin connector. Measure continuity between EVAP purge control solenoid valve 2-pin connector terminal No. 2 (Red/Yellow wire) and ground. If continuity is present, go to next step. If continuity is not present, replace EVAP purge control solenoid valve.
- Disconnect PCM 32-pin connector. Measure continuity between EVAP purge control solenoid valve 2-pin connector terminal No. 2 (Red/Yellow wire) and ground. If continuity is present, repair short circuit in wiring between EVAP purge control solenoid valve and PCM. If continuity is not present, replace PCM.
- Disconnect vacuum hoses coming from EVAP 2-way valve. Connect vacuum pump to disconnected hose. Connect jumper wire between PCM 32-pin connector terminal No. 3 (Blue wire) and ground. Turn ignition on. Apply vacuum to hose. If valve holds vacuum, go to next step. If valve does not hold vacuum, go to step 8.
- Turn ignition off. Disconnect EVAP by-pass solenoid valve 2-pin connector. Measure continuity between EVAP by-pass solenoid valve 2-pin connector terminal No. 2 (Blue wire) and ground. If continuity is present, go to next step. If continuity is not present, repair open circuit in wiring between EVAP by-pass solenoid valve and PCM.
- Turn ignition on. Measure voltage between EVAP by-pass solenoid valve 2-pin connector terminal No. 1 (Black/Yellow wire) and ground. If battery voltage is present, replace EVAP by-pass solenoid valve and "O" ring. If battery voltage is not present, repair open circuit in wiring between EVAP by-pass solenoid valve and No. 6 15-amp PCM fuse.
- Plug upper port of EVAP 2-way valve. Measure voltage between PCM 32-pin connector terminal No. 29 (Light Green wire) and 31-pin connector terminal No. 18 (Green/Black wire) while slowly applying vacuum. If voltage drops to about 1.5 volts and holds for at least 20 seconds, EVAP by-pass solenoid valve/EVAP 2-way valve is okay. Go to next step. If voltage does not drop to about 1.5 volts and hold, repair leakage from EVAP by-pass solenoid valve, EVAP 2-way valve, fuel tank pressure sensor and "O" rings.
- Disconnect vacuum hose from EVAP control canister filter. Connect vacuum pump to disconnected hose. Turn ignition on. Apply vacuum to hose with 5 strokes of vacuum pump. If valve holds vacuum, go to next step. If valve does not hold vacuum, EVAP control canister vent shut valve is okay. Go to step 12.
- Turn ignition off. Disconnect EVAP control canister vent valve 2-pin connector. Measure continuity between EVAP control canister vent shut valve 2-pin connector terminal No. 2 (Light Green/White wire) and ground. If continuity is present, go to next step. If continuity is not present, replace EVAP control canister vent shut valve and "O" ring.
- Disconnect PCM 32-pin connector. Measure continuity between EVAP by-pass solenoid valve 2-pin connector terminal No. 2 (Light Green/White wire) and ground. If continuity is present, repair short circuit in wiring between EVAP control canister vent shut valve and PCM. If continuity is not present, replace PCM.
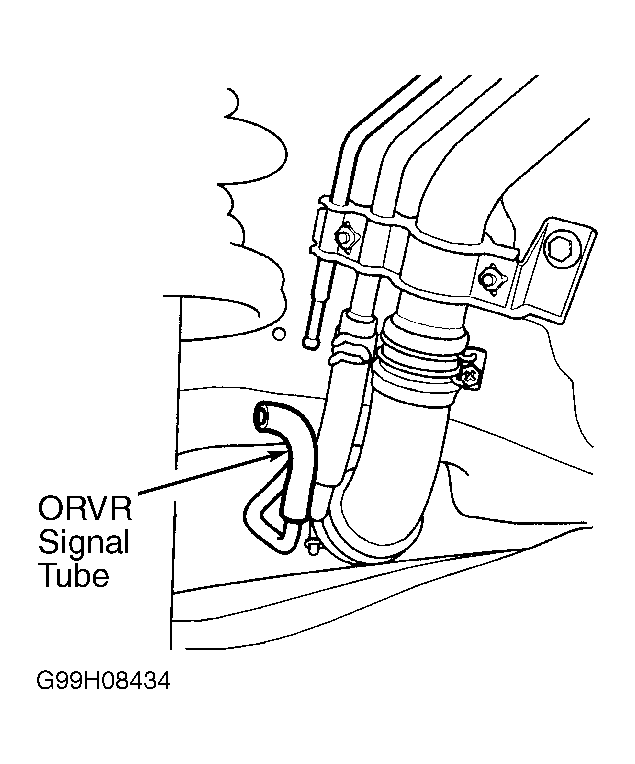
- Ensure fuel tank is less than one-half full. Remove fuel filler cap to relieve fuel tank pressure. Reinstall cap. Remove left rear inner fender. Disconnect On-Board Refueling Vapor Recovery (ORVR) signal tube. See Fig 1. Connect vacuum pump to disconnected hose. Plug tube "B". Apply vacuum to ORVR vapor recirculation hose. If vacuum holds, replace ORVR vent shut valve. If vacuum does not hold, float is okay. Go to next step.
 Courtesy of AMERICAN HONDA MOTOR CO., INC.
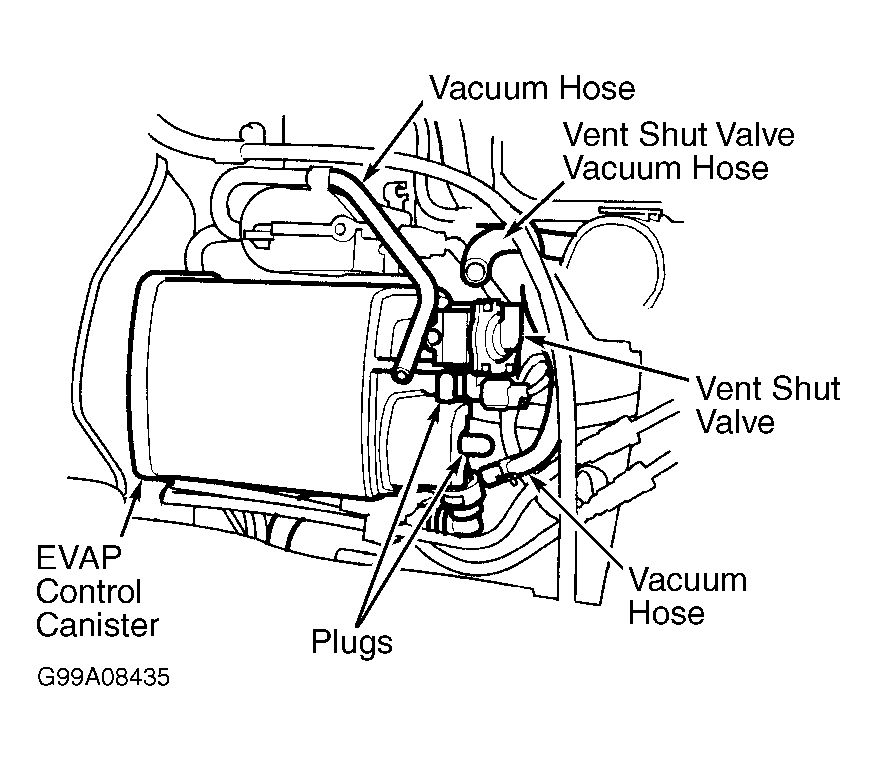
- Remove vacuum pump and plug open port in disconnected hose. Disconnect vacuum hose "D" from EVAP control canister vent shut valve. See Fig 2. Connect vacuum pump to vacuum hose. Pump vacuum pump about 80 times. If vacuum holds, go to next step. If vacuum does not hold, go to step 15.
 Courtesy of AMERICAN HONDA MOTOR CO., INC.
- Connect an additional vacuum pump to ORVR signal tube. See Fig 1. Apply one pump of vacuum to ORVR signal tube. Check vacuum on second vacuum pump. If vacuum holds, replace ORVR vent shut valve. If vacuum is released, ORVR vent shut valve is okay.
- Disconnect ORVR quick-disconnect line from EVAP canister. Plug port on canister. Reapply 80 pumps of vacuum from vacuum pump. If vacuum holds, replace ORVR vent shut valve. If vacuum does not hold, check EVAP canister vent shut valve "O" ring. If "O" ring is okay, replace EVAP canister.
- Fill gas tank with fuel. Check for excessive fuel in 2-way valve and ORVR vapor recirculation hose. If fuel does not run out of hose at either location, ORVR is okay. Go to next step. If fuel runs out of hose at either location, replace ORVR valve.
- Tighten fuel cap 3 clicks. Connect scan tool to vehicle. Start and idle engine for 5 minutes. Using scan tool, check fuel tank pressure sensor reading. If fuel tank pressure is greater than .16 in. Hg or less than -.16 in. Hg, replace PCM. If fuel tank pressure is within these specifications, check for leaks in fuel tank, fuel fill cap, fuel fill pipe, On-Board Refueling Vapor Recovery (ORVR) shut valve, ORVR vapor recirculation valve, ORVR vapor recirculation tube, ORVR signal tube, and ORVR vapor vent tube. Repair or replace components as necessary.