With SH-AWD
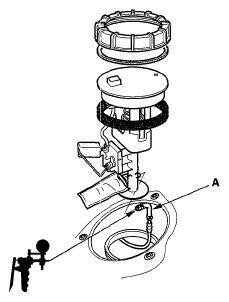
- Remove the secondary fuel gauge sending unit (see
SECONDARY FUEL GAUGE SENDING UNIT REMOVAL/INSTALLATION )
- Connect a vacuum pump/gauge, 0-30 in Hg, to the transfer tube (A)
 Courtesy of AMERICAN HONDA MOTOR CO., INC.
- Turn the ignition switch to ON (II), or press the engine start/stop button to select the ON mode
- From the INSPECTION MENU of the HDS, select Fuel Pump ON
- Read the vacuum pump/gauge, 0-30 in Hg The vacuum should be 4.0 kPa (1.2 in Hg, 30 mmHg)
- If the vacuum is OK, the transfer fuel pump and the transfer tube is OK
- If the vacuum is out of specification, go to step 6
- Turn the ignition switch to LOCK (0), or press the engine start/stop button to select the OFF mode
- Install the secondarily fuel gauge sending unit (see
INSTALLATION (WITH SH-AWD) )
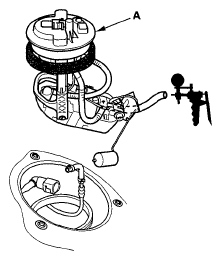
- Remove the fuel tank unit (see
REMOVAL (WITH SH-AWD) )
- Connect the vacuum pump/gauge, 0-30 in Hg, to the fuel tank unit (A)
 Courtesy of AMERICAN HONDA MOTOR CO., INC.
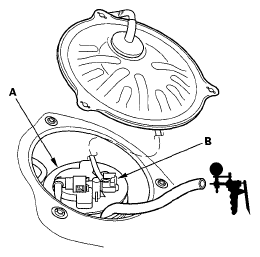
- Lower the fuel tank unit (A) into the fuel tank until the pick up screen is submerged in the fuel
 Courtesy of AMERICAN HONDA MOTOR CO., INC.
- Connect the fuel tank unit 4P connector (B)
- Turn the ignition switch to ON (II), or press the engine start/stop button to select the ON mode
- From the INSPECTION MENU of the HDS, select Fuel Pump ON
- Read the vacuum pump/gauge, 0-30 in Hg The vacuum should be 4.0 kPa (1.2 in Hg, 30 mmHg)
- If the vacuum is OK, replace the transfer tube, then recheck the fuel vacuum
- If the vacuum is out of specification, replace the fuel tank unit (see
REMOVAL (WITH SH-AWD) ), then recheck the fuel vacuum