Diagnostic Test
- Perform On-Board Diagnostic (OBD) System Check. See ON-BOARD DIAGNOSTIC (OBD) SYSTEM CHECK in TESTS W/CODES
article. After performing OBD system check, go to next step.
- Check for Diagnostic Trouble Codes (DTCs). If DTC P0340 exists, perform DTC P0340 test. See TESTS W/CODES
article. If DTC P0340 does not exist, go to next step.
- Disconnect fuel injector harness connectors. Disconnect spark plug wires from spark plugs. Install spark tester to spark plug wires, one at wire at a time. Observe spark tester while cranking engine. If good spark exists at each plug wire, go to next step. If good spark does not exist at each plug wire, go to step 5).
- Check spark plugs for damage. If spark plugs are damaged, replace as necessary and go to step 32). If spark plugs are okay, perform fuel injector circuit diagnosis. See FUEL SYSTEM in SYSTEM/COMPONENT TESTS
article.
- Measure resistance in each spark plug wire. If resistance is 3000-6700 ohms/foot, go to next step. If resistance is not 3000-6500 ohms/foot, go to step 30).
- Check distributor cap and rotor for cracks terminal corrosion and water. If problem does not exist, go to next step. If problem exists, repair as necessary and go to step 32).
- Remove distributor cap. Connect spark tester to ignition coil output tower. Crank engine while observing spark tester. If good spark does not exist, go to next step. If good spark exists, check the following and repair as necessary:
- Fuel injectors for proper output volume.
- ECT sensor reading using scan tool. Reading should be approximately equal to engine coolant temperature.
- TP sensor reading using scan tool. Reading should be approximately 7-18 percent (0.42-1.15 volts) with throttle closed.
- Fuel pressure.
- Main relay and main relay circuit.
- Blown IG-COIL METER fuse.
- Short to ground in Blue/White wire between noise suppressor filter and distributor.
- Damaged wiring harness.
- Poor connection at PCM and/or other ignition related components.
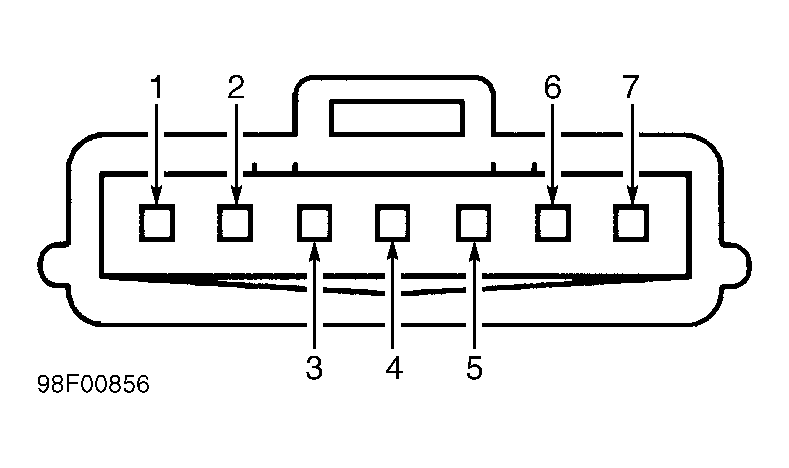
- Disconnect distributor harness connector. Turn ignition switch to RUN position. Measure voltage between terminals No. 7 (Black/White wire) and No. 4 (Black/Orange wire) at distributor harness connector. See Fig 1
. If battery voltage exists, go to next step. If battery voltage does not exist, go to step 16).
- Ensure ignition switch is in RUN position. Measure voltage between terminals No. 1 (Black/Blue wire) and No. 2 (Blue/Black wire) at distributor harness connector. If battery voltage exists, go to next step. If battery voltage does not exist, go to step 26).
- Turn ignition switch to LOCK position. Measure resistance between terminals No. 6 and 7 at distributor. If resistance is 0.7-1.1 ohms at 68°F (20°C), go to next step. If resistance is not 0.7-1.1 ohms at 68°F (20°C), go to step 26).
- Measure resistance between ignition coil wire terminal and terminal No. 7 at distributor. If 13,000-18,000 ohms exists, go to next step. If 13,000-18,000 ohms does not exist, go to step 26).
- With distributor harness still disconnected, remove ignition control module drive input wire from harness connector (Orange wire). Connect distributor harness connector. Using a voltmeter, backprobe ignition control module drive input circuit at PCM. Observe voltmeter while cranking engine. If 4-5 volts exists, leave voltmeter connected and go to next step. If 4-5 volts does not exist, go to step 27).
- Install ignition control module drive input circuit wire back into distributor harness connector. Observing voltmeter while cranking engine. If 4-5 volts does not exist, go to step 28). If 4-5 volts exists, go to step 29).
- Ensure ignition switch is in RUN position. Measure voltage between ground and terminal No. 7 (Black/White wire) at distributor harness connector. If battery voltage exists, go to next step. If battery voltage does not exist, go to step 22).
- Repair open in distributor ground circuit (Black/Orange wire) and go to step 32).
- Ensure ignition switch is in RUN position. Measure voltage between ground and terminal No. 2 (Black/White wire) at distributor harness connector. If battery voltage exists, go to next step. If battery voltage does not exist, go to step 18).
- Repair open in distributor ground circuit (Black/Blue wire) and go to step 32).
- Check ignition feed circuit (Blue/Black wire) for open or short, between main relay and distributor harness connectors. If open or short does not exist, go to next step. If open or short exists, repair as necessary and go to step 32).
- Turn ignition switch to LOCK position. Remove main relay, located behind left side of glove box. Turn ignition switch to RUN position. Using a test light connected to ground, probe terminal No. 2 (Black/Red wire) at main relay harness connector. If test light illuminates, go to next step. If test light does not illuminate, go to step 29).
- Using a test light connected to ground, probe terminal No. 1 (Black/White wire) at main relay harness connector. If test light illuminates, go to next step. If test light does not illuminate, go to step 22).
- Turn ignition switch to LOCK position. Using a test light connected to battery voltage, probe terminal No. 3 (Blue wire) at main relay harness connector. Turn ignition switch to RUN position. If test light does not illuminate, go to step 24). If test light illuminates, go to step 25).
- Repair open in ignition feed circuit (Black/White wire), between IG-COIL METER fuse and distributor harness connector. After repairs are complete, go to step 32).
- Repair open or short to ground in ignition voltage circuit (Black/Red wire), between FI fuse and main relay harness connector. After repairs are complete, go to step 32).
- Check main relay control circuit (Blue wire) for open, between PCM and main relay harness connectors. If open does not exist, go to step 31). If open exists, repair as necessary and go to step 32).
- Replace main relay and go to step 32).
- Replace ignition coil and go to step 32).
- Check ignition control module drive input circuit (Orange wire) for short, between PCM and distributor harness connectors. If short does not exist, go to step 31). If short exists, repair as necessary and go to step 32).
- Repair open in ignition control module drive input circuit (Orange wire), between PCM and distributor harness connectors. After repairs are complete, go to step 32).
- Replace ignition control module and go to step 32).
- Replace spark plug wires as necessary and go to step 32).
- Replace PCM and go to next step.
- After repairs are complete, start engine and observe Malfunction Indicator Light (MIL). If MIL illuminates for 3 second then goes out, system is okay at this time. If MIL does not illuminate or stays illuminated, repair as necessary. See TESTS W/CODES
article.
 Courtesy of GENERAL MOTORS CORP.