DTC P1490: Low Speed Fan Control Relay Circuit: Testing
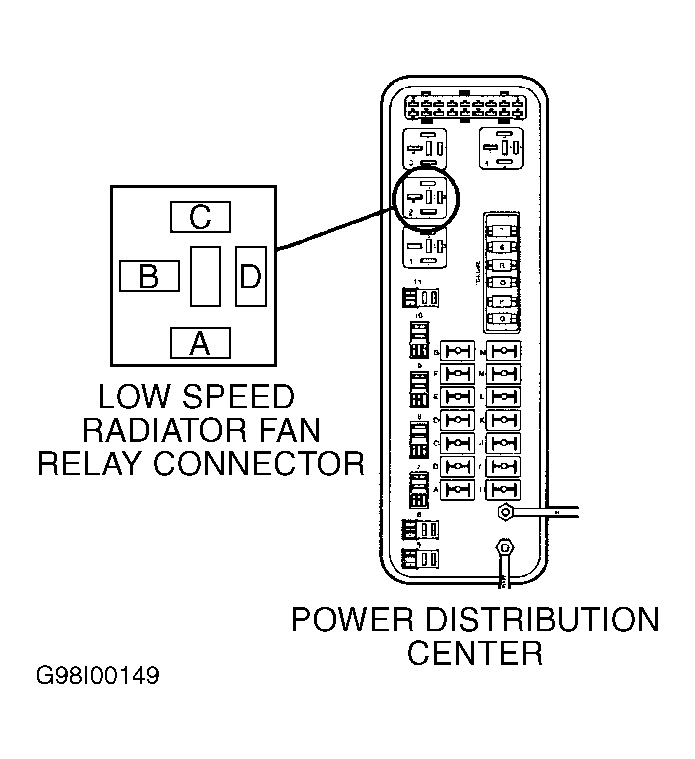
- Turn ignition on. Using scan tool, actuate low speed radiator fan relay. Locate low speed radiator fan relay in Power Distribution Center (PDC). See Fig 1. If low speed radiator fan relay cycles on and off, go to next step. If low speed radiator fan relay does not cycle on and off, stop relay actuation and go to step 4.
- Ensure low speed radiator fan relay is still actuated. Wiggle wiring harness from low speed radiator fan relay PCM. PCM is located on left side of engine compartment, between PDC and Transmission Control Module (TCM). See Figure. If low speed radiator fan relay actuation is interrupted, repair connector or wiring harness where wiggling caused interruption. If no problems were found, go to next step.
- Visually inspect related connectors and wiring harness for damage. Repair connectors and wiring harness as necessary. If connectors and wiring harness are okay, reconnect all connectors. No problem is indicated at this time. Test is complete.
- Turn ignition off. Remove low speed radiator fan relay from PDC. Turn ignition on. Measure voltage between ground and terminal "A" (Light Green/Black wire) at low speed radiator fan relay socket in PDC. See Fig 1. If voltage is more than 10 volts, go to next step. If voltage is 10 volts or less, check for open in Light Green/Black wire between low speed radiator fan relay and junction block. Junction block is located behind end cover on left side of instrument panel. Repair wiring as necessary. Also check fuse No. 21 (10-amp) in junction block. Replace fuse as necessary.
 Courtesy of DAIMLERCHRYSLER CORPORATION
- Turn ignition off. Disconnect PCM connectors. Measure resistance of Dark Blue/Pink wire between terminal "C" at low speed radiator fan relay socket in PDC and terminal No. 55 at PCM C2 harness connector. See Figure and Fig 1
. If resistance is less than 5 ohms, go to next step. If resistance is 5 ohms or more, repair open in Dark Blue/Pink wire.
- Measure resistance between ground and terminal No. 55 (Dark Blue/Pink wire) at PCM C2 harness connector. If resistance is 5 ohms or more, go to next step. If resistance is less than 5 ohms, repair short to ground in Dark Blue/Pink wire.
- Install low speed radiator fan relay. Turn ignition of. Connect one end of a jumper wire to terminal No. 55 (Dark Blue/Pink wire) at PCM C2 harness connector. See Figure. Momentarily connect other end of jumper wire to ground. If low speed radiator fan relay actuates (click noise heard), go to next step. If low speed radiator fan relay does not actuate, replace low speed radiator fan relay.
- At this time, PCM is assumed to be defective. Replace PCM.