MPI Control Relay (1.5L)
- For relay location, see MPI CONTROL RELAY LOCATION
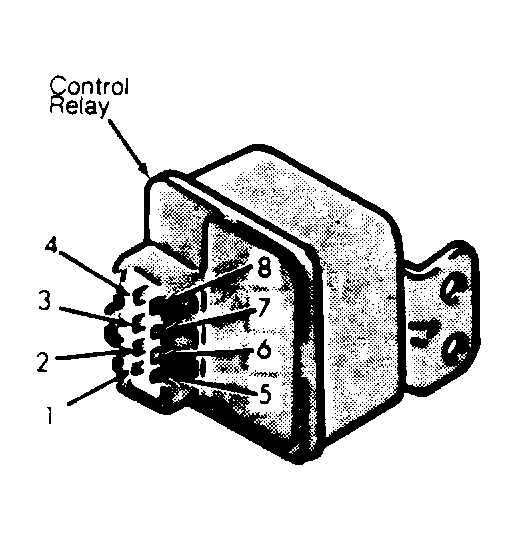
table. Check for battery voltage at terminal No. 4 of relay connector. See Fig 1
. If battery voltage is present, go to step 3). If battery voltage is not present, check circuit between relay and battery, including fusible link No. 1. Go to next step.
- Disconnect wiring harness connector at relay. Remove relay. Check continuity, in turn, between terminal No. 4 and following: terminals No. 1, 2 and 3. If there is no continuity, go to next step. If there is continuity, replace relay.
- Check diode operation between terminals No. 6 and 8. If there is continuity in only one direction, go to next step. If there is no continuity in either direction or if there is continuity in both directions, replace relay.
- Measure resistance between terminals No. 6 and 7. If resistance is approximately 35 ohms, go to next step. If resistance is not approximately 35 ohms, replace relay.
- Measure resistance, in turn, between terminal No. 5 and following: terminals No. 2 and 3. In both tests, if resistance is approximately 95 ohms, go to next step. If resistance is not approximately 95 ohms, replace relay.
- Connect positive lead of 12-volt source to terminal No. 7 and negative lead to terminal No. 6. If there is continuity between terminals No. 1 and 4, go to next step. If there is no continuity, replace relay.
- Connect positive lead of 12-volt source to terminal No. 5 and negative lead to terminal No. 2. If there is continuity between terminals No. 1 and 4, go to next step. If there is no continuity, replace relay.
- Connect positive lead of 12-volt source to terminal No. 5 and negative lead to terminal No. 3. If there is continuity between terminals No. 1 and 4, go to next step. If there is no continuity, replace relay.
- Connect positive lead of 12-volt source to terminal No. 8 and negative lead to terminal No. 6. Check continuity, in turn, between terminal No. 4 and following: terminals No. 3 and 2. If continuity exists, relay is okay. If there is no continuity, replace relay.
 Courtesy of MITSUBISHI MOTOR SALES OF AMERICA.