Starter System Test
- Check Battery
Ensure battery is fully charged and has sufficient capacity. Replace battery if in question. If battery is okay, go to next step.
- Check Signal To Starter Solenoid
Disconnect Gray/Black wire from starter solenoid. While holding ignition switch in START position, measure voltage between Gray/Black wire and ground. If voltage is greater than 10 volts, go to next step. If voltage is less than 10 volts, go to step 5).
- Check Voltage To Starter Motor
Turn ignition off. Measure voltage between ground and "B" terminal on starter solenoid (positive battery cable). If voltage is greater than 10 volts, go to next step. If voltage is less than 10 volts, repair positive battery cable. Restore electrical connections and check system operation.
- Check Resistance of Negative Battery Cable
Disconnect negative battery cable. Measure resistance of negative battery cable. If resistance is less than 5 ohms, replace starter motor. If resistance is greater than 5 ohms, repair or replace negative battery cable. Restore electrical connections and check system operation.
- Check Voltage To Starter Relay
Turn ignition off. Remove starter relay. Measure voltage between starter relay harness connector terminal No. 3 and ground. See Fig 1
. If voltage is greater than 10 volts, go to next step. If voltage is less than 10 volts, repair Red wire between battery and engine compartment fuse box.
 Courtesy of FORD MOTOR CO.
- Check Gray/Black Wire For Open
Measure resistance of Gray/Black wire between starter relay terminal No. 5 and at starter motor. If resistance is less than 5 ohms, go to next step. If resistance is greater than 5 ohms, go to step 25). Restore electrical connections and check system operation.
- Check Voltage At Gray/White Wire
While holding ignition switch in START position, measure voltage at starter relay harness connector terminal No. 2. If voltage is greater than 10 volts, go to step 13). If voltage is less than 10 volts, go to next step.
- Check Fuse No. 10
Test fuse No. 10 (20-amp) in engine compartment fuse panel. If fuse is okay, go to next step. Replace fuse if blown. If fuse blows again check circuit for short to ground. See WIRING DIAGRAMS
. Restore electrical connections and check system operation.
- Check Red Wire For Open
Disconnect ignition switch harness connector (located at ignition switch). Remove fuse No. 10 (20-amp). Measure resistance of Red wire between fuse No. 10 cavity and ignition switch harness connector. If resistance is less than 5 ohms, go to next step. If resistance is greater than 5 ohms, repair open Red wire. Restore electrical connections and check system operation.
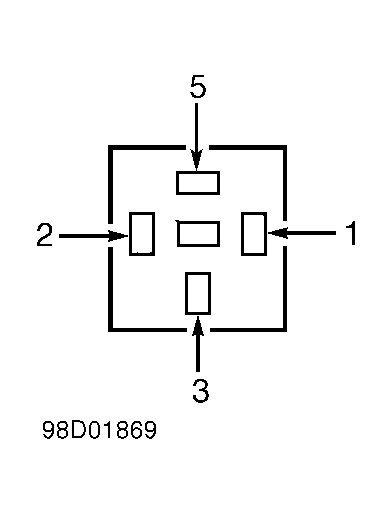
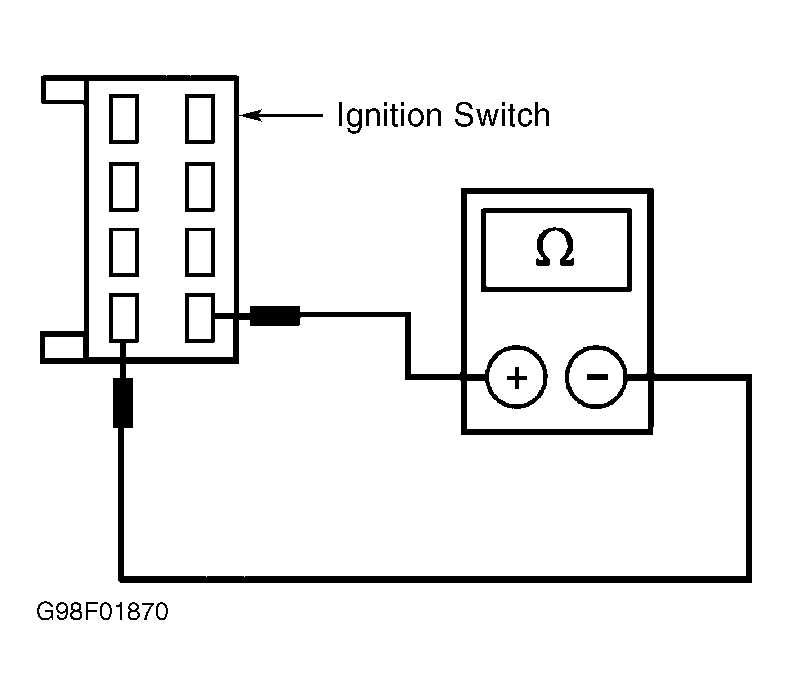
- Check Ignition Switch
Hold ignition switch in START position. Measure resistance between ignition switch terminals No. 1 and 5. See Fig 2
. If resistance is less than 5 ohms, go to next step. If resistance is greater than 5 ohms, replace ignition switch. Restore electrical connections and check system operation.
 Courtesy of FORD MOTOR CO.
- Check Gray/White Wire For Open
Disconnect engine compartment fuse box connector C334 (10-pin connector). Measure resistance of Gray/White wire between engine compartment fuse box connector C334 and ignition switch harness connector. If resistance is less than 5 ohms, go to next step. If resistance is greater than 5 ohms, repair open Gray/White wire. Restore electrical connections and check system operation.
- Check Starter Relay Diode
Remove starter relay diode from engine compartment fuse box. Measure resistance between diode terminals. Continuity should exist in one direction and not in the other direction. Replace diode if resistance is not as specified. If diode is okay, repair open engine compartment fuse panel. Restore electrical connections and check system operation.
- Check Starter Relay
Turn ignition off. Remove starter relay. Connect a jumper wire between positive battery terminal and starter relay terminal No. 2. See Fig 3
. Connect another jumper wire between negative battery terminal No. 1 and ground. Measure resistance between starter relay terminals No. 5 and 3. If resistance is less than 5 ohms, go to step 14). If resistance is greater than 5 ohms, replace relay. Restore electrical connections and check system operation.
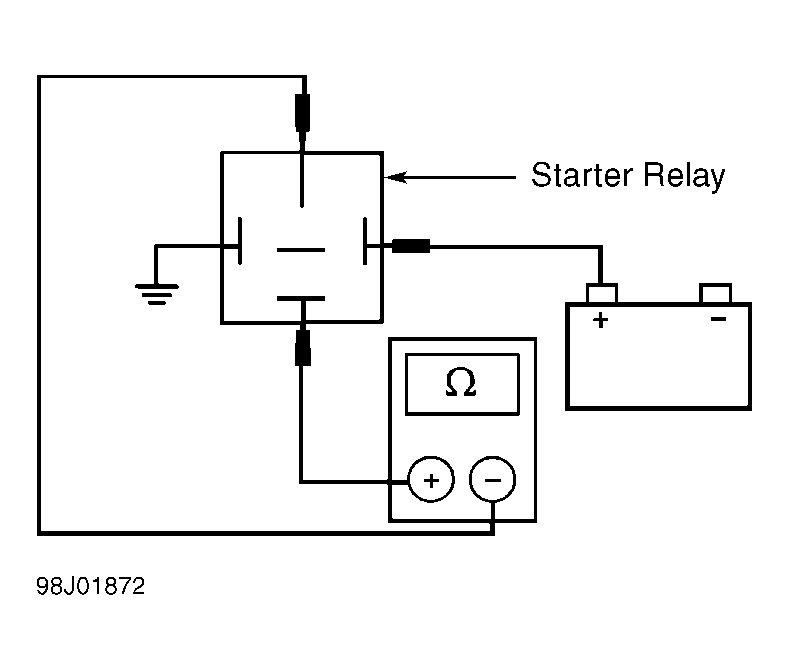 Courtesy of FORD MOTOR CO.
- Check Gray/Black Wire For Short To Ground
Measure resistance between starter relay harness connector terminal No. 5 and ground. See Fig 1
. If resistance is less than 10 k/ohms, repair Gray/Black wire for short to ground. If resistance is greater than 10 k/ohms, go to next step if equipped with M/T. If resistance is greater than 10 k/ohms, go to step 16) if equipped with A/T.
- Check Black/Yellow Wire For Open (M/T)
Disconnect Clutch Pedal Position (CPP) switch harness connector. Measure resistance of Black/Yellow wire between CPP switch harness connector and starter relay harness connector terminal No. 1. See Fig 1
. If resistance is greater than 5 ohms, go to next step. If resistance is less than 5 ohms, go to step 18).
- Check Black/Yellow Wire For Open (A/T)
Disconnect Transmission Range (TR) sensor. Measure resistance of Black/Yellow wire between TR sensor harness connector and starter relay harness connector terminal No. 1. If resistance is less than 5 ohms, go to step 19). If resistance is greater than 5 ohms, go to next step.
- Check Fuse Box
Disconnect engine compartment fuse box harness connector C334 (10-pin connector). Measure resistance of Black/Yellow wire between C334 and CPP switch or TR sensor harness connector. If resistance is greater than 5 ohms, repair open Black/Yellow wire. If resistance is less than 5 ohms, replace engine compartment fuse panel.
- Check CPP Switch
Measure resistance between Clutch Pedal Position (CPP) switch terminals while pressing clutch pedal. If resistance is less than 5 ohms, go to step 20). If resistance is greater than 5 ohms, replace CPP switch. Restore electrical connections and check system operation.
- Check TR Sensor
Measure resistance between Transmission Range (TR) Sensor harness connector terminals No. 9 and 14 while transmission selector is in Park or Neutral. See Fig 4
. If resistance is less than 5 ohms, go to next step. If resistance is greater than 5 ohms, replace TR sensor. Restore electrical connections and check system operation.
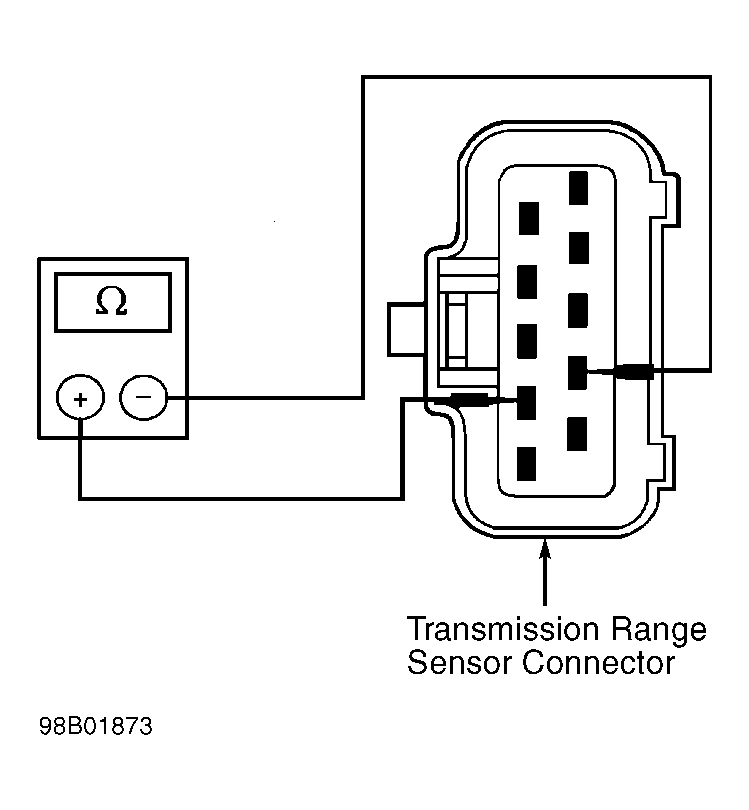 Courtesy of FORD MOTOR CO.
- Check For PATS Module
Check if vehicle is equipped with Passive Anti-Theft System (PATS) module located at base of right "A" pillar. PATS control module has a 16-pin connector. If PATS module exists, go to next step. If vehicle does not have any factory anti-theft system, repair open Black wire between CPP or TR sensor and ground point behind right kick panel. If vehicle has factory anti-theft system but is not equipped PATS module, go to step 22).
- Check Black Or Black/Green Wire For Open
Disconnect PATS module harness connector. On M/T equipped models, measure resistance of Black wire between Clutch Pedal Position (CPP) switch harness connector and PATS module harness connector. On A/T equipped models, measure resistance of Black/Green wire changing into Black wire between TR sensor and PATS module harness connector. If resistance is less than 5 ohms, replace PATS module. If resistance is greater than 5 ohms, repair open Black or Black/Green wire. Restore electrical connections and check system operation.
- Check Black Or Black/Green Wire For Open
Disconnect anti-theft/central locking module harness connector C451 (13-pin). On models with M/T, measure resistance of Black wire between Clutch Pedal Position (CPP) switch harness connector and anti-theft/central locking module harness connector. On A/T equipped models, measure resistance of Black/Green wire changing into Black wire between TR sensor and PATS module harness connector. If resistance is less than 5 ohms, replace PATS module.