Valve Clearance
- Remove negative battery cable and valve cover. Rotate engine until zero degree mark on timing belt cover is aligned with timing mark groove on crankshaft pulley. Ensure cylinder No. 1 is at TDC by removing distributor cap and ensuring rotor is pointed at No. 1 spark plug wire terminal. If rotor does not point to No. 1 terminal, rotate crankshaft one revolution (360 degrees). See Figure
.
- Check intake valve clearances of cylinders No. 1 and 2, and exhaust valve clearances of cylinders No. 1 and 3. Record clearance measurements of valves that are not within specification. See VALVE CLEARANCE SPECIFICATIONS table. Turn crankshaft one complete revolution (360 degrees). Check intake valve clearances of cylinders No. 3 and 4, and exhaust valve clearances of cylinders No. 2 and 4. Record clearance measurements of valves that are not within specification.
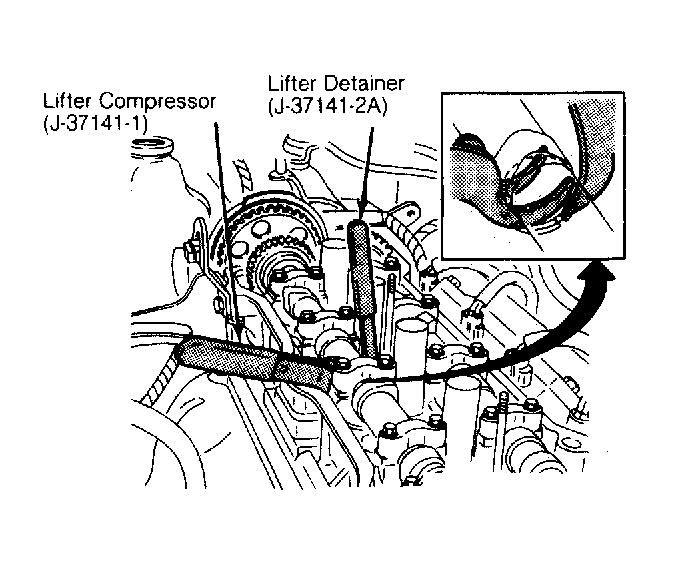
- To adjust clearance, rotate crankshaft until cam lobe of appropriate valve is 180 degrees away from lifter adjusting shim. Use Lifter Compressor (J-37141-1) to push lifter down. Insert Lifter Detainer (J-37141-2A) between camshaft and lifter. See Fig 1
.
- Remove lifter compressor and lifter adjusting shim using screwdriver and magnet. Calculate required lifter adjusting shim thickness using Shim Thickness Selection Charts. See Figure
and Figure
or use following formula: N = T + A
- N = Thickness of shim required.
- T = Thickness of shim removed.
- A = Valve clearance measured minus valve clearance specification.
- Replace removed lifter adjusting shim with one allows the required valve clearance. Repeat procedure as necessary.
 Courtesy of GENERAL MOTORS CORP.
 VALVE CLEARANCE SPECIFICATIONS
| Application |
Clearance In. (mm) |
| Intake |
.006-.010 (.15-.25) |
| Exhaust |
.008-.012 (.20-.30) |