Fuel Pressure
- Release fuel pressure. See FUEL SYSTEM PRESSURE RELEASE
. Disconnect negative battery cable. Remove bolt and fuel inlet hose from fuel rail.
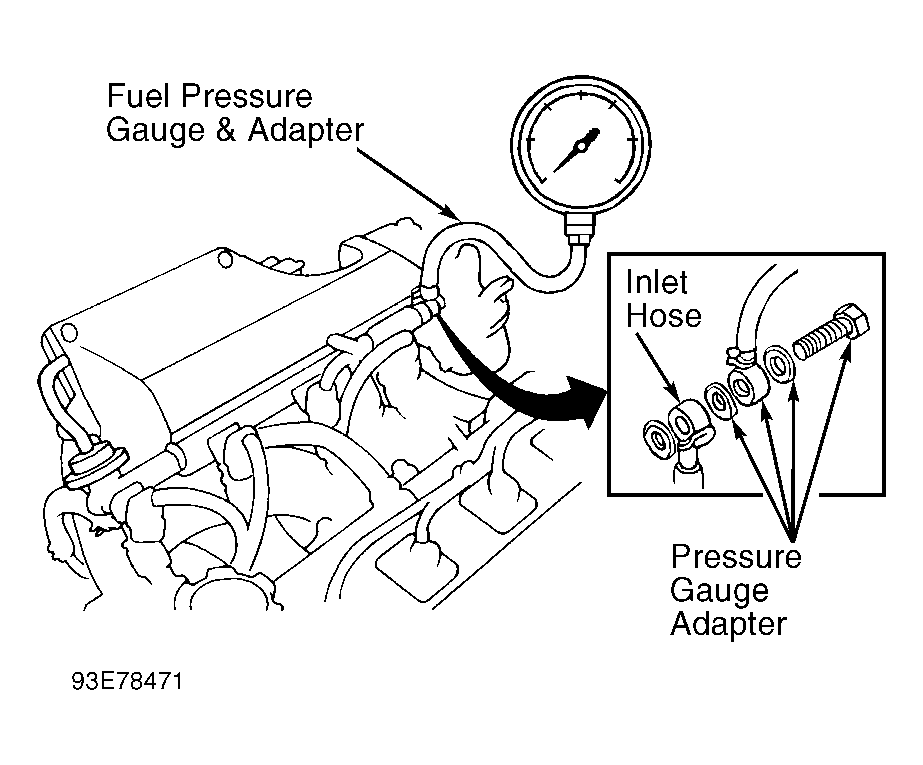
- Install Adapter (J-39802) with gaskets and fuel inlet hose to fuel rail. See Fig 1
. Tighten adapter retaining bolt to 22 ft. lbs. (29 N.m). Install Fuel Pressure Gauge (J-34730-1A) to adapter.
- Reconnect negative battery cable. Turn ignition on. Locate DLC on left strut tower. Connect jumper wire between Data Link Connector (DLC) terminals No. 12/B+ (Black/Red wire) and No. 1/FP (Blue/Black wire).
- Check fuel pressure. See FUEL PUMP PERFORMANCE
. If fuel pressure is more than specified, ensure fuel return line is not plugged. If fuel return line is okay, replace fuel pressure regulator. If fuel pressure is less than specified, check for leaks in fuel line, fuel pump or fuel pressure regulator. Repair as necessary. If no leaks are found, go to next step.
- Remove jumper wire from DLC. Start engine. Disconnect and plug fuel pressure regulator vacuum hose. Check fuel pressure. Reconnect fuel pressure regulator vacuum hose. Check fuel pressure. See FUEL PUMP PERFORMANCE
. If fuel pressure is not as specified, repair or replace fuel pressure regulator and/or vacuum hose as necessary. Turn engine off and go to next step.
- Check fuel pressure with ignition off. Pressure should hold at more than specification for at least 5 minutes after engine is turned off. See FUEL PUMP PERFORMANCE
. If pressure is less than specification, check for a leaking fuel pump, pressure regulator and/or fuel injectors. Replace or repair as necessary.
- Disconnect 4 fuel injector connectors. Turn ignition on. Momentarily connect a jumper wire between DLC terminals No. 12/B+ (Black/Red wire) and No. 1/FP (Blue/Black wire). Install one end of Fuel Injector Test Harness Adapter (J-34730-355) to fuel injector terminals and other end to Fuel Injector Tester (J-34730-3A). Connect fuel injector tester power leads to battery. Set fuel injector tester to one pulse and activate one time only.
- Check fuel pressure while activating fuel injector tester. When fuel injector tester is activated, pressure should drop to 26-34 psi (1.8-2.4 kg/cm2
). If fuel pressure is as specified, repeat step 7) for remaining injectors. If fuel pressure is not as specified, replace fuel injector and repeat step 7) for remaining fuel injectors.
- Turn ignition off. Release fuel pressure and remove fuel pressure gauge. See FUEL SYSTEM PRESSURE RELEASE
. Using 2 new gaskets, reconnect fuel feed hose to fuel rail. Connect negative battery cable, disconnected during fuel pressure release. Turn ignition on and momentarily connect a jumper wire between DLC terminals No. 12/B+ (Black/Red wire) and No. 1/FP (Blue/Black wire). Check for fuel leaks.
 Courtesy of GENERAL MOTORS CORP.
 FUEL PUMP PERFORMANCE
| KOEO
Hold Pressure psi (kg/cm2
) |
Engine @ Idle psi (kg/cm2
) |
| 38-44 (2.7-3.1) |
38-44 |
| (2.7-3.1) |
21 (1.5) |