Oil Pan Installation
- Remove all of the old liquid gasket from the oil pan mating surfaces, bolts, and bolt holes.
- Clean and dry the oil pan mating surfaces.
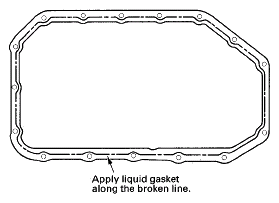
- Apply liquid gasket, P/N 08717-0004, 08718-0001, 08718-0003, or 08718-0009, evenly to the engine block mating surface of the oil pan and to the inner threads of the bolt holes. Install the component within 5 minutes of applying the liquid gasket.
NOTE:
- If you apply liquid gasket P/N 08718-0012, the component must be installed within 4 minutes.
- If too much time has passed after applying the liquid gasket, remove the old liquid gasket and residue, then reapply new liquid gasket.
 Courtesy of AMERICAN HONDA MOTOR CO., INC.
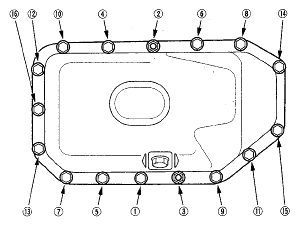
- Install the oil pan.
- Torque the bolts/nuts in three steps. In the final step, torque all bolts, in sequence, to 12 N.m (1.2 kgf.m, 8.8 lbf.ft).
 Courtesy of AMERICAN HONDA MOTOR CO., INC.
- M/T model: Install the clutch cover.
 Courtesy of AMERICAN HONDA MOTOR CO., INC.
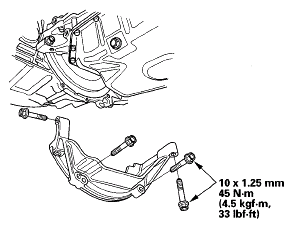
- If the engine is still in the vehicle, install the subframe.
- Support the subframe with the subframe adapter and a jack, and lift it up to the body.
- Loosely install the new front subframe mounting bolts (see step 12 in ENGINE INSTALLATION
).
- Align the reference marks with the center of the subframe mounting bolts, then torque the bolts to the specified torque (see step 14 in ENGINE INSTALLATION
).
- A/T model: Install the automatic transmission fluid (ATF) filter mounting bolt (see step 36 in ENGINE INSTALLATION
).
- Tighten the rear mount mounting bolts (see step 16 in ENGINE INSTALLATION
).
- Tighten the front mount mounting bolt (see step 15 in ENGINE INSTALLATION
).
- Connect the suspension knuckle ball joints (see LOWER ARM REPLACEMENT
).
- Connect the stabilizer links (see STABILIZER LINK REMOVAL/INSTALLATION
- Remove the engine support hanger from the vehicle.
- After assembly, wait at least 30 minutes before filling the engine with oil.