Canada Models: Installation
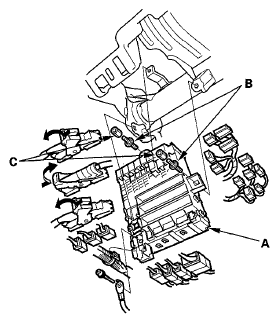
- Install the relays and connect the connectors to the under-dash fuse/relay box (A), then install the under-dash fuse/relay box in the reverse order of removal.
 Courtesy of AMERICAN HONDA MOTOR CO., INC.
- Remove the double nuts from stud bolts (B), then install the nuts (C) to the stud bolts.
- Install the removed parts in the reverse order of removal.
- Do the battery terminal reconnection procedure (see BATTERY TERMINAL DISCONNECTION AND RECONNECTION
).
- If the under-dash fuse/relay box is being replaced, do the following with the HDS.
- Have all registered keys and the ECM/PCM code.
- Connect the HDS to the data link connector (DLC).
- Turn the ignition switch to ON (ll).
- Select IMMOBI from the System Selection Menu, then select IMMOBILIZER SETUP.
- Select REPLACE MPCS/MICU/IMOES.
- Do the registration according to the instructions on the HDS screen.
- Confirm that all systems work properly.