EPS Control Unit Removal/Installation
- Do the 12 volt battery terminal disconnection procedure (see
USING THE GR8 BATTERY DIAGNOSTIC STATION
).
- Remove the driver's dashboard undercover (see
DRIVER'S DASHBOARD UNDERCOVER REMOVAL/INSTALLATION
).
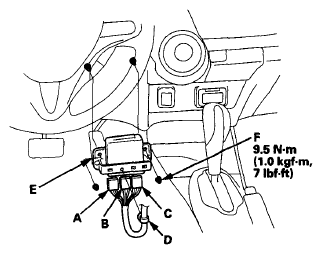
- Disconnect EPS control unit connector A (2P), connector B (2P), and connector C (16P).
 Courtesy of AMERICAN HONDA MOTOR CO., INC.
- Remove the harness clip (D) from EPS control unit bracket (E).
- Remove the nuts (F) from the EPS control unit bracket.
- Remove the EPS control unit.
- Install the EPS control unit in the reverse order of removal.
- Do the 12 volt battery terminal reconnection procedure (see
USING THE GR8 BATTERY DIAGNOSTIC STATION
).
- Do the memorizing of the torque sensor neutral position (see MEMORIZING THE TORQUE SENSOR NEUTRAL POSITION ).
- After installation, start the engine, allow it to idle, and turn the steering wheel to full left or full right. Check that the EPS indicator does not come on.