CVT Driven Pulley Pressure Sensor Replacement
- Raise the vehicle on a lift, or apply the parking brake, block the rear wheels, and raise the front of the vehicle. Make sure it is securely supported, and allow the front wheels to rotate freely.
- Remove the splash shield (see
SPLASH SHIELD REPLACEMENT
).
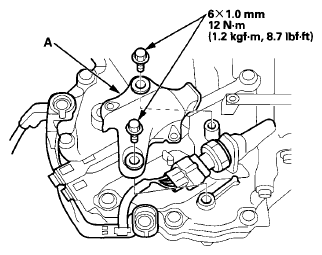
- Remove the CVT driven pulley pressure sensor cover (A).
 Courtesy of AMERICAN HONDA MOTOR CO., INC.
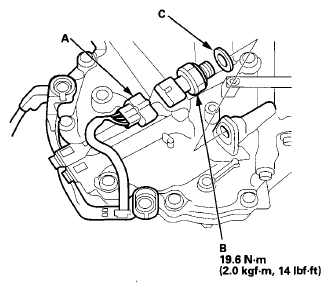
- Disconnect the CVT driven pulley pressure sensor 3P connector (A), then remove the CVT driven pulley pressure sensor (B) and sealing washer (C).
 Courtesy of AMERICAN HONDA MOTOR CO., INC.
- Install the new CVT driven pulley pressure sensor and a new sealing washer, and tighten the metal part of the sensor. Do not allow dust or other foreign particles to enter the transmission.
- Check the connectors for corrosion, dirt, or oil, and clean or repair if necessary.
- Connect the CVT driven pulley pressure sensor 3P connector.
- Install the CVT driven pulley pressure sensor cover.
- Install the splash shield (see
SPLASH SHIELD REPLACEMENT
).