Fuel Tank Replacement
- Drain the fuel tank (see FUEL TANK DRAINING
), then reinstall the fuel tank unit without connecting the fuel tank unit 4P connector and the fuel tank unit quick-connect fitting.
- Raise the vehicle on a lift.
- Remove the exhaust pipe (see
EXHAUST PIPE AND MUFFLER REPLACEMENT
).
- With VTM-4: Remove the propeller shaft (see
PROPELLER SHAFT RUNOUT
).
- Remove the EVAP canister cover (see step 2 under FTP SENSOR REPLACEMENT
).
- Remove the fuel tank protector (A).
 Courtesy of AMERICAN HONDA MOTOR CO., INC.
- Disconnect the quick-connector fittings (B) and the hoses (C). Slide back the clamps, then twist the hoses as you pull to avoid damaging them.
- Place a jack or other support under the fuel tank (D), then remove the strap bolts (E) and the straps (F).
- Remove the fuel tank.
- Install the parts in the reverse order of removal.
 Courtesy of AMERICAN HONDA MOTOR CO., INC.
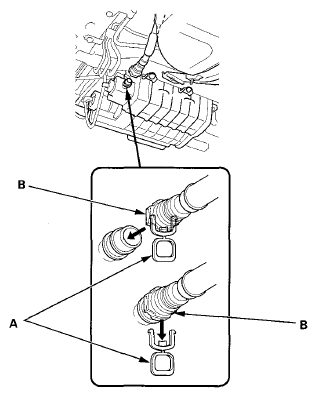
NOTE:
- New fuel tanks have ring pull (A) at the fuel vapor hose connector (B). When you connect the hose and confirm that the connection is secure, remove the ring pull by pulling it down.
- Before connecting the fuel fill pipe and the quick-connect fittings, check for dirt, and clean it if needed, taking care not to damage the fuel fill pipe and other parts.