Non-Tilt Wheel Column: Reassembly
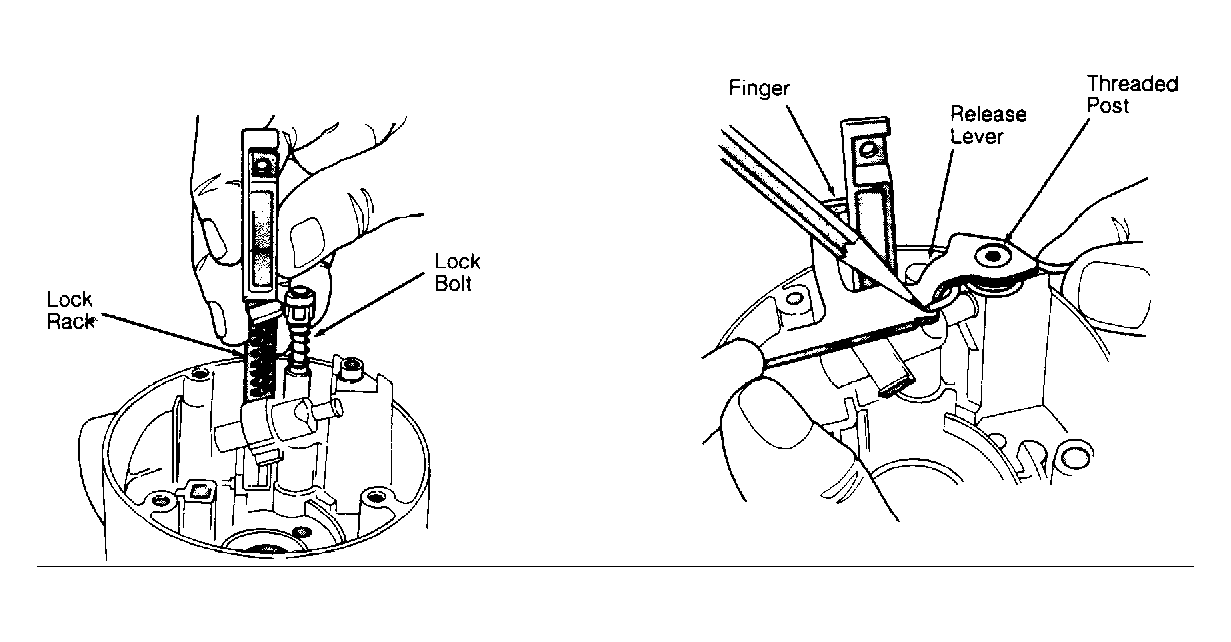
- Coat all friction surfaces with grease. Insert key sector through key/lock cylinder hole. Install lock sector shaft. Ensure sector turns freely. Install lock rack preload spring. Assemble lock bolt and rod and install assembly in housing. Mate assembly with lock sector gear teeth. Install shift lever detent plate on housing. See Fig 1.
- Install thrust cap and ignition switch actuating rod on housing. Insert gear selector lever housing lower bearing and align indentations in shell with projections on housing. Install gear selector spring in housing.
- Install gear selector lever housing and shroud on column. Rotate housing to ensure that bearing is seated. With gear selector housing in Park position and lock rack pulled downward, position and seat key/lock cylinder housing on column. Tighten 4 screws to 40 INCH lbs. (4.5 N.m).
- Insert shift tube in lower end of column and rotate until shift tube upper key slides into gear selector housing keyway. On models equipped with floor shift, proceed to step 10). On column shift models, proceed to next step.
- Install key/lock cylinder housing and shroud on steering column, place key in ignition cylinder and rotate until key is aligned with keyway in housing. Insert cylinder into housing far enough to contact switch actuator. Press inward and rotate cylinder. When aligned, cylinder will move inward and spring-loaded retainer will snap into place. Cylinder is now locked in column.
- Turn key/lock cylinder to ON position and install key/lock buzzer switch. Move ignition switch to ACC position then back 2 clicks to OFF position. The remote rod hole in ignition switch should be centered. Insert remote rod in ignition switch slider hole. Tighten ignition switch mounting screws to 35 INCH lbs. (4 N.m).
- Install lower bearing, adapter, retainer and spring clip at lower end of column. Install steering shaft into lower end of column and route through into upper bearing. Position turn signal switch and wire harness in key/lock housing. Fold wires against connector and feed down through column. Install wiper wiring harness and route through column. Align and secure turn signal switch. Tighten screws to 35 INCH lbs. (4 N.m).
- Install dimmer switch actuator arm and tighten screw to 35 INCH lbs. (4 N.m). Route cruise control wiring harness in column (if equipped). Install turn signal/wiper/dimmer/cruise control switch stalk on column by pressing straight in. Position thrust washer, upper bearing preload spring and cancel cam on steering column.
- Install hazard warning switch knob. Place lock plate on shaft, depress lock plate with depressor and install new snap ring. Install steering wheel. See STEERING WHEEL & HORN PAD . Tighten steering wheel nut to specification. See TORQUE SPECIFICATIONS table.
- On models equipped with floor shift, install key release lever return spring over threaded pivot post on housing. Insert key release finger in lock rack slot and position hole in lever over threaded pivot post. See Fig 1. Ensure inner end of spring contacts release lever.
 Courtesy of CHRYSLER MOTORS
- Raise key release lever slightly. Install lever spring between lever and boss on housing. Lubricate and place wave washer on threaded pivot post. Position shroud on key/lock housing. Tighten screws to 18 INCH lbs. (2 N.m).
- Insert short, hooked end of remote rod in lock rack. Install assembled key/lock housing on steering column and tighten screws to 60 INCH lbs. (7 N.m). Install key/lock cylinder housing and shroud on steering column, place key in ignition cylinder and rotate until key is aligned with keyway in housing.
- Insert cylinder into housing far enough to contact switch actuator. Press inward and rotate cylinder. When parts align, cylinder will move inward and spring-loaded retainer will snap into place. Cylinder is now locked in column.
- Turn key/lock cylinder to ON position and install key/lock buzzer switch. Move ignition switch slider to ACC position, then back 2 clicks to OFF position. The remote rod hole in ignition switch should be centered. Insert remote rod in ignition switch slider hole and tighten ignition switch to column screws to 35 INCH lbs. (4 N.m).
- Install lower bearing, adapter, retainer and spring clip at lower end of column. Install steering shaft into lower end of column and insert into upper bearing. Position turn signal switch and wire harness in key/lock housing. Fold wires against connector and feed down through column jacket. Install wiper wiring harness and route through column. Align and secure turn signal switch. Tighten screws to 35 INCH lbs. (4 N.m).
- Install dimmer switch actuator arm and tighten screw to 35 INCH lbs. (4 N.m). Route cruise control wiring harness in column (if equipped). Install turn signal/wiper/dimmer/cruise control switch stalk on column by pressing straight in. Position thrust washer, upper bearing preload spring and canceling cam on steering column.
- Install hazard warning switch knob. Place lock plate on shaft, compress plate and install new snap ring. Ensure that new snap ring is completely seated in groove before removing depressor. Install steering wheel. Tighten steering wheel nut to specification.