Test B: No Communication With Lighting Control Module
- Turn ignition switch to LOCK position. Connect New Generation Star (NGS) tester to Data Link Connector (DLC). Monitor Lighting Control Module (LCM) PID IGN_LC. If NGS tester does not display UNABLE TO PERFORM TEST/FUNCTION or MODULE NOT RESPONDING: LCM or CHECK IGNITION STATUS/VERIFY CABLE REQUIREMENTS or CHECK CABLE CONNECTIONS, go to next step. If NGS tester displays UNABLE TO PERFORM TEST/FUNCTION or MODULE NOT RESPONDING: LCM or CHECK IGNITION STATUS/VERIFY CABLE REQUIREMENTS or CHECK CABLE CONNECTIONS, go to step 16
.
- Turn ignition switch to RUN position. Monitor LCM PID IGN_LC while turning key to each position. If PID IGN_LC indicates ACCY while in ACCESSORY position and OFF in all other positions, replace LCM. If PID IGN_LC indicates ACCY while in RUN position, go to next step. If PID IGN_LC indicates OFF in all positions, go to step 7
.
- Turn ignition switch to RUN position. Measure voltage at output side of fuse No. 5 (10-amp) in instrument panel fuse box. If battery voltage does not exist, go to next step. If battery voltage exists, repair open in Red/Yellow wire between instrument panel fuse box and LCM.
- Check fuse No. 5 in instrument panel fuse box. If fuse is blown, go to next step. If fuse is okay, repair open in Brown/Pink wire between instrument panel fuse box and ignition switch.
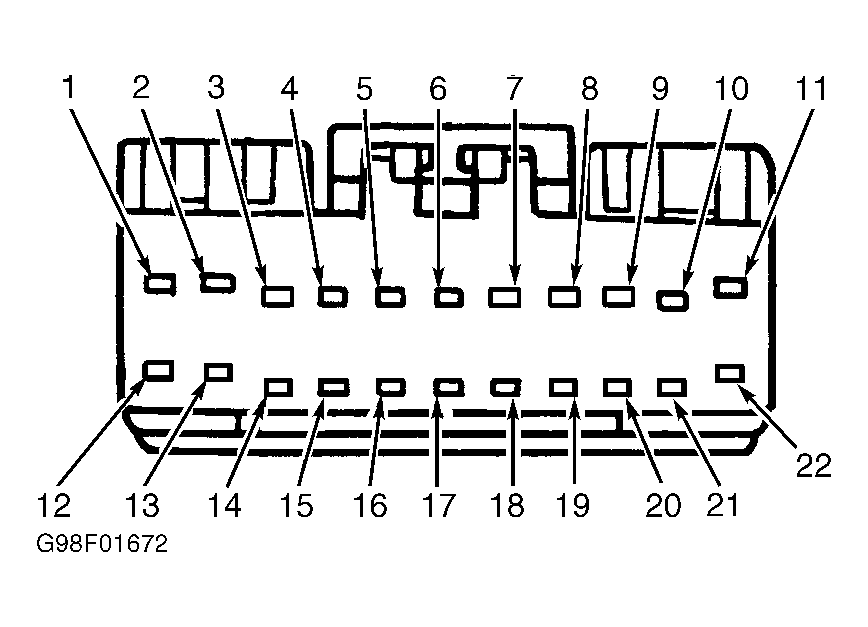
- Turn ignition switch to LOCK position. Disconnect LCM harness connector C206. Disconnect light sensor amplifier harness connector C243. Measure resistance between ground and terminal No. 17 (Red/Yellow wire) at LCM harness connector C206. See Fig 1
. If resistance is 20 ohms or less, repair short to ground in Red/Yellow wire. If resistance is greater than 20 ohms, go to next step.
- Turn ignition switch to LOCK position. Connect LCM harness connector C206. Remove fuse No. 5 (10-amp) in instrument panel fuse box. Measure resistance between ground and output side of fuse No. 5 in instrument panel fuse box. If resistance is 20 ohms or less, repair autolamp concern. See AUTOLAMP SYSTEMS - CONTINENTAL article. If resistance is greater than 20 ohms, replace LCM.
- Turn ignition switch to RUN position. Measure voltage at output side of fuse No. 4 (10-amp) in instrument panel fuse box. If battery voltage exists, go to next step. If battery voltage does not exist, go to step 9
.
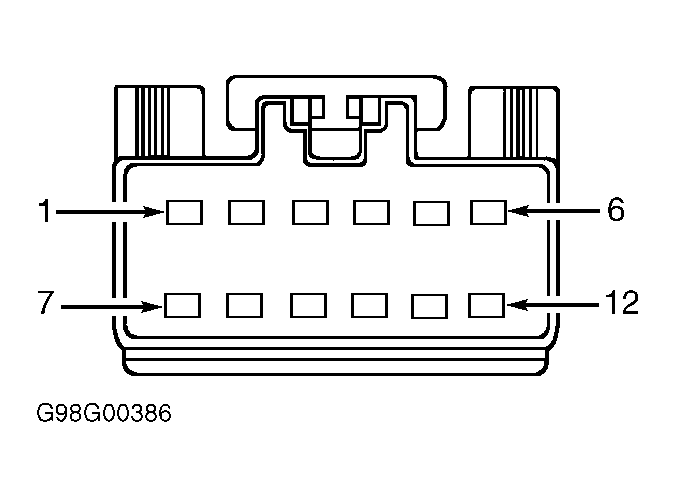
- Turn ignition switch to LOCK position. Disconnect LCM harness connector C208. Turn ignition switch to RUN position. Measure voltage at terminal No. 2 (Black/Pink wire) at LCM harness connector C208. See Fig 2
. If battery voltage exists, replace LCM. If battery voltage does not exist, repair open in Black/Pink wire.
- Turn ignition switch to LOCK position. Check fuse No. 4 (10-amp) in instrument panel fuse box. If fuse is blown, go to next step. If fuse is okay, repair open in Black/Light Green wire between instrument panel fuse box and ignition switch.
- Disconnect driver's door lock switch harness connector C505. Measure resistance between ground and terminal No. 2 (Black/Pink wire) at LCM harness connector C208. If resistance is 10 k/ohms or less, go to next step. If resistance is greater than 10 k/ohms, replace driver's door lock switch.
- Disconnect passenger's door lock switch harness connector C602. Measure resistance between ground and terminal No. 2 (Black/Pink wire) at LCM harness connector C208. If resistance is 10 k/ohms or less, go to next step. If resistance is greater than 10 k/ohms, replace passenger's door lock switch.
- Disconnect passenger's power window switch harness connector C600. Measure resistance between ground and terminal No. 2 (Black/Pink wire) at LCM harness connector C208. If resistance is 10 k/ohms or less, go to next step. If resistance is greater than 10 k/ohms, replace passenger's power window switch.
- Disconnect left rear power window switch harness connector C709. Measure resistance between ground and terminal No. 2 (Black/Pink wire) at LCM harness connector C208. If resistance is 10 k/ohms or less, go to next step. If resistance is greater than 10 k/ohms, replace left rear power window switch.
- Disconnect right rear power window switch harness connector C809. Measure resistance between ground and terminal No. 2 (Black/Pink wire) at LCM harness connector C208. If resistance is 10 k/ohms or less, go to next step. If resistance is greater than 10 k/ohms, replace right rear power window switch.
- Ensure ignition switch is in LOCK position. Connect LCM harness connector C208. Using and ohmmeter, measure resistance by backprobing between ground and terminal No. 2 (Black/Pink wire) at LCM harness connector C208. If resistance is greater than 2 k/ohms, replace LCM. If resistance is 2 k/ohms or less, repair Black/Pink wire.
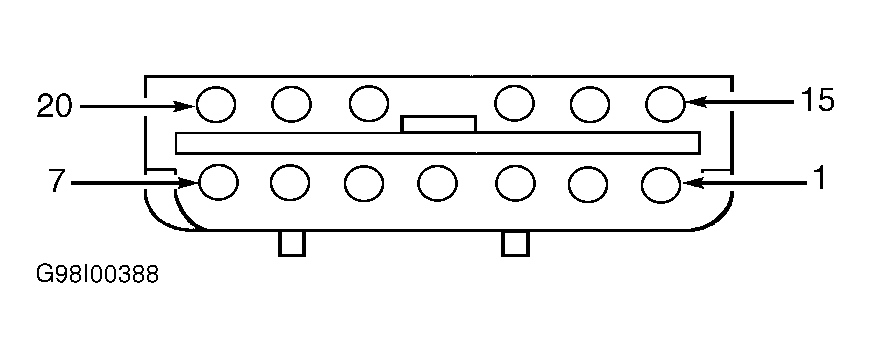
- Turn ignition switch to LOCK position. Disconnect LCM harness connectors. Measure resistance between ground and terminal No. 13 (Black wire) at LCM harness connector C206. See Fig 1
. Measure resistance between ground and terminal No. 1 (Black wire) at LCM harness connector C207. See Fig 3
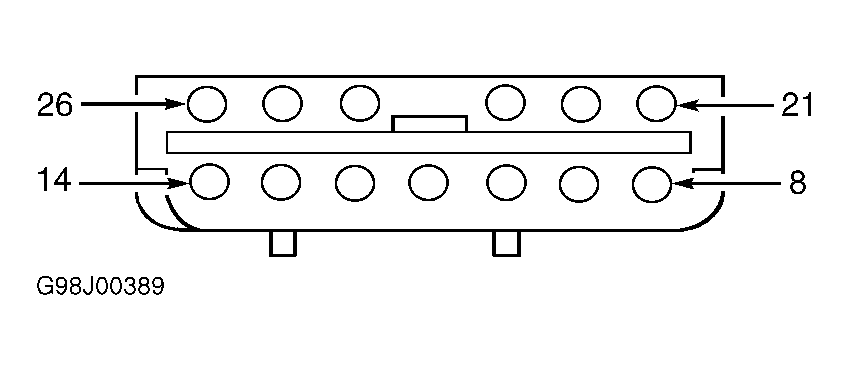
. Measure resistance between ground and terminal No. 9 (Black wire) at LCM harness connector C211. See Fig 4
. If all resistance readings are 5 ohms or less, go to next step. If any resistance reading is greater than 5 ohms, repair open in appropriate Black wire.
- Measure resistance between ground and terminal No. 15 (Black/Light Blue wire) at LCM harness connector C207. If resistance is 5 ohms or less, repair module communication concern. See MODULE COMMUNICATIONS NETWORK - CONTINENTAL article. If resistance is greater than 5 ohms, repair open in Black/Light Blue wire.
 Courtesy of FORD MOTOR CO.
 Courtesy of FORD MOTOR CO.
 Courtesy of FORD MOTOR CO.
 Courtesy of FORD MOTOR CO.