Front Door Glass Removal/Installation: Notes
- Perform the front door glass preparation. (See FRONT DOOR GLASS PREPARATION .)
NOTE:
- Before removing the front door glass, the removal procedure for the front door glass installation bolt can be facilitated by adjusting the top of the front door glass to the position approx.107 mm {4.21 in} away from the upper part of the front beltline molding.
- Disconnect the negative battery terminal. (See NEGATIVE BATTERY TERMINAL DISCONNECTION/CONNECTION
.)
- Remove the front door trim. (See FRONT DOOR TRIM REMOVAL/INSTALLATION
.)
- Remove the front door speaker. (See FRONT DOOR SPEAKER REMOVAL/INSTALLATION
.)
- Remove the front door inner weather strip.
 Courtesy of MAZDA MOTORS CORP.
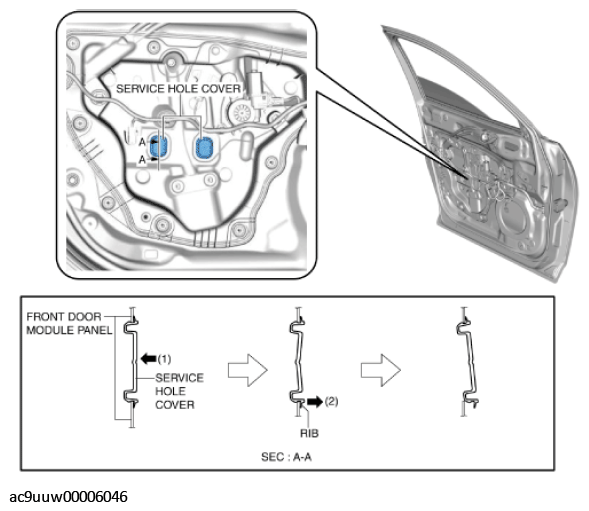
- Press the center of the service hole covers in the direction of arrow (1) shown in the figure.
 Courtesy of MAZDA MOTORS CORP.
- Remove the service hole cover by holding its rib and partially peeling it back in the direction of arrow (2) shown in the figure.
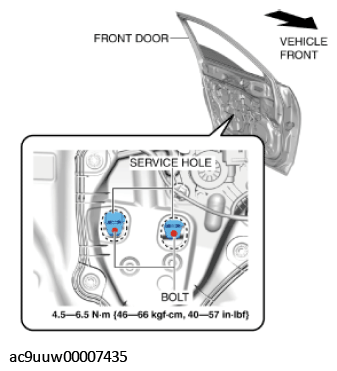
- Verify that the front door glass installation bolts are in a position in which they can be removed from the service hole.
- Remove the bolts.
CAUTION:
- If the bolts are removed without supporting the front door glass, the front door glass may fall off and be damaged. Remove the bolts while inserting your hand into the front door speaker installation hole to support the front door glass.
 Courtesy of MAZDA MOTORS CORP.
- While supporting the front door glass using one hand, grasp the upper side of the front door glass using the other hand.
 Courtesy of MAZDA MOTORS CORP.
- Lift up the front door glass, tilt it in the direction of arrow (1) shown in the figure, then remove it in the direction of arrow (2).
 Courtesy of MAZDA MOTORS CORP.
- Install in the reverse order of removal.