Retrieving Codes
NOTE:
Ensure battery voltage is proper before retrieving codes.
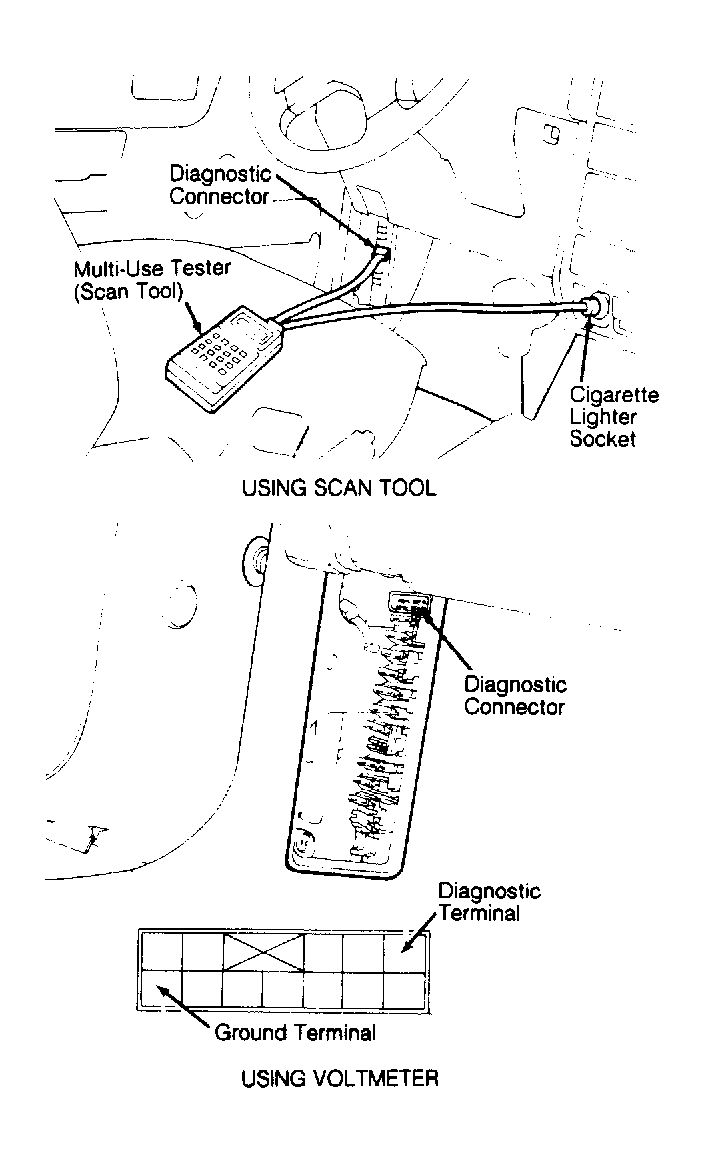
- Turn ignition switch to OFF position. Connect either a voltmeter between MPI diagnostic terminal and ground terminal of diagnostic connector, or Multi-Use Tester (Scan Tool) (09391-33200
) to diagnostic connector and cigarette lighter. See Fig 1
. Turn ignition switch to ON position and disclosure of ECU memory (fault codes) will begin.
- If using voltmeter to retrieve fault codes, it is important that voltage signals are accurately timed. Signals will appear in long and short pulses. Long pulses represent the first digit of the fault code. Short pulses represent the second digit. For example, one long pulse followed by 5 short pulses represents Code 15 (or Item No. 15 in CODE CHARTS
).
- If using scan tool and malfunction indicator light comes on while various checks are being made, check self-diagnostic output.
- After all checks have been made and/or trouble codes have been recorded, make necessary repairs. After repairs have been made, retest component(s) to ensure problem has been corrected.
 Courtesy of HYUNDAI MOTOR CO.
 Courtesy of HYUNDAI MOTOR CO.
 DIAGNOSTIC CODES - EXCEL, SCOUPE & PRECIS
| Code Number |
Fault Item |
Probable Cause |
See: |
|
ECU |
Faulty ECU |
ECU LOCATION |
| 11 |
O2 Sensor |
Fuel Press., Injectors, Vac. Leak, O2 Sens. |
Figure |
| 12 |
Airflow Sensor |
Airflow Sensor |
Figure |
| 13 |
Intake Air Temp. Sensor |
Intake Air Temp. Sensor |
Figure |
| 14 |
Throttle Position Sensor |
Throttle Position Sensor, Idle Switch |
Figure |
| 15 |
Motor Position Sensor |
Motor Position Sensor |
Figure
and Figure |
| 21 |
Coolant Temperature Sensor |
Coolant Temperature Sensor |
Figure |
| 22 |
Crank Angle Sensor |
Crank Angle Sensor |
Figure
and Figure |
| 23 |
TDC Sensor (No. 1 Cylinder) |
Distributor |
|
| 24 |
Vehicle Speed Sensor Reed Switch |
VSS Reed Switch |
|
| 25 |
Barometric Pressure Sensor |
Barometric Pressure Sensor |
Figure |
| 41 |
Fuel Injector |
Injector Coil Resistance |
Figure
and Figure |
| 42 |
Fuel Pump |
Control Relay |
Figure |
| 43 |
EGR Temp. Sensor (Calif. Only) |
EGR Temp. Sensor, Vlv., Ctrl. Sol., Ctrl. Vac. |
Figure |
| 44 |
Ignition Coil & Power Transistor |
Ignition Timing |
Figure |
DIAGNOSTIC CODES - SONATA 2.4L
| Code Number |
Fault Item |
Probable Cause |
See: |
|
ECU |
Faulty ECU |
ECU LOCATION |
| 11 |
O2 Sensor |
Fuel Press., Injectors, Vac. Leak, O2 Sens. |
Figure |
| 12 |
Airflow Sensor |
Airflow Sensor |
Figure |
| 13 |
Intake Air Temp. Sensor |
Intake Air Temp. Sensor |
Figure |
| 14 |
Throttle Position Sensor |
Throttle Position Sensor, Idle Switch |
Figure |
| 15 |
Motor Position Sensor |
Motor Position Sensor |
Figure
and Figure |
| 21 |
Coolant Temperature Sensor |
Coolant Temperature Sensor |
Figure |
| 22 |
Crank Angle Sensor |
Crank Angle Sensor |
Figure
and Figure |
| 23 |
TDC Sensor (No. 1 Cylinder) |
Distributor |
|
| 24 |
Vehicle Speed Sensor Reed Switch |
VSS Reed Switch |
|
| 25 |
Barometric Pressure Sensor |
Barometric Pressure Sensor |
Figure |
| 41 |
Fuel Injector |
Injector Coil Resistance |
Figure
and Figure |
| 42 |
Fuel Pump |
Control Relay |
Figure |
| 43 |
EGR Temp. Sensor (Calif. Only) |
EGR Temp. Sensor, Vlv., Ctrl. Sol., Ctrl. Vac. |
Figure |
| 44 |
Ignition Coil & Power Transistor |
Ignition Timing |
Figure |
DIAGNOSTIC CODES - SONATA 3.0L
| Code Number |
Fault Item |
Probable Cause |
See: |
|
ECU |
Faulty ECU |
ECU LOCATION |
| 11 |
O2 Sensor |
Fuel Press., Injectors, Vac. Leak, O2 Sens. |
Figure |
| 12 |
Airflow Sensor |
Airflow Sensor |
Figure |
| 13 |
Intake Air Temp. Sensor |
Intake Air Temp. Sensor |
Figure |
| 14 |
Throttle Position Sensor |
Throttle Position Sensor, Idle Switch |
Figure |
| 21 |
Coolant Temperature Sensor |
Coolant Temperature Sensor |
Figure |
| 22 |
Crank Angle Sensor |
Crank Angle Sensor |
Figure
and Figure |
| 23 |
TDC Sensor (No. 1 Cylinder) |
Distributor |
|
| 24 |
Vehicle Speed Sensor Reed Switch |
VSS Reed Switch |
|
| 25 |
Barometric Pressure Sensor |
Barometric Pressure Sensor |
Figure |
| 41 |
Fuel Injector |
Injector Coil Resistance |
Figure
and Figure |
| 42 |
Fuel Pump |
Control Relay |
Figure |
| 43 |
EGR Temp. Sensor (Calif. Only) |
EGR Temp. Sensor, Vlv., Ctrl. Sol., Ctrl. Vac. |
Figure |
| 44 |
Ignition Coil & Power Transistor |
Ignition Timing |
Figure |