Disassembling And Assembling Belt TENSIONER
 Courtesy of PORSCHE OF NORTH AMERICA, INC.
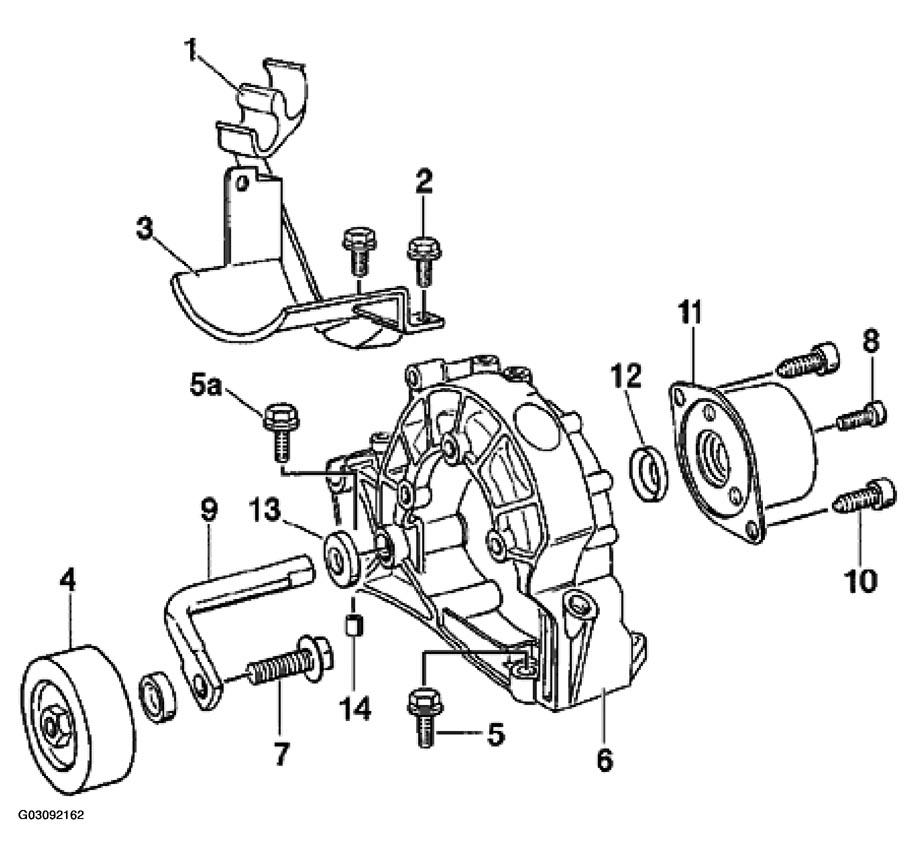
 DISASSEMBLY AND ASSEMBLY PROCEDURE OF BELT TENSIONER
| No. |
Designation |
Qty. |
Removal |
Installation |
| 1 |
Holder |
1 |
|
Clip in refrigerant lines |
| 2 |
Hexagon head bolt M6 x 16 |
2 |
|
|
| 3 |
Cover |
3 |
|
|
| 4 |
Tensioning roller |
1 |
Undo at hexagon (wrench size 24) and simultaneously hold at the hexagon head bolt |
Tightening torque 60 Nm (44 ft.lb) Hold at the hexagon head bolt when tightening (wrench size 15) |
| 5 |
Hexagon head bolt M8 x 25 |
2 |
|
|
| 5a |
Hexagon head bolt M8 x 35 |
2 |
|
|
| 6 |
Bracket for hydraulic pump and belt tensioner |
1 |
|
Grease plastic bushings of the lever bearing with Olista Longtime 3 EP |
| 7 |
Hexagon head bolt (micro-encapsulated) |
1 |
The hexagon head bolt can be removed only after the belt tensioner or bracket has been loosened! |
Apply a thin coating of locking lacquer on the tread of the hexagon bolt. See |
| 8 |
Pan-head screw |
1 |
|
Tightening torque 9.7 Nm (7.0 ft.lb) |
| 9 |
Lever |
1 |
Drive out of the tensioning element using a drift ($$ 5) |
Fit in correct position; grease in bearing area |
| 10 |
Pan-head screw |
2 |
|
Tightening torque 23 Nm (17 ft.lb) |
| 11 |
Tensioning element |
1 |
|
|
| 12 |
Dust cap |
1 |
|
|
| 13 |
Dust cap |
1 |
|
|
| 14 |
Dowel sleeve |
2 |
|
Fit in the two bores of the bracket (on right in direction of travel). |