Outback 3.0L
- Using Customer Complaint Check List, attempt to start engine. See Figure
. If starter operates when ignition switch is turned but engine does not start, go to next step. If starter does not operate when ignition switch is turned, go to step 3
.
- Check for Diagnostic Trouble Codes (DTCs) stored in memory. If DTCs are present, repair cause of problem and retest system. See DIAGNOSTIC TROUBLE CODE DEFINITIONS
in SELF-DIAGNOSTICS - 3.0L article. If DTCs are not present, check Engine Control Module (ECM) power feed and ground circuits. See ENGINE CONTROL MODULE POWER SUPPLY & GROUND CIRCUITS
.
- Turn ignition off. Disconnect starter single-pin electrical harness connector. Using a DVOM, measure voltage of White/Green wire (White/Blue wire on models with anti-theft system) between starter single-pin electrical harness connector and good engine ground point while holding ignition switch in ST position. Ensure gear selector is in Park or Neutral while activating starter. If voltage is greater than 10 volts, go to next step. If voltage is not greater than 10 volts, go to step 5
.
- Turn ignition off. Disconnect ground cable from starter. Using a DVOM, measure resistance of ground cable between ground cable terminal and engine ground point. If resistance is less than 5 ohms, check starter. See appropriate STARTERS article in ENGINE. If resistance is not less than 5 ohms, repair open in ground circuit. See STARTING/CHARGING in SYSTEM WIRING DIAGRAMS article in ELECTRICAL.
- Turn ignition off. Access ignition switch and disconnect ignition switch Blue 4-pin electrical harness connector. Using a DVOM, measure voltage on White wire between ignition switch Blue 4-pin electrical harness connector terminal No. 1 and good body ground point. If voltage is greater than 10 volts, go to next step. If voltage is not greater than 10 volts, check slow blow fuses No. 1 (100-amp) and No. 4 (50-amp) located in main fuse box at left side of engine compartment at shock tower. If fuses are blown, replace fuses and locate and repair open in power feed circuit between ignition switch and battery. See STARTING/CHARGING in SYSTEM WIRING DIAGRAMS article in ELECTRICAL.
- Reconnect ignition switch Blue 4-pin electrical harness connector. Using a DVOM, backprobe between ignition switch Blue 4-pin electrical harness connector terminal No. 3 (White/Black wire) and good chassis ground point with ignition in ST position. If voltage is greater than 10 volts, go to step 8
. If voltage is not greater than 10 volts, go to next step.
- Check ignition switch Blue 4-pin electrical harness connector for poor contact. If poor contact is present in connector, repair as necessary. If contact is okay, replace ignition switch. See appropriate STEERING COLUMN SWITCHES article in ACCESSORIES & EQUIPMENT.
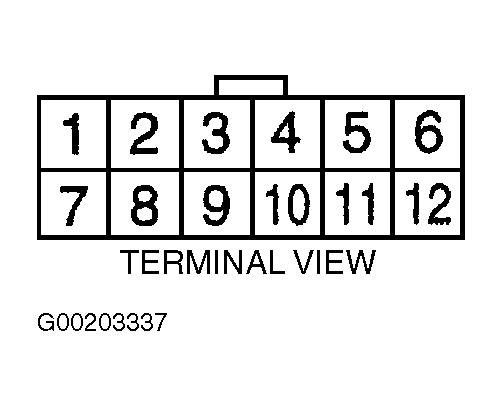
- Turn ignition off and separate Black 12-pin transaxle electrical harness connector on top of transaxle assembly. Place transaxle selector lever in Park or Neutral. Using a DVOM, measure resistance on transaxle side of 12-pin transaxle electrical harness connector between terminals No. 11 (Black/White wire) and No. 12 (Black/Yellow wire). See Figure
. If resistance is not less than one ohm, go to next step. If resistance is less than one ohm, repair open in appropriate wire between ignition switch and starter. See STARTING/CHARGING in SYSTEM WIRING DIAGRAMS article in ELECTRICAL.
- With ignition off and Black 12-pin transaxle electrical harness connector on top of transaxle assembly disconnected, disconnect 12-pin electrical harness connector from inhibitor switch. Using a DVOM, measure resistance of Black/White wire between transaxle side of 12-pin transaxle electrical harness connector terminal No. 11 and harness side of 12-pin inhibitor switch electrical harness connector terminal No. 7. See Figure
and Fig 1
. If resistance is less than one ohm, go to next step. If resistance is not less than one ohm, repair open in Black/White wire between transaxle harness connector and inhibitor switch connector. See STARTING/CHARGING in SYSTEM WIRING DIAGRAMS article in ELECTRICAL.
- Check 12-pin inhibitor switch electrical harness connector for poor contact. If poor contact is present in connector, repair as necessary. If contact is okay, replace inhibitor switch. See REMOVAL & INSTALLATION in appropriate STEERING COLUMN SWITCHES article in ACCESSORIES & EQUIPMENT.
 Courtesy of SUBARU OF AMERICA, INC.