Transmission Reassembly
- Inspect rotor bushing for motor generator No. 2 assembly. Using a dial indicator, measure bushing inside diameter. See Fig 1. Standard diameter should be .788-.789" (20.03-20.05 mm). Maximum diameter is .791" (20.10 mm). If inside diameter exceeds specification, replace motor generator No. 2 assembly.
- Place on wooden blocks under motor generator No. 1 assembly to stabilize unit. See Figure. Apply sealant to screw plug and install it into motor generator No. 1 assembly using a hexagon wrench. See Figure. Install NEW gasket and drain plug. Tighten plug to specification. See TORQUE SPECIFICATIONS .
 Courtesy of © TOYOTA, LICENSE AGREEMENT TMS1002
- Place wooden blocks under motor generator No. 2 assembly to stabilize unit. See Figure. Be careful not to bend parking lock rod. Apply thread sealant to 2 screw plugs and install them into motor generator No. 2 assembly using hexagon wrench. Install 2 NEW gaskets to filler plugs and install plugs. See Figure. Tighten plugs to specification. See TORQUE SPECIFICATIONS .
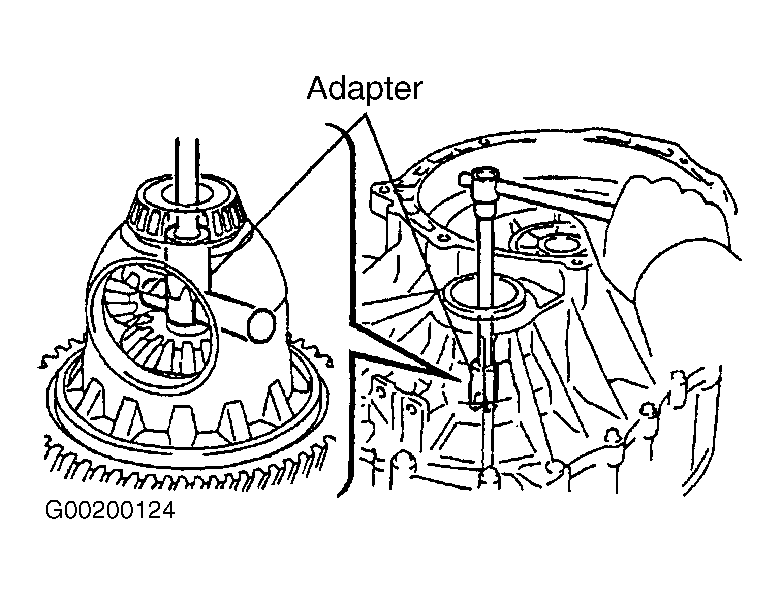
- Using appropriate adapter, driver and a hammer, install NEW differential oil seals to motor generator No. 1 and No. 2 assemblies. Install oil seals to a depth of .087-.126" (2.20-3.20 mm). Coat lip of seal with ATF. Install breather plug and tighten to specification.
- Place wooden blocks under motor generator No. 2 assembly to stabilize unit in a horizontal position. Do not apply excessive force to high voltage cable. Using appropriate adapter, driver and a hammer, install differential side bearing outer race and shim to motor generator No. 2 assembly. If replacing shim, ensure NEW shim is same thickness as original shim.
- Using appropriate adapter, driver and a hammer, install counter driven gear tapered roller bearing outer race and shim to motor generator No. 2 assembly. Using appropriate adapter, driver and a hammer, install differential side bearing outer race to motor generator No. 1 assembly. Using appropriate adapter, driver and a hammer, install counter driven gear tapered roller bearing outer race to motor generator No. 1 assembly.
- Install differential assembly into motor generator No. 2 assembly. See Figure. Apply ATF to side bearing. Install engine hanger with chain on motor generator No. 1 assembly side of transaxle. Lift transaxle up and install a wooden block underneath transaxle to stabilize it. See Figure.
- Install 13 bolts and motor generator No. 1 assembly to motor generator No. 2 assembly. See Fig 2. Using appropriate adapter, rotate differential case assembly in both directions to seat bearings. See Fig 3.
- Using appropriate adapter and INCH-lb. torque wrench, measure differential preload. See Fig 3. Preload (starting torque) for NEW bearings should be 8.67-13.90 INCH lbs. (.98-1.57 N.m). Preload (starting torque) for used bearings should be 4.34-6.90 INCH lbs. (.49-.78 N.m). Turning torque for all bearings should be 6.90-12.13 INCH lbs. (.78-1.37 N.m) at 60 RPM. If preload is not within specification, replace shim located behind left side differential outer race.
 Courtesy of © TOYOTA, LICENSE AGREEMENT TMS1002
 Courtesy of © TOYOTA, LICENSE AGREEMENT TMS1002
- Shims are available in thicknesses from .0709" (1.800 mm) to .0744" (1.890 mm), in increments of .0011" (.030 mm). Shims are marked with numbers from No. 1 to No. 4.
- Shims are also available in thicknesses from .0756" (1.920 mm) to .0913" (2.320 mm), in increments of .0011" (.030 mm). Shims are marked with numbers from No. 50 to No. 70.
- Shims are also available in thicknesses from .0921" (2.340 mm) to .0969" (2.460 mm), in increments of .0011"(.030 mm). Shims are marked with numbers from No. 19 to No. 23.
- As shim thickness is increased by .0007" (.020 mm), preload will increase about 2.04 INCH lbs. (.23 N.m).
- Remove 13 bolts and separate motor generator No. 1 assembly from motor generator No. 2 assembly. See Fig 2. Install counter driven gear into motor generator No. 2 assembly. See Figure. Apply ATF to side bearing.
- Install engine hanger with chain on motor generator No. 1 assembly side of transaxle. Lift transaxle up and install a wooden block underneath transaxle to stabilize it. See Figure. Mate motor generator No. 1 assembly with motor generator No. 2 assembly. Install 21 bolts. See Figure. Tighten bolts to specification. See TORQUE SPECIFICATIONS .
- Using appropriate adapter, rotate differential case assembly in both directions to seat bearings. See Fig 3.
- Using appropriate adapter and INCH-lb. torque wrench, measure counter driven gear preload. Preload (starting torque) for NEW bearings should be 33.72-53.99 INCH lbs. (3.81-6.10 N.m). Preload (starting torque) for used bearings should be 16.91-26.82 INCH lbs. (1.91-3.03 N.m). Turning torque for all bearings should be 29.12-58.95 INCH lbs. (3.29-6.66 N.m) at 60 RPM. If preload is not within specification, replace shim located behind left side counter driven gear outer race.
- Shims are available in thicknesses from .0492" (1.250 mm) to .0516" (1.310 mm), in increments of .0011" (.030 mm). Shims are marked with numbers from No. 1 to No. 3.
- Shims are also available in thicknesses from .0528" (1.340 mm) to .0685" (1.740 mm), in increments of .0007" (.020 mm). Shims are marked with numbers from No. 50 to No. 70.
- Shims are also available in thicknesses from .0693" (1.760 mm) to .0740" (1.880 mm), in increments of .0011" (.030 mm). Shims are marked with numbers from No. 18 to No. 22.
- As shim thickness is increased by .0007" (.020 mm), preload will increase about 9.74 INCH lbs. (1.10 N.m).
- Remove 13 bolts and separate motor generator No. 1 assembly from motor generator No. 2 assembly. See Fig 2. Install 2 bearing races and needle roller bearing to motor generator No. 1 assembly. See Figure.
- Install drive sprocket assembly to motor generator No. 1 assembly. Install input shaft assembly. Install 2 bearing races and needle roller bearing. Install planetary ring gear. Install ring gear flange. See Figure.
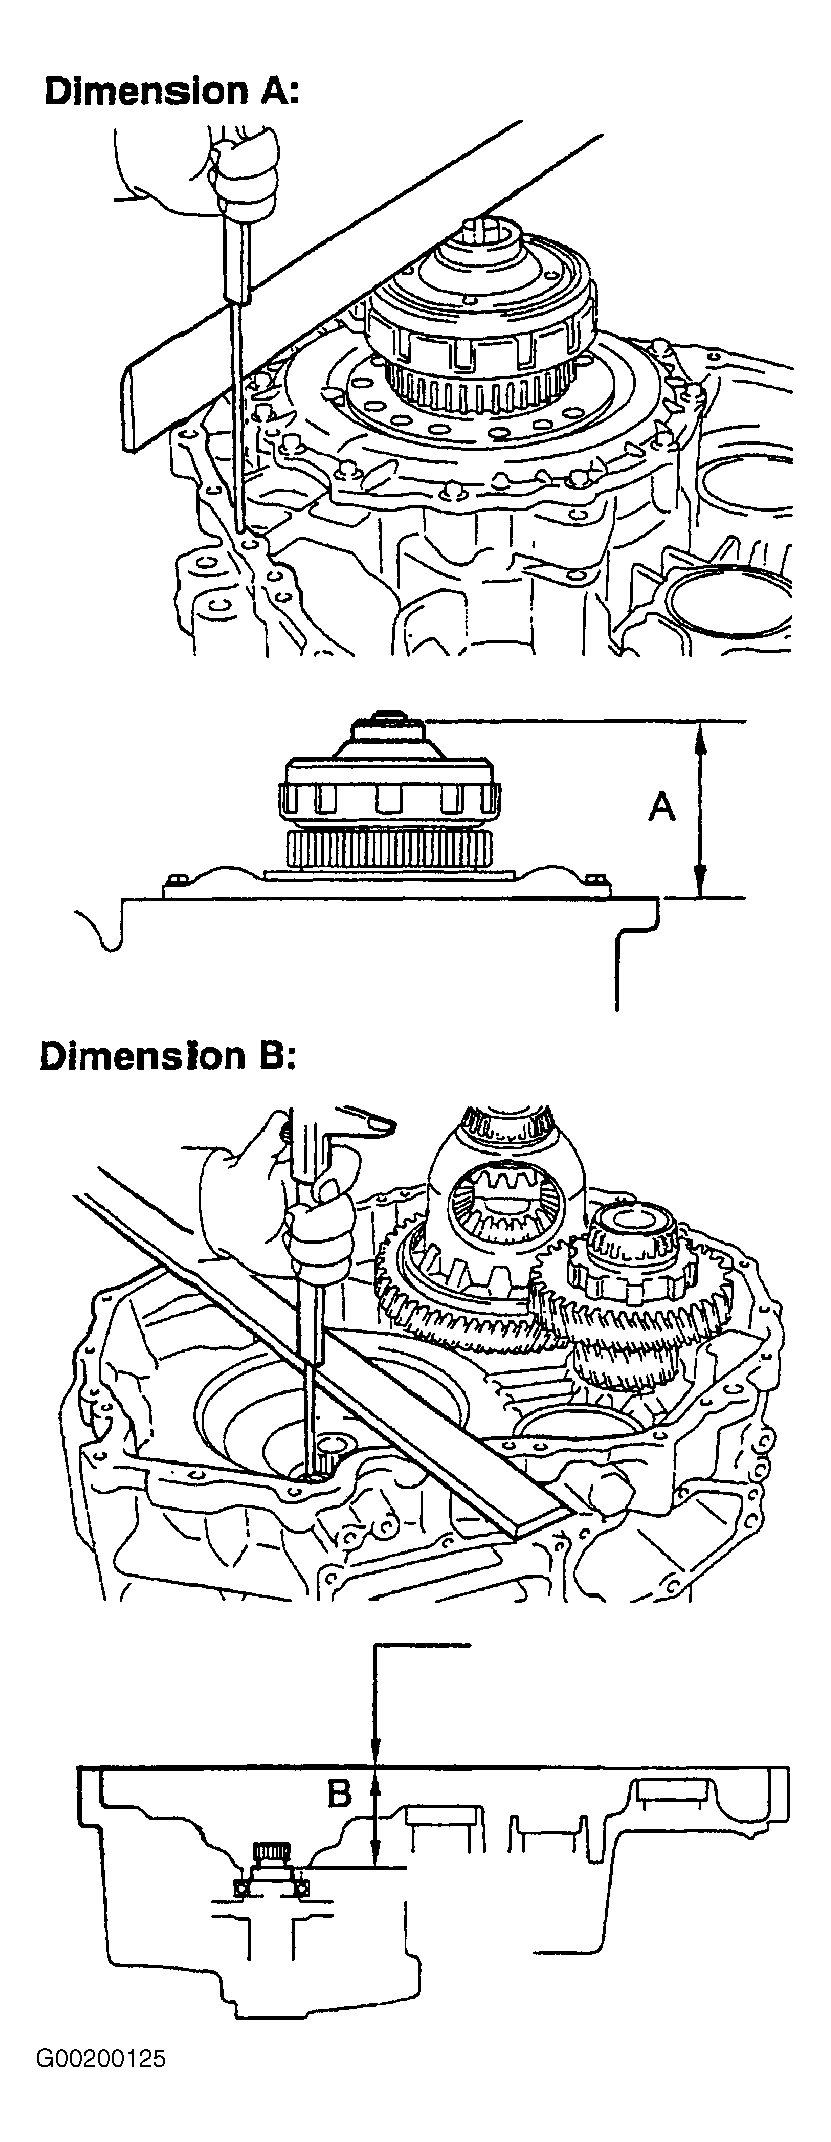
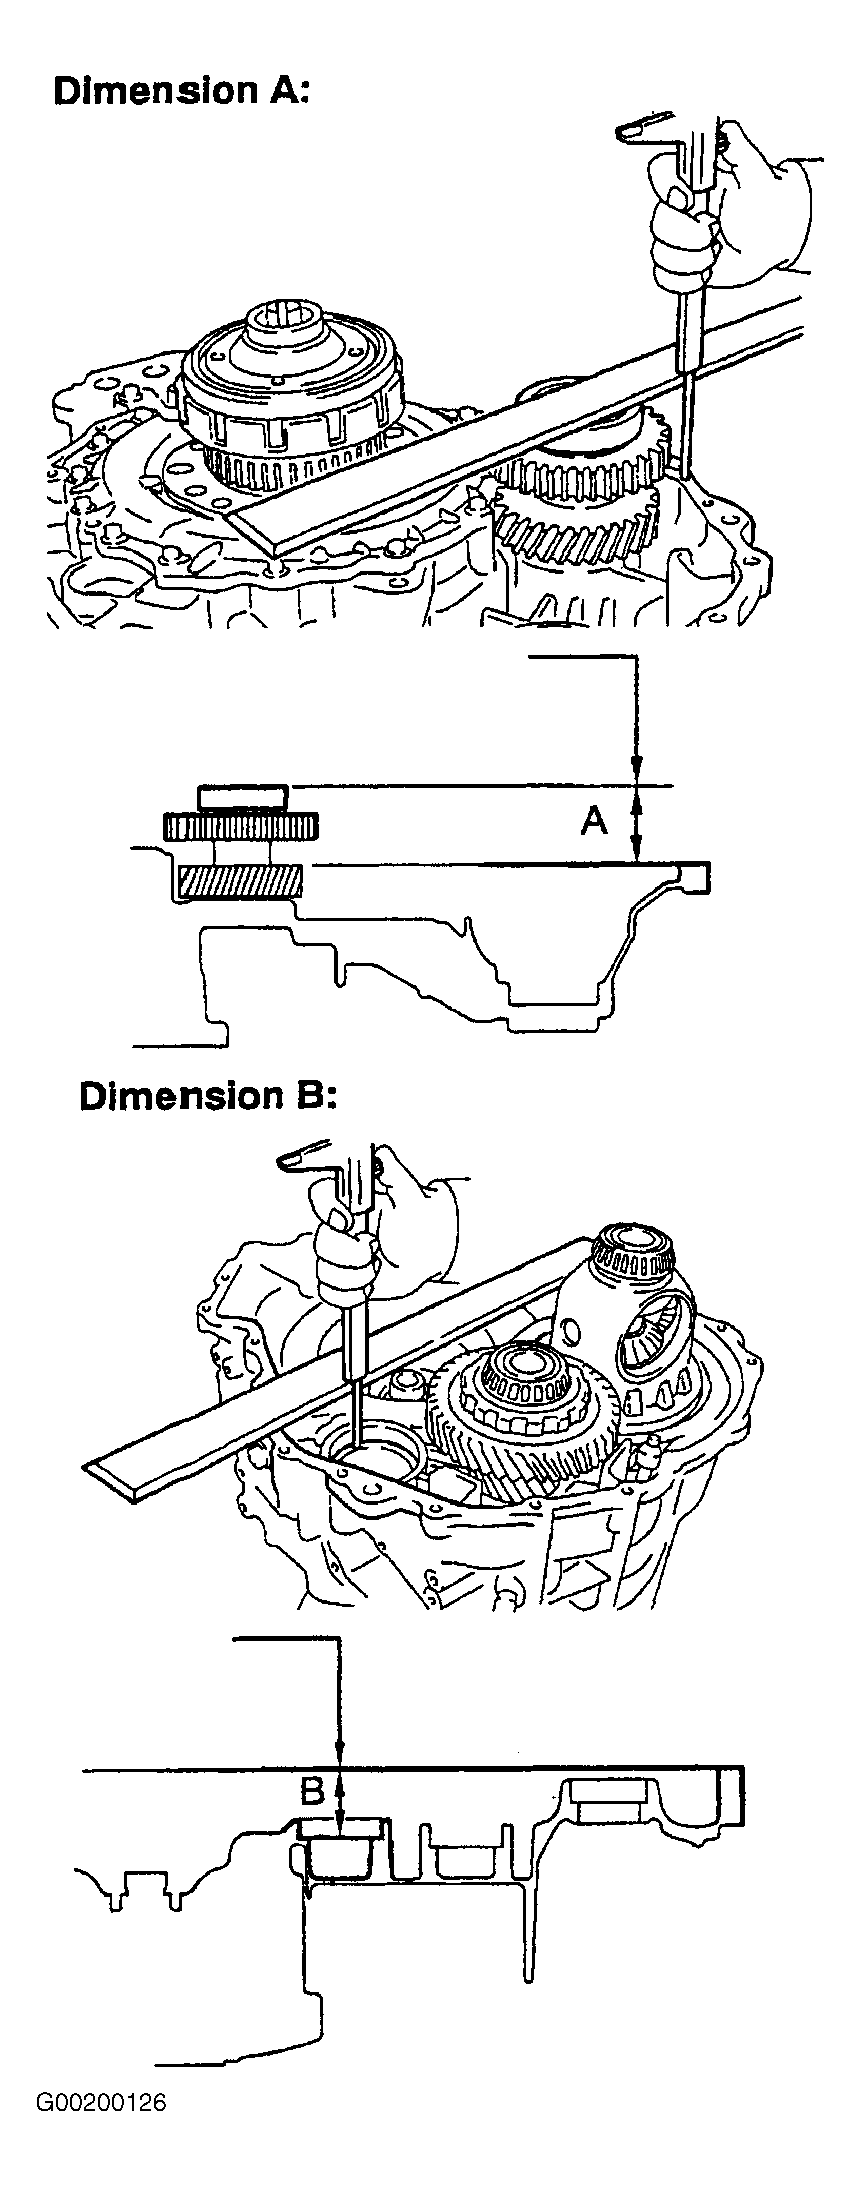
- Using a straightedge and vernier calipers, measure dimensions "A" and "B". See Fig 4. Select an input shaft shim that will ensure value is within specification. Shim thickness equals dimension "B" minus "A". Shims (12) are available in thicknesses from .039" (1.00 mm) to .126" (3.20 mm), in increments of .008" (.20 mm). Shims are marked with numbers from No. 1 to No. 12.
- Install counter drive gear assembly to motor generator No. 1 assembly. Using a straightedge and vernier calipers, measure dimensions "A" and "B". See Fig 5. Select a counter drive gear shim that will ensure value is within specification. Shim thickness equals dimension "B" minus "A". Shims (11) are available in thicknesses from .053" (1.35 mm) to .073" (1.85 mm), in increments of .002" (.05 mm). Shims are marked with letters from "A" to "L", (except the letter "I").
 Courtesy of © TOYOTA, LICENSE AGREEMENT TMS1002
 Courtesy of © TOYOTA, LICENSE AGREEMENT TMS1002
- Install shim selected in step 24. Install ring gear flange, 2 races and thrust bearing. Apply ATF to thrust bearing. Install planetary ring gear. Install input shaft assembly. See Figure. Install shim selected in step 25.
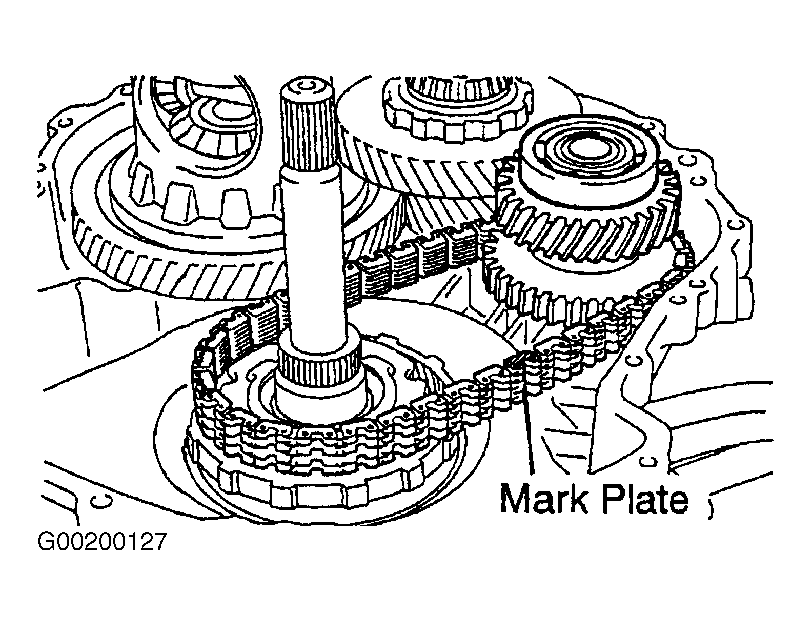
- Install counter drive gear assembly and chain at the same time. Install chain with mark plate facing up. See Fig 6. Install chain on drive sprocket and install both components. Apply ATF to drive sprocket needle roller bearing. Install 2 bearing races and needle roller bearing. Apply ATF to bearing.
- Install lock sleeve. Install cam guide sleeve to sleeve bracket. Install cam guide sleeve, sleeve bracket, torsion spring and 2 bolts. See Figure. Tighten bolts to specification. See TORQUE SPECIFICATIONS .
 Courtesy of © TOYOTA, LICENSE AGREEMENT TMS1002
- Install parking lock pawl. Using a screwdriver, fit torsion spring into cutout of parking lock pawl. Install parking lock pawl shaft, lock clamp and bolt. See Figure. Tighten bolt to specification.
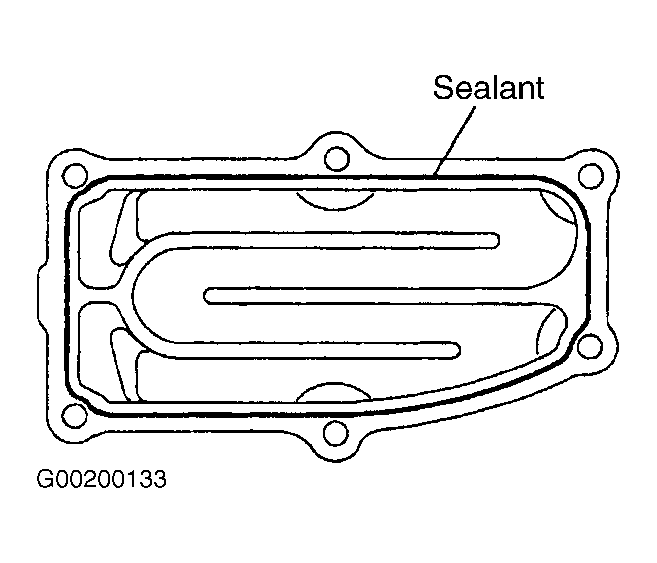
- Install NEW "O" ring to oil strainer. Install bolt and oil strainer. See Figure. Tighten bolt to specification. Install magnet to oil pan. Apply thread sealant to oil pan bolt threads. Install NEW gasket and oil pan with 12 bolts. Tighten bolts to specification.
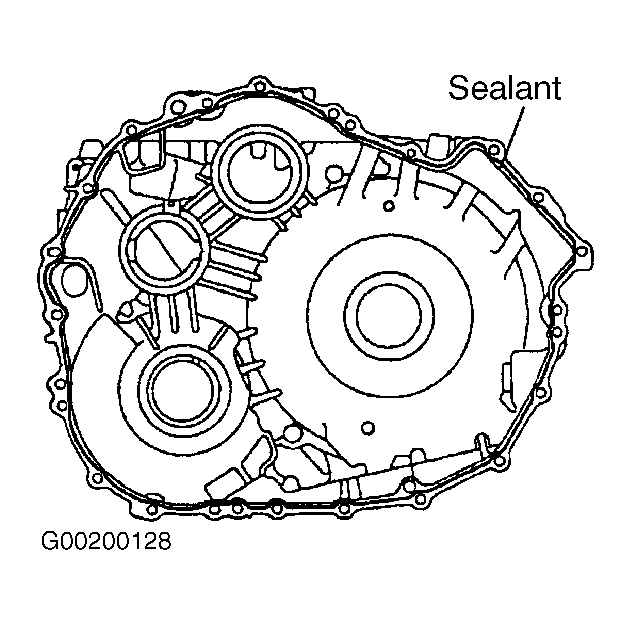
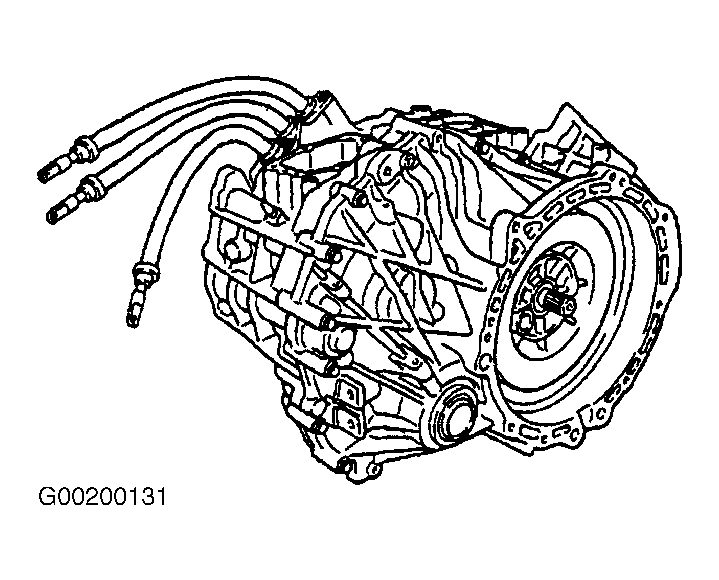
- Install NEW gasket and drain plug. Tighten plug to specification. Apply Three Bond (1281) sealant to outer sealing surface of motor generator No. 2 assembly. See Fig 7. Install motor generator No. 1 assembly to motor generator No. 2 assembly. Ensure parking rod is inserted into cam guide sleeve. See Fig 8.
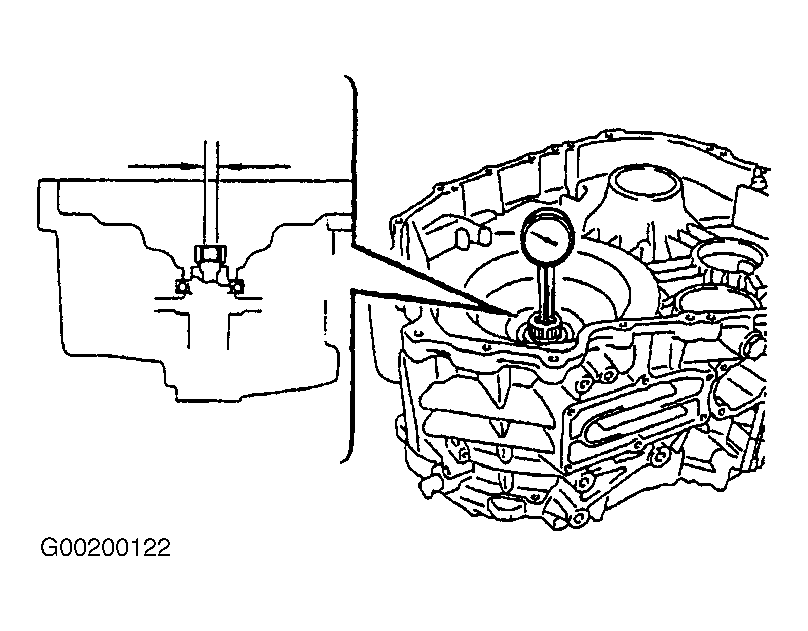
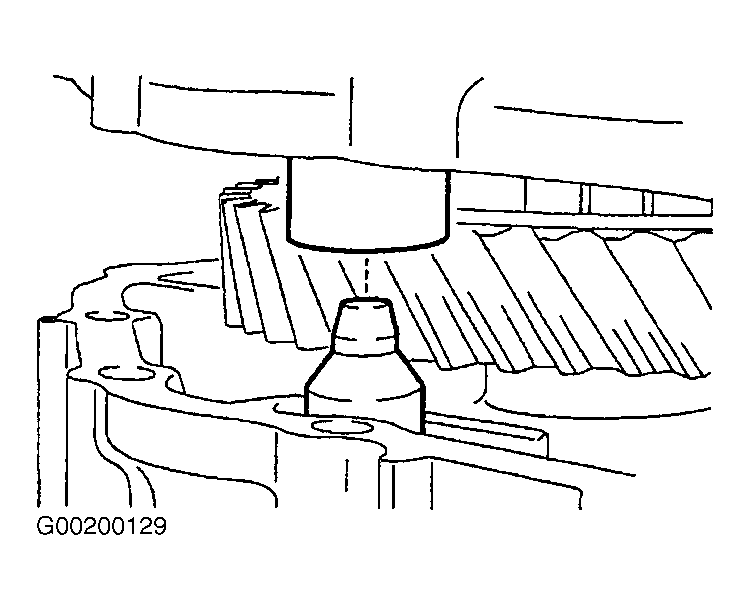
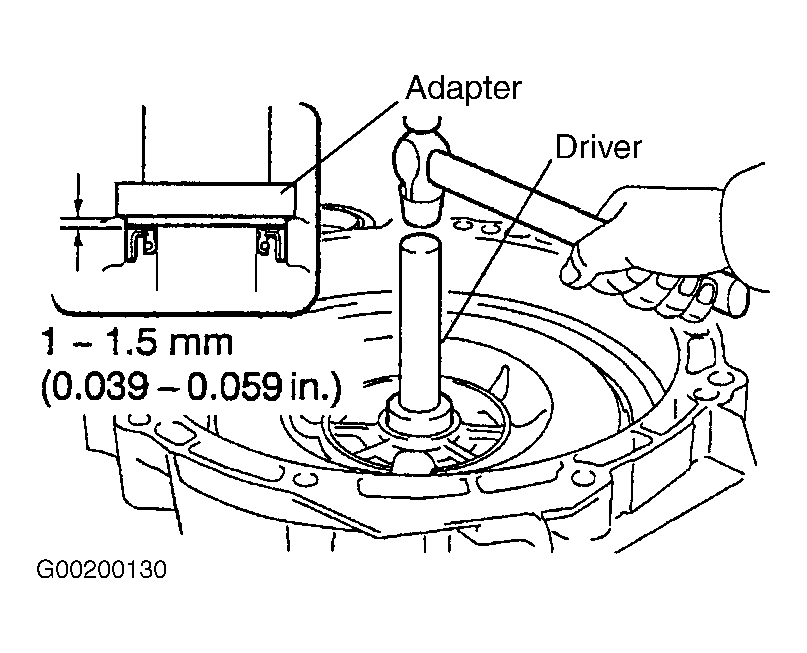
- Apply thread sealant to bolt threads. Install 21 bolts and tighten to specification. See Figure. See TORQUE SPECIFICATIONS . Using appropriate adapter, driver and a hammer, install NEW input shaft oil seal to a depth of .039-.059" (1.00-1.50 mm). See Fig 9. Drive oil seal in until adapter comes in contact with case. Coat lip of oil seal with ATF.
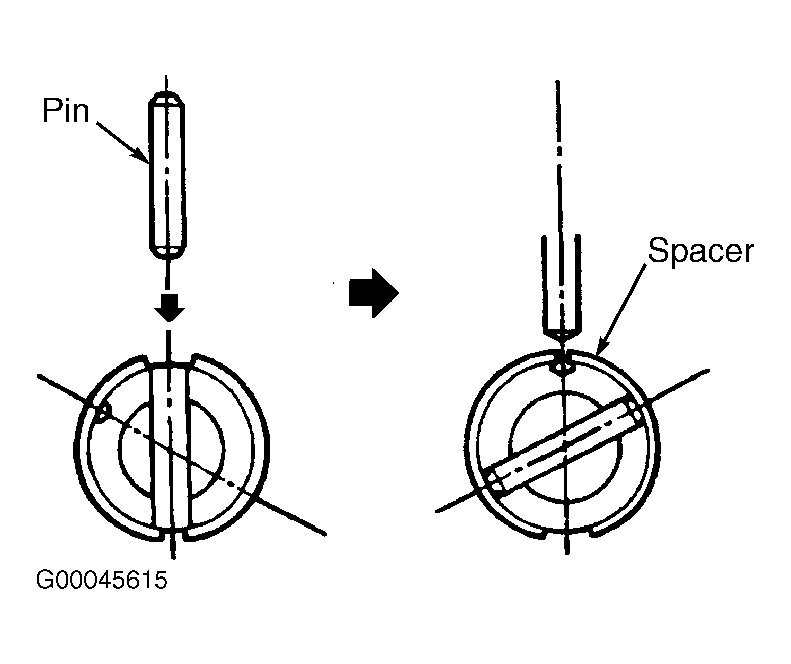
- Position transaxle in position as shown in Fig 10. Install parking lock lever No. 3 to parking lock shaft. Using a pin punch and a hammer, drive in pin. See Figure. Turn spacer and lever shaft to align small hole in spacer with staking position mark on lever shaft. See Fig 11. Using a pin punch, stake spacer through small hole. Ensure spacer does not turn.
 Courtesy of © TOYOTA, LICENSE AGREEMENT TMS1002
 Courtesy of © TOYOTA, LICENSE AGREEMENT TMS1002
 Courtesy of © TOYOTA, LICENSE AGREEMENT TMS1002
 Courtesy of © TOYOTA, LICENSE AGREEMENT TMS1002
 Courtesy of © TOYOTA, LICENSE AGREEMENT TMS1002
- Apply ATF to parking lock shaft. Apply lubricant to parking lock lever No. 3. Install washer to parking lock shaft. See Figure. Install parking lock shaft. Using appropriate adapter and a hammer, install NEW oil seal to parking shaft cover. Coat oil seal lip with lubricant.
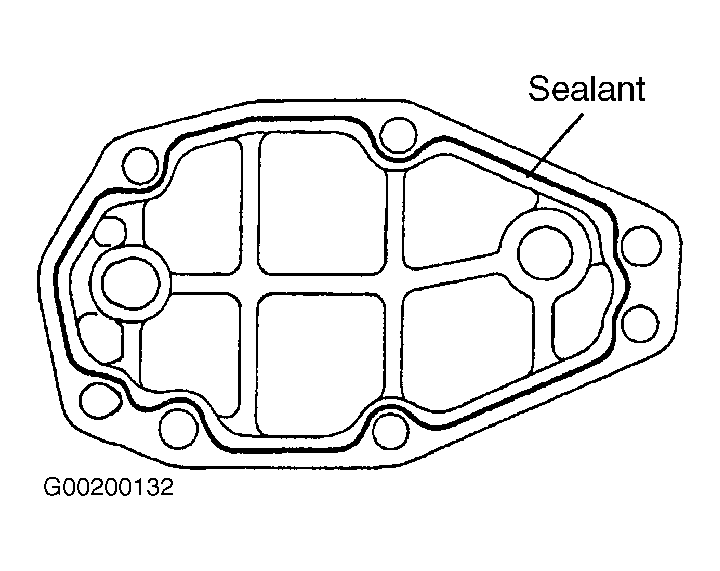
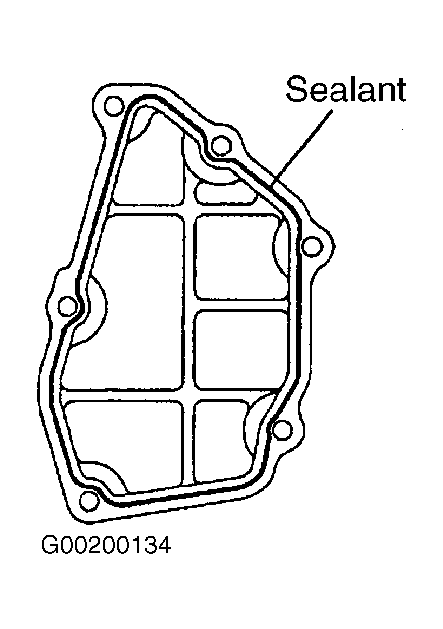
- Remove any old sealant material and be careful not to drop any oil on contact surfaces of parking shaft cover and motor generator No. 2 assembly. Ensure sealing surfaces are clean. Apply Three Bond 1281 sealant to parking lock cover. See Fig 12. Ensure cover is installed within 10 minutes of applying sealant to cover.
- Install 5 bolts and parking shaft cover. Tighten bolts to specification. See TORQUE SPECIFICATIONS . Ensure oil seal lip is not damaged during cover installation.
- Remove any old sealant material and be careful not to drop any oil on contact surfaces of motor water jacket cover and motor generator No. 2 assembly. Ensure sealing surfaces are clean. Apply sealant to motor water jacket cover. See Fig 13. Ensure cover is installed within 10 minutes of applying sealant to cover.
- Apply thread sealant to cover bolt threads. Install 6 bolts and tighten to specification. Apply thread sealant to housing tube threads. Install housing tube and tighten to specification. Install detent spring and detent spring cover with bolt. See Figure. Tighten bolt to specification. See TORQUE SPECIFICATIONS .
- Remove any old sealant material and be careful not to drop any oil on contact surfaces of parking cover and motor generator No. 2 assembly. Ensure sealing surfaces are clean. Apply sealant to parking cover. See Fig 14. Ensure cover is installed within 10 minutes of applying sealant to cover. Install parking cover with 6 bolts. Tighten bolts to specification.
- Apply ATF to individual sliding parts of oil pump. Install oil pump drive shaft. Install oil pump driven rotor and drive rotor. See Figure. Note reference marks made during disassembly. Install NEW "O" ring without twisting it. Apply thread sealant to bolts. Install oil pump cover and 5 bolts. Tighten bolts to specification. See TORQUE SPECIFICATIONS .
- Install NEW "O" ring to oil pump cover plug. Install plug and tighten to specification. Install 2 wiring harness connectors and 2 bolts on motor generator No. 2 assembly. Tighten bolts to specification.
- Install wiring harness connector and bolt on motor generator No. 1 assembly. Tighten bolt to specification. Apply Three Bond (1344) Loctite 242 sealant to water jacket union threads. Install 4 water jacket unions and tighten to specification. See TORQUE SPECIFICATIONS .
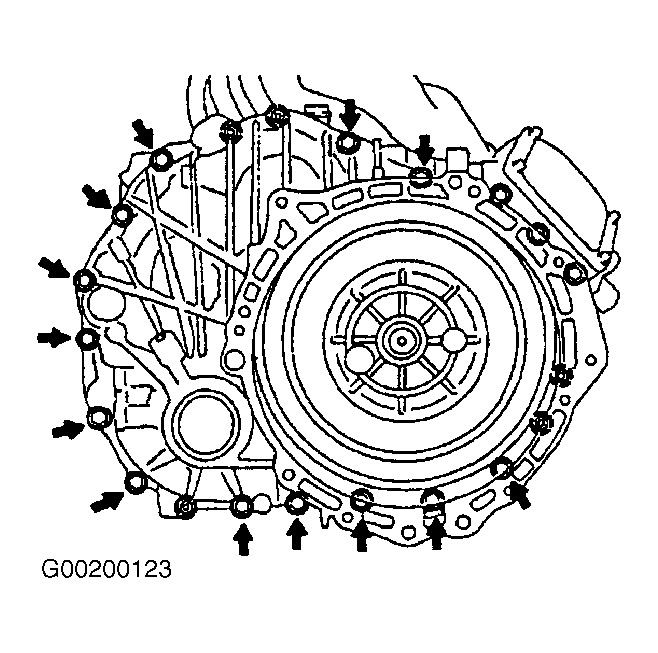
- Install 3 top bolts for high voltage cable. Tighten bolts to specification. See TORQUE SPECIFICATIONS . Apply Three Bond (1344) Loctite 242 sealant to 3 lower bolt threads. Install 3 bolts, located below high voltage cable bolts and tighten to specification. See Figure.
- Apply sealant around outer edge of power cable cover. Ensure cover is installed within 10 minutes of applying sealant to cover. Install power cable cover with 4 bolts. Tighten bolts to specification. Apply Three Bond (1324) sealant to bolt threads. Install 3 bolts and mounting bracket. See Figure. Tighten bolts to specification.
 Courtesy of © TOYOTA, LICENSE AGREEMENT TMS1002
 Courtesy of © TOYOTA, LICENSE AGREEMENT TMS1002
 Courtesy of © TOYOTA, LICENSE AGREEMENT TMS1002