September 30: LEMON manuals is back up on a temporary server! Slowness is possible
Radiator Replacement
- Drain the engine coolant (see
COOLANT CHECK ).
- Remove the condenser fan shroud assembly and radiator fan shroud assembly (see
FAN, FAN MOTOR, AND SHROUD REMOVAL AND INSTALLATION ).
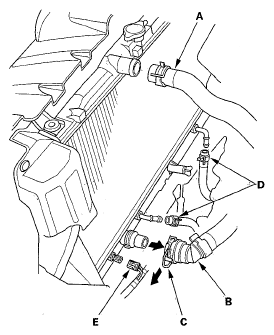
- Remove the upper radiator hose (A).
 Courtesy of AMERICAN HONDA MOTOR CO., INC.
- Clean any dirt off the quick connector (B), radiator, and lower radiator hose.
- Pull out the lock (C) by hand, then wiggle the quick connector loose, and remove it from the radiator. Do not use any tools to remove the quick connector.
- Remove the automatic transmission fluid (ATF) cooler hoses (D), then plug the hose and the line.
- Disconnect the engine coolant temperature (ECT) sensor 2 connector (E).
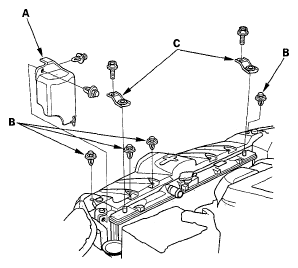
- Remove the intake air duct cover (A) and the four clips (B), then remove the upper radiator brackets (C).
 Courtesy of AMERICAN HONDA MOTOR CO., INC.
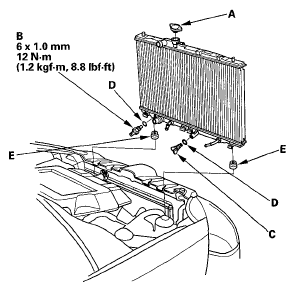
- Pull up the radiator, then remove the radiator cap (A), ECT sensor 2 (B), and drain plug (C).
 Courtesy of AMERICAN HONDA MOTOR CO., INC.
- Reassemble the radiator with new O-rings (D).
- Install the radiator. Make sure the lower cushions (E) are set securely.
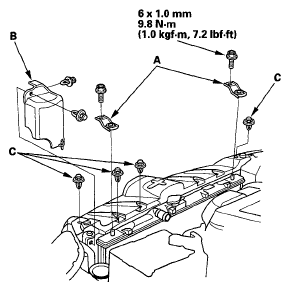
- Install the upper radiator brackets (A), then install the intake air duct cover (B) and the four clips (C).
 Courtesy of AMERICAN HONDA MOTOR CO., INC.
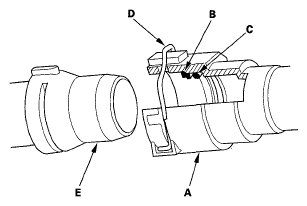
- Check the quick connector (A) and set ring (B) for cracks or damage. If the connector and/or set ring are cracked or damaged, replace the connector.
 Courtesy of AMERICAN HONDA MOTOR CO., INC.
- Make sure the set ring is in place inside the quick connector. If the set ring is displaced or not properly seated in the connector, replace the quick connector.
- Replace the O-ring (C) in the quick connector.
- Check the lock (D). If the lock is damaged or deformed, replace it. When installing the new lock to the connector, slide it straight down along the groove.
- Install a new lower radiator hose on the quick connector, and install the clamp.
- Clean the connecting surface of the radiator (E), then apply clean engine coolant around the connecting surface.
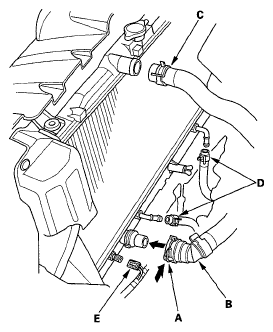
- Push down the lock (A), then push the quick connector (B) onto the radiator until you hear it click.
 Courtesy of AMERICAN HONDA MOTOR CO., INC.
- Install the upper radiator hose (C).
- Install the ATF cooler hoses (D), and connect the ECT sensor 2 connector (E).
- Install the condenser fan shroud assembly and radiator fan shroud assembly (see
FAN, FAN MOTOR, AND SHROUD REMOVAL AND INSTALLATION ).
- Refill the radiator with engine coolant, and bleed the air from the cooling system with the heater valve open (see step 6
).