EPS Control Unit Removal/Installation
- Make sure you have the anti-theft code for the audio or navigation system, then write down the audio presets.
- Make sure the ignition switch is OFF, then disconnect the negative cable from the battery.
- Remove the passenger's dashboard lower cover (see
DRIVER'S DASHBOARD LOWER COVER REMOVAL/INSTALLATION
).
- Remove the passenger's side kick panel (see
TRIM REMOVAL/INSTALLATION - DOOR AREAS
).
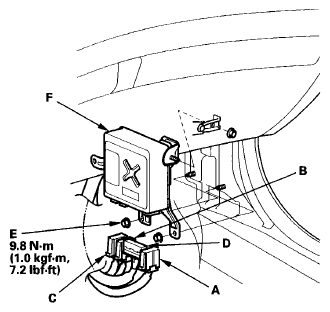
- Disconnect EPS control unit connectors A (2P), connector B (2P), connector C (2P), and connector D (28P).
 Courtesy of AMERICAN HONDA MOTOR CO., INC.
- Remove the nuts (E) from the EPS control unit (F).
- Remove the EPS control unit.
- Install the EPS control unit in the reverse order of removal.
- Reconnect the negative cable to the battery and do the following items:
- Enter the anti-theft code for the audio or navigation system, then enter the customer's audio presets.
- Set the clock.
- Make sure the horn and turn signal switches work properly.
- Make sure the steering wheel switches work properly.
- If the EPS control unit is replaced, the EPS control unit must memorize the torque sensor neutral position (see MEMORIZING THE TORQUE SENSOR NEUTRAL POSITION
).
- After installation, start the engine, and let it idle. Turn the steering wheel from lock-to-lock several times. Check that the EPS indicator does not come on.