Mixture Control Unit (Air Flow Sensor)
- Activate fuel pump with bridging adaptor switch (US4480/3). Leave ignition OFF. Remove air duct assembly.
- Lift sensor plate with magnet or by hand until it is slightly unseated. Gradually raise plate to limit of upward travel.
- Steady resistance should be felt over entire travel of sensor plate. No tight or binding spots should be evident. If so, check for dirty pivot or need for lubrication.
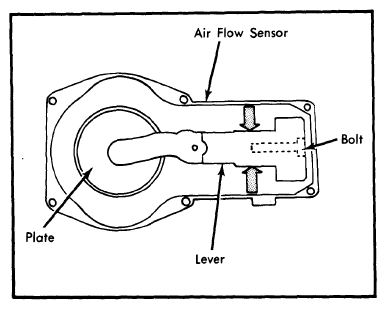
- Ensure sensor plate is centered in inlet cone. If adjustment is needed, use suitable tool (1109 or equivalent) or insert a 0.004" (0.10 mm) feeler gauge around outside of sensor plate while in seated position. Centering bolt should be slightly loosened. Apply Loctite to threads and tighten bolt after adjustment.
- If plate cannot be centered and lever appears off center, remove air sensor housing and clamping bolt on lever counterweight. Coat bolt with Loctite, install finger tight, and center lever. Tighten bolt and check lever position.
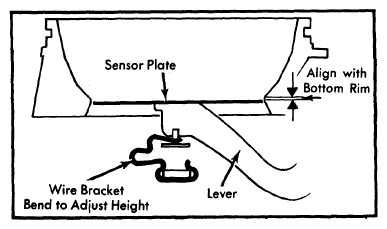
- To adjust sensor plate height, run engine until warm, then turn engine off. Remove rubber boot and check plate level. Bend clip up or down carefully until plate is even with bottom rim of air cone. Readjust CO% and idle after moving sensor plate. See Fig 2.
- Run fuel pump for a few seconds. Using strong magnet or small pliers, move plate up and down. It should move in both directions without sticking or binding. If plate sticks while moving upward, fuel distributor plunger may be at fault.
- Remove fuel distributor from air sensor housing. Check plunger for free movement, being careful not to drop it. Wash in solvent, then lubricate with gasoline and be sure "O" ring is seated properly. If plunger still hangs up, fuel distributor must be replaced.
 Courtesy of NOT AVAILABLE
 Courtesy of NOT AVAILABLE