September 30: LEMON manuals is back up on a temporary server! Slowness is possible
Without the HDS
- Remove the left kick panel (see step 2 on
TRIM REMOVAL/INSTALLATION - DOOR AREAS
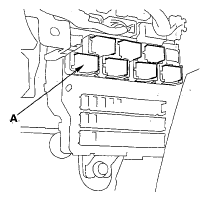
), and remove PGM-FI main relay 2 (FUEL PUMP) (A) from the under-dash fuse/relay box.
 Courtesy of AMERICAN HONDA MOTOR CO., INC.
- Start the engine, and let it idle until it stalls.
NOTE:
If any DTCs are stored, clear and ignore them.
- Turn the ignition switch to LOCK (0).
- Remove the fuel fill cap to relieve the pressure in the fuel tank.
- Do the battery terminal disconnection procedure (see
BATTERY TERMINAL DISCONNECTION AND RECONNECTION
).
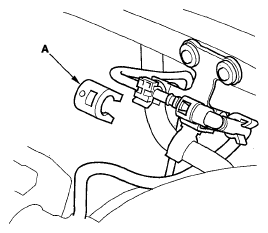
- Remove the quick-connect fitting cover (A).
 Courtesy of AMERICAN HONDA MOTOR CO., INC.
- Check the fuel quick-connect fitting for dirt, and clean it if needed.
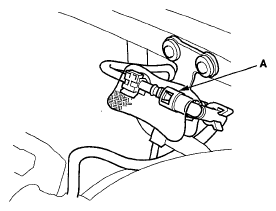
- Place a rag or shop towel over the quick-connect fitting (A).
 Courtesy of AMERICAN HONDA MOTOR CO., INC.
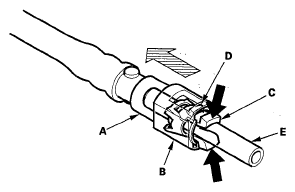
- Disconnect the quick-connect fitting (A): Hold the connector (B) with one hand, and squeeze the retainer tabs (C) with the other hand to release them from the locking tabs (D). Pull the connector off.
NOTE:
- Be careful not to damage the line (E) or other parts.
- Do not use tools.
- If the connector does not move, keep the retainer tabs pressed down, and alternately pull and push the connector until it comes off easily.
- Do not remove the retainer from the line; once removed, the retainer must be replaced with a new one.
 Courtesy of AMERICAN HONDA MOTOR CO., INC.
- After disconnecting the quick-connect fitting, check it for dirt or damage (see step 4
).
- Do the battery terminal reconnection procedure (see
BATTERY TERMINAL DISCONNECTION AND RECONNECTION
).