Drive Plate Removal/Installation
- Remove the transmission assembly (see TRANSMISSION REMOVAL
).
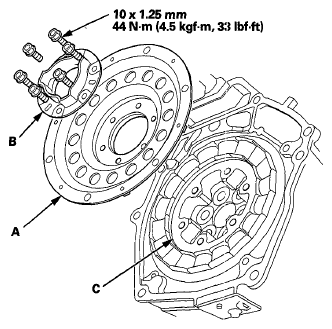
- Remove the flywheel support (B) and the drive plate (A).
- Inspect the drive plate (A) and the flywheel support (B), and replace it if it is damaged.
 Courtesy of AMERICAN HONDA MOTOR CO., INC.
- Install the drive plate and the flywheel support on the motor rotor (C), and secure them with the bolts, if removed.
NOTE:
- The motor rotor contains very strong magnets and should be handled with special care.
- Extra special care must be taken on the installation of the drive plate, it may suddenly be pulled toward the motor with great force causing serious hand or finger injury, or damaged components.
- Keep pieces of metal and all foreign particles out of the motor rotor during the transmission removal.
- Install the transmission assembly (see TRANSMISSION INSTALLATION
).