September 30: LEMON manuals is back up on a temporary server! Slowness is possible
If the Crankshaft is Already Installed
- Set the crankshaft to bottom dead center (BDC) for each cylinder as its piston is installed.
- Remove the connecting rod caps, and check that the connecting rod bearing is securely in place.
- Apply new engine oil to the piston, inside of the ring compressor, and the cylinder bore, then attach the ring compressor to the piston/connecting rod assembly.
- Position the piston/connecting rod assembly with the arrow (A) facing the cam chain side of the engine block.
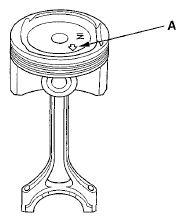 Courtesy of AMERICAN HONDA MOTOR CO., INC.
- Position the piston/connecting rod assembly in the cylinder, and tap it in using the wooden handle of a hammer (A). Maintain downward force on the ring compressor (B) to prevent the rings from expanding before entering the cylinder bore.
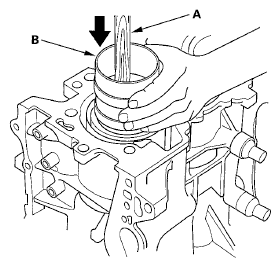 Courtesy of AMERICAN HONDA MOTOR CO., INC.
- Stop after the ring compressor pops free, and check the connecting rod-to-crank journal alignment before pushing the piston into place.
- Check the connecting rod bearing clearance with plastigage (see CONNECTING ROD BEARING REPLACEMENT
).
- Inspect the connecting rod bolts (see CONNECTING ROD BOLT INSPECTION
).
- Apply new engine oil to the bolt threads, then install the rod caps with bearings. Torque the bolts to 9.8 N.m (1.0 kgf.m, 7.2 lbf.ft).
- Tighten the connecting rod bolts an additional 90°.
NOTE:
Remove the connecting rod bolt if you tightened it beyond the specified angle, and go back to step 8 of the procedure. Do not loosen it back to the specified angle.
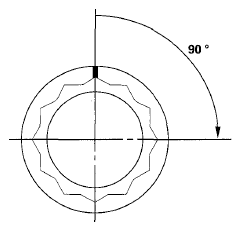 Courtesy of AMERICAN HONDA MOTOR CO., INC.