HVAC Control Unit Removal/Installation
- Remove the audio unit (see
AUDIO UNIT REMOVAL/INSTALLATION
).
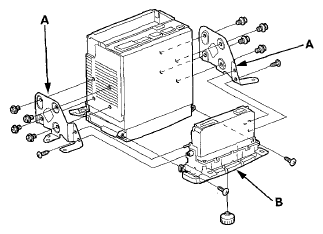
- Remove the self-tapping screws, bolts, and the brackets (A).
 Courtesy of AMERICAN HONDA MOTOR CO., INC.
- Remove the self-tapping screws and separate the audio unit and the HVAC control unit (B).
- Install the control unit in the reverse order of removal. After installation, operate the various functions to see whether it works properly.
- Run the self-diagnostic function to confirm that there are no problems in the system (see HOW TO USE THE HVAC CONTROL UNIT SELF-DIAGNOSTIC FUNCTION WITHOUT THE HDS
).