Diagnostic Procedure
- Perform ON-BOARD DIAGNOSTIC II SYSTEM CHECK
under SELF-DIAGNOSTIC SYSTEM. After performing OBD-II system check, go to next step.
- Turn ignition on with engine off. Review and record FAILURE RECORDS data, then clear DTCs. Operate vehicle within FAILURE RECORDS data recorded. If scan tool indicates that DTC P0532 RAN AND PASSED this ignition, check for intermittent problem. See DIAGNOSTIC AIDS
. If scan tool reading does not indicate DTC P0532 RAN AND PASSED this ignition, go to next step.
- Turn ignition off. Disconnect A/C refrigerant pressure sensor harness connector. A/C refrigerant pressure sensor is located in receiver/dryer at behind grill. Start engine. On scan tool monitor A/C PRESSURE SENSOR parameter. If parameter holds steady at less than 0.1 volt, leave harness connector disconnected and go to step 5
. If parameter does not hold steady at less than 0.1 volt, leave harness connector disconnected and go to next step.
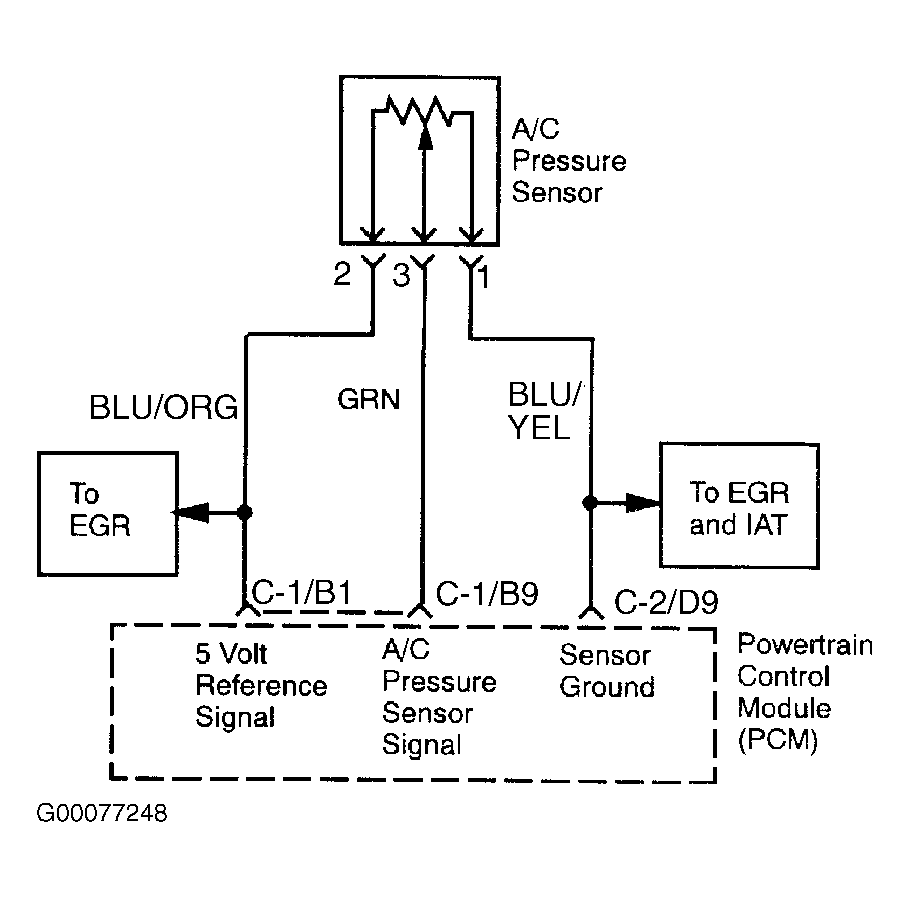
- Check for short to voltage in A/C pressure switch input (Green wire) between A/C pressure sensor and PCM. See Fig 1
. If problem is found, repair as necessary. After repairs are complete, see VERIFYING VEHICLE REPAIR
under SELF-DIAGNOSTIC SYSTEM. If no problem is found, go to step 12
.
- Check for open, short to ground or short to voltage in A/C pressure switch input (Green wire) between A/C pressure sensor and PCM. See Fig 1
. If problem is found, repair as necessary. After repairs are complete, see VERIFYING VEHICLE REPAIR
under SELF-DIAGNOSTIC SYSTEM. If no problem is found, leave harness connector disconnected and go to next step.
- Check for open, short to ground or short to voltage in A/C pressure switch 5-volt reference circuit (Red wire) between A/C pressure sensor and PCM. See Fig 1
. If problem is found, repair as necessary. After repairs are complete, see VERIFYING VEHICLE REPAIR
under SELF-DIAGNOSTIC SYSTEM. If no problem is found, leave harness connector disconnected and go to next step.
- Turn ignition off. Using DVOM, measure voltage between ground and A/C pressure sensor harness connector No. 2 (Red wire). Turn ignition on. Voltage reading should be about 5 volts. If voltage is as specified, leave harness connector disconnected and go to next step. If voltage is not as specified, go to step 12
.
- Turn ignition off. Using a fused jumper wire, jumper A/C pressure sensor harness connector terminals No. 2 (Red wire) and No. 3 (Green wire). Turn ignition on. Using scan tool, observe A/C PRESSURE SENSOR voltage parameter. Voltage parameter should be about 5-volts. If parameter is as specified, leave harness connector disconnected and go to next step. If parameter is not as specified, go to step 12
.
- Check for open, short to ground or short to voltage in A/C pressure sensor ground (Gray/Black wire) between A/C pressure sensor and PCM. If problem is found, repair as necessary. After repairs are complete, see VERIFYING VEHICLE REPAIR
under SELF-DIAGNOSTIC SYSTEM. If no problem is found, leave harness connector disconnected and go to next step.
- Turn ignition on. Using DVOM, measure voltage between A/C pressure sensor harness connector terminals No. 1 (Gray/Black wire) and No. 2 (Red wire). Voltage reading should be about 5 volts. If voltage is as specified, go to next step. If voltage is not as specified, go to step 12
.
- Replace A/C refrigerant pressure sensor. See MANUAL A/C-HEATER SYSTEMS - RODEO article in AIR CONDITIONING & HEATING. After repairs are complete, see VERIFYING VEHICLE REPAIR
under SELF-DIAGNOSTIC SYSTEM.
- Replace and reprogram PCM. See POWERTRAIN CONTROL MODULE REPLACEMENT
under POWERTRAIN CONTROL MODULE. After repairs are complete, see VERIFYING VEHICLE REPAIR
under SELF-DIAGNOSTIC SYSTEM.
 Courtesy of ISUZU MOTOR CO.