October 30: LEMON manuals on a temporary server, it is slow and having issues, download the manuals you need! Later in November we will switch back to the fast server.
Combination Meter: Installation
- INSTALL COMBINATION METER ASSEMBLY
- Connect the connector.
 Courtesy of © TOYOTA, LICENSE AGREEMENT TMS1002
- Install the combination meter with the 4 screws.
 Courtesy of © TOYOTA, LICENSE AGREEMENT TMS1002
- INSTALL INSTRUMENT CLUSTER FINISH PANEL SUB-ASSEMBLY
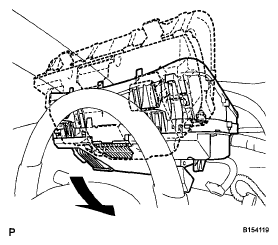
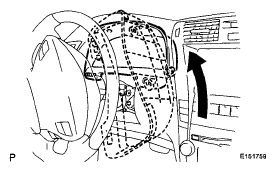
- Rotate the finish panel as shown in the illustration to install it.
 Courtesy of © TOYOTA, LICENSE AGREEMENT TMS1002
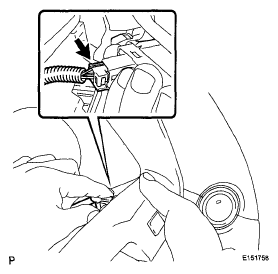
- Hold the back of the trip switch on the finish panel with your right hand, and connect the connector with your left hand.
 Courtesy of © TOYOTA, LICENSE AGREEMENT TMS1002
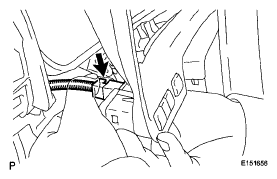
- Hold the back of the light control rheostat on the finish panel with your right hand, and connect the connector with your left hand.
 Courtesy of © TOYOTA, LICENSE AGREEMENT TMS1002
- Insert the upper part of the finish panel into the instrument panel opening, and fix the center with your right hand.
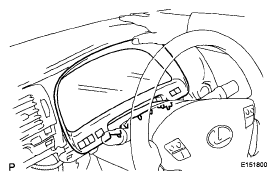 Courtesy of © TOYOTA, LICENSE AGREEMENT TMS1002
- Press up the lower right side of the finish panel to attach the clip.
NOTE:
If the trip switch is pressed to attach the clip, the switch will be damaged.
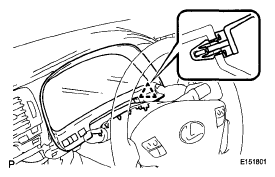 Courtesy of © TOYOTA, LICENSE AGREEMENT TMS1002
- Press up the lower left side of the finish panel to attach the clip
NOTE:
If the light control rheostat switch is pressed to attach the clip, the switch will be damaged.
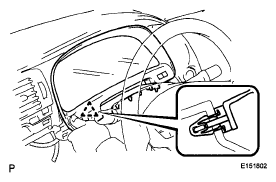 Courtesy of © TOYOTA, LICENSE AGREEMENT TMS1002
- Install the 2 clips
- INSTALL WINDSHIELD WIPER SWITCH ASSEMBLY
(See
INSTALLATION
)
- INSTALL STEERING COLUMN COVER (w/o Driver Monitor Camera)
(See
INSTALLATION
)
- INSTALL STEERING COLUMN COVER (w/ Driver Monitor Camera)
(See
INSTALLATION
)
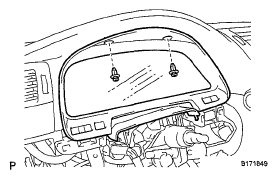 Courtesy of © TOYOTA, LICENSE AGREEMENT TMS1002
- INSTALL NO. 1 INSTRUMENT PANEL SAFETY PAD SUB-ASSEMBLY
- Connect the connectors.
- Attach the 5 clips and claw to install the safety pad
- Install the 2 screws
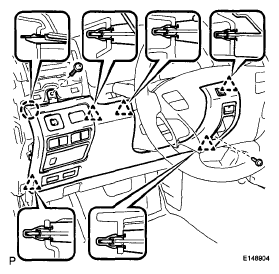 Courtesy of © TOYOTA, LICENSE AGREEMENT TMS1002
- Attach the claw to install the hole cover
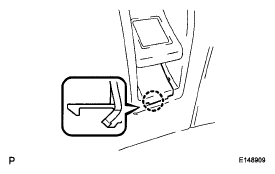 Courtesy of © TOYOTA, LICENSE AGREEMENT TMS1002
- INSTALL NO. 1 INSTRUMENT CLUSTER MOLDING
- Attach the 2 clips to install the molding
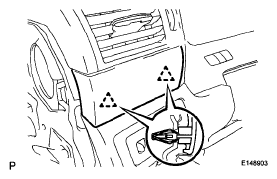 Courtesy of © TOYOTA, LICENSE AGREEMENT TMS1002
- INSTALL INSTRUMENT SIDE PANEL LH
- Attach the 6 clips to install the side panel.
- CONNECT CABLE TO NEGATIVE BATTERY TERMINAL
NOTE:
- Reset the AUTO TILT AWAY function setting to the previous condition by changing the customize parameter (see
CUSTOMIZE PARAMETERS
).
- When disconnecting the cable, some systems need to be initialized after the cable is reconnected (see
INITIALIZATION
).
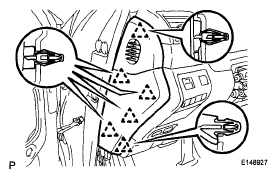 Courtesy of © TOYOTA, LICENSE AGREEMENT TMS1002
- INSTALL BATTERY SERVICE HOLE COVER LH
(See
INSTALLATION
)
- INSTALL LUGGAGE COMPARTMENT MAT SUB-ASSEMBLY
(See
INSTALLATION
)