September 30: LEMON manuals is back up on a temporary server! Slowness is possible
Steering Gear: Reassembly
- Install a NEW "O" ring on spool valve. Apply Grease (C1AZ-19590-E) to pivot lever hole in spool valve and to pivot lever hole in valve body. Apply Premium Power Steering Fluid (E6AZ-19582-AA) to rest of spool valve. Install spool valve. Apply grease to pivot lever/collar and to bushing.
- Install pivot lever into spool valve housing. Make sure longest end of pivot lever/collar is seated in spool valve. Install end plug in spool valve housing. Apply power steering fluid to inner guide. Push inner guide and inner rack seal into rack housing with Inner Rack Seal Remover (T87C-3504-A).
- Apply grease to rack teeth, but DO NOT
plug rack air hole with grease. Install Rack Oil Seal Protector (D83P-3504-K). Install a NEW rack piston seal on rack using Piston Seal Replacer (T81P-3504-L) with Pusher (T75L-3517-A2) and Sizer (T81P-3504-K).
- Apply power steering fluid to rack piston and cover rack with electrical tape. Coat inside of rack housing with power steering fluid and carefully slide rack into housing. Slide rack as far as it will go into housing. Remove rack seal protector. Install a NEW bushing into outer bulkhead using Pinion Cover Installer (T18P-3504-Y).
- Install a NEW sealing ring, oil seal and "O" rings at bulkhead end of rack housing. Lubricate all parts with power steering fluid before installation. Wrap outer bulkhead with towel and install with pipe wrench. Stake bulkhead to rack housing with punch. Install lower bearing on pinion shaft. Install and tighten retaining nut to 29-36 ft. lbs. (39-49 N.m).
- Stake nut to pinion shaft. Install pinion shaft into housing with rack extending 2.70" (68.7 mm) out of housing on pinion shaft end or centered in housing. Also, notch on pinion shaft spline must be located 60 degrees from horizontal center. See Fig 1
.
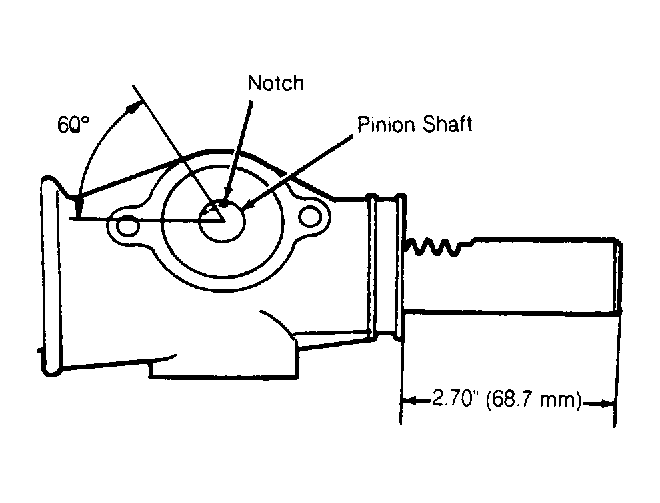 Courtesy of FORD MOTOR CO.
- Grease upper pinion bearing and install in housing using Upper Pinion Seal Replacer (T78P-3504-D). Tighten pinion bearing cover to 44-80 INCH lbs. (5-9 N.m), then loosen it 10-20 degrees. Tighten lock nut to 29-36 ft. lbs. (39-49 N.m).
- Using a NEW gasket, attach valve body to rack housing. Install yoke, spring, adjusting plug and lock nut. Tighten cover to 40-49 INCH lbs. (4.5-5.5 N.m). Loosen cover 45 degrees. Measure pinion torque using INCH-lb. torque wrench and Pinion Adapter (T87C-3504-C).
- Pinion torque should be 5.3-13.3 INCH lbs. (.6-1.5 N.m). If pinion torque is not within specification, loosen or tighten adjusting plug. After pinion torque is set, tighten lock nut to 29-36 ft. lbs. (39-49 N.m). Mount steering gear in soft-jawed vise and install damper ring, washer and tie rod.
- Tighten tie rod to 44-59 ft. lbs. (60-80 N.m). Stake tab washer in 2 places. Position damper ring in washer. Install other damper ring, washer and tie rod. Install tie rod dust boots and secure outer ends with clamps and inner sides with wire.
- Install tie rod ends and adjust according to index marks made during disassembly. Wrap electrical tape around and apply grease to pinion shaft. Apply grease to lips of pinion shaft seal. Install pinion shaft seal using Pinion Bearing Replacer (T78P-3504-D).
- Remove electrical tape from pinion shaft. Install support brackets and rubber bushings. Install external oil lines and 2 NEW copper sealing rings on each banjo fitting.