- Verify there is no abnormal tire wear per Courtesy Inspection
NOTE:
SC-14-00-001 Standard Courtesy Inspection Checklist, While performing courtesy inspection, Note any abnormal tire wear that could indicate the need for an alignment
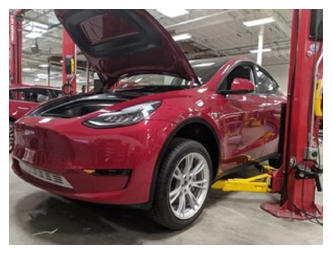
- Raise and support the vehicle.
NOTE:
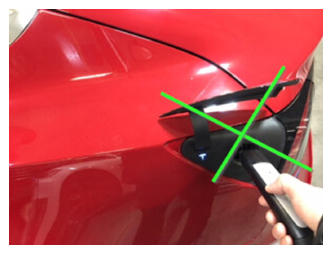
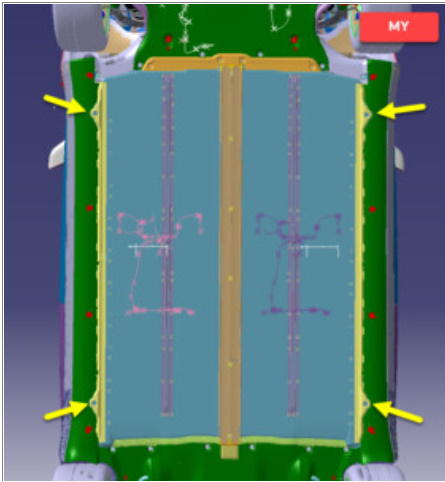
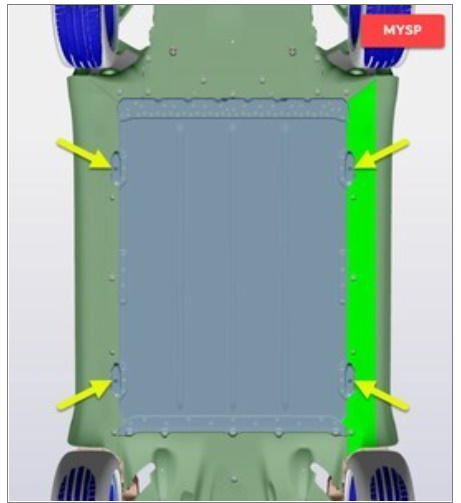
Ensure vehicle is not charging, Remove charging cable if it's plugged in, Note the MYSP lifting points are more narrow than the MY
 Courtesy of TESLA, INC. Courtesy of TESLA, INC.
|
 Courtesy of TESLA, INC. Courtesy of TESLA, INC.
|
 Courtesy of TESLA, INC. Courtesy of TESLA, INC.
|
 Courtesy of TESLA, INC. Courtesy of TESLA, INC.
|
- Open all four doors
- Lower all four windows
- Connect to vehicle using Toolbox 3.0
- Select 'Actions/Autodiag' and search for 'Thermal'
- Select "Start Thermal Fluid Fill/Drain (Coolant only)", click Run and allow routine to complete.
NOTE:
Select 'X' at top right of window to close once complete, Verify vehicle is in Series via Garage > Vitals > Thermal tab > Coolant loops
- Move LH front seat forward
- Move RH front seat forward
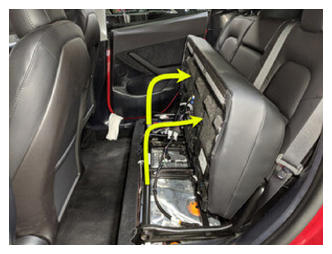
- Release 2nd row seat cushion
NOTE:
Lift front edge of seat cushion upward to release foam from frame, Pull towards front of vehicle then tilt bench against 40/60 back
 Courtesy of TESLA, INC. Courtesy of TESLA, INC.
|
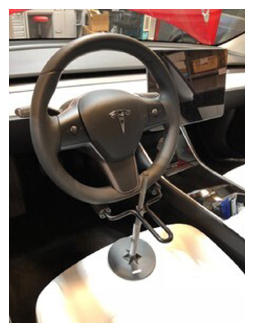
- Move LH front seat backward
- Set steering wheel straight ahead
- Lock steering wheel into position
NOTE:
Protect seat from damage
 Courtesy of TESLA, INC. Courtesy of TESLA, INC.
|
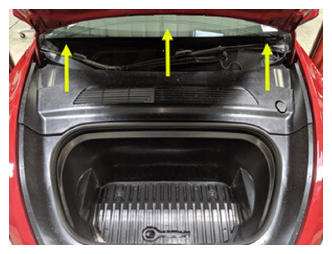
- Open hood
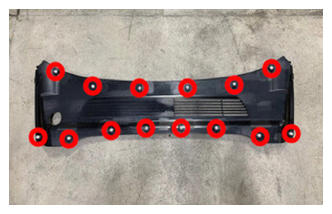
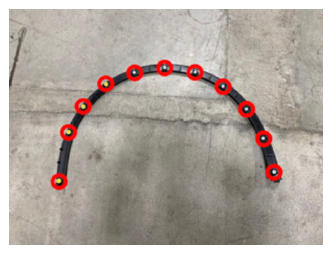
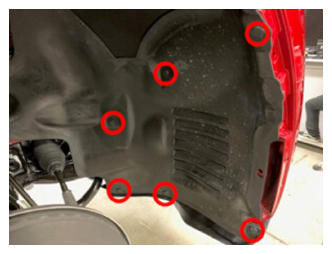
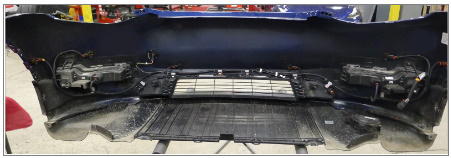
- Remove rear apron
NOTE:
14x clips
 Courtesy of TESLA, INC. Courtesy of TESLA, INC.
|
 Courtesy of TESLA, INC. Courtesy of TESLA, INC.
|
- Power off vehicle from center display
NOTE:
Via Controls > Safety > Power Off, Select Power Off button at warning dialogue box
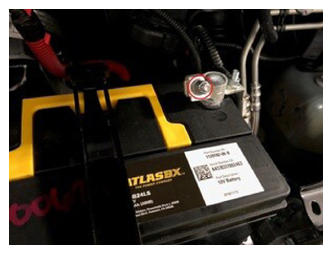
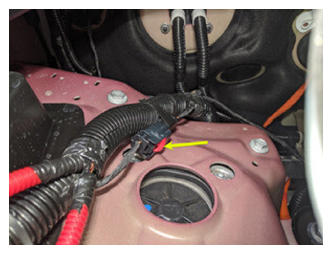
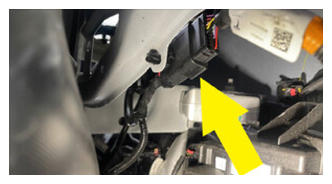
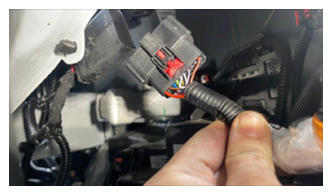
- Disconnect 12V negative terminal and first responders loop
NOTE:
1x nut, 10mm, 6 N.m, 1x connector, Ensure vehicle is in park, climate control system is off, and vehicle is not charging before disconnecting 12V, Negative terminal should be disconnected before FRL, Allow 2 minutes for all electrical circuits to fully discharge
 Courtesy of TESLA, INC. Courtesy of TESLA, INC.
|
 Courtesy of TESLA, INC. Courtesy of TESLA, INC.
|
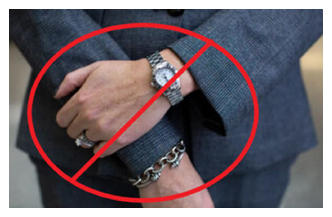
- Remove all items from pockets and ensure not wearing metal items
 Courtesy of TESLA, INC. Courtesy of TESLA, INC.
|
 Courtesy of TESLA, INC. Courtesy of TESLA, INC.
|
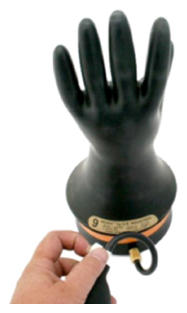
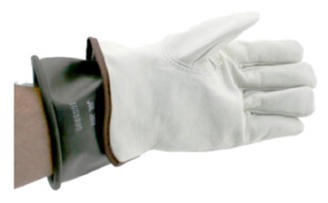
- Inspect HV insulating gloves
NOTE:
Check gloves for damage prior to use, Refer to Tech Note TN-15-92-003
, "High Voltage Awareness Care Points" for information on inspecting HV gloves.
 Courtesy of TESLA, INC. Courtesy of TESLA, INC.
|
- Put on HV insulating gloves and leather over gloves
NOTE:
Make sure to wear Electrical Protective Gloves any time Hioki tester is used
 Courtesy of TESLA, INC. Courtesy of TESLA, INC.
|
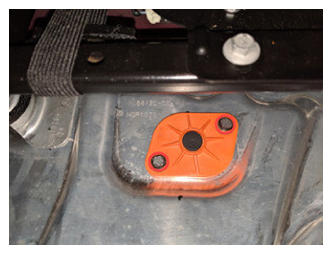
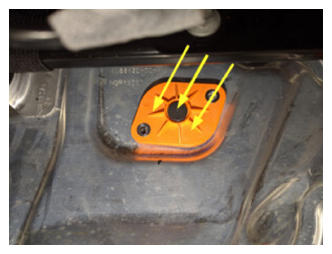
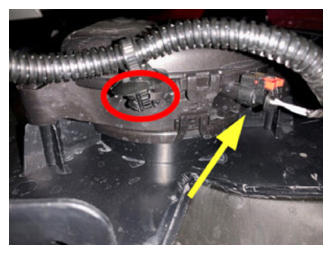
- Remove the bolts securing penthouse probe lid cover to penthouse cover
NOTE:
2x bolts, EP10 5-Lobe, 6 N.m, Discard after removal
 Courtesy of TESLA, INC. Courtesy of TESLA, INC.
|
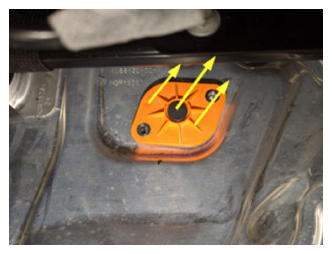
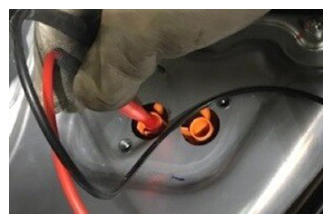
- Remove the penthouse probe lid cover from the penthouse cover
 Courtesy of TESLA, INC. Courtesy of TESLA, INC.
|
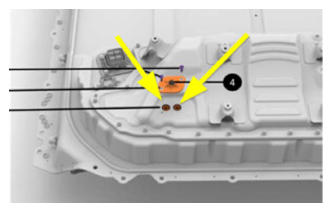
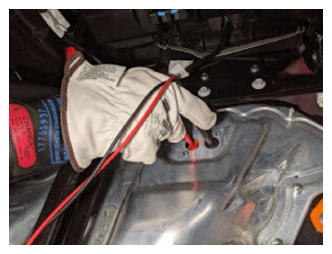
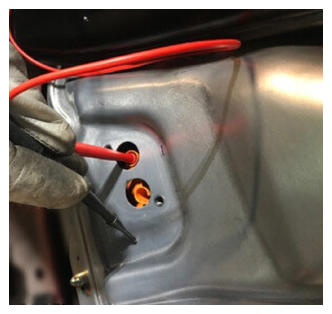
- Verify no high voltage
NOTE:
Make sure to wear PPE (HV gloves, safety glasses) when working on high voltage component, Measure B+ to Ground, B- to Ground, B+ to B-, If voltage is greater than 10V, Pack contactors are not open or welded, Stop work and reach out to Service Engineering
 Courtesy of TESLA, INC. Courtesy of TESLA, INC.
|
 Courtesy of TESLA, INC. Courtesy of TESLA, INC.
|
 Courtesy of TESLA, INC. Courtesy of TESLA, INC.
|
 Courtesy of TESLA, INC. Courtesy of TESLA, INC.
|
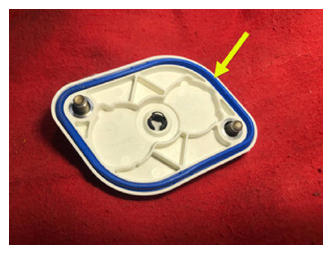
- Position the penthouse probe lid cover to the penthouse cover
NOTE:
Inspect gasket to confirm it has no visual damage
 Courtesy of TESLA, INC. Courtesy of TESLA, INC.
|
 Courtesy of TESLA, INC. Courtesy of TESLA, INC.
|
- Install the bolts securing penthouse probe lid cover to penthouse cover
NOTE:
2x bolts, EP10 5-Lobe, 6 N.m, Install new fasteners
Courtesy of TESLA, INC.
|
- Remove HV insulating gloves
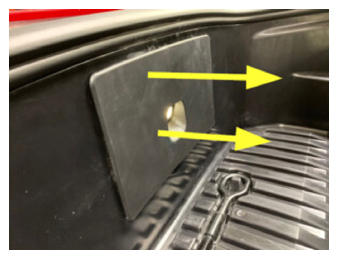
- Remove access panel
NOTE:
3x clips, 1x connector
 Courtesy of TESLA, INC. Courtesy of TESLA, INC.
|
 Courtesy of TESLA, INC. Courtesy of TESLA, INC.
|
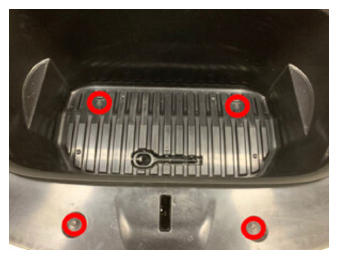
- Remove fasteners securing the frunk assembly
NOTE:
5x bolts, 10mm, 5 N.m, Newer vehicles may be equipped with 4x bolts and 1x push clip securing frunk to reservoir neck
 Courtesy of TESLA, INC. Courtesy of TESLA, INC.
|
 Courtesy of TESLA, INC. Courtesy of TESLA, INC.
|
- Remove frunk assembly from vehicle
NOTE:
6x clips, Replace any clips if broken or missing
 Courtesy of TESLA, INC. Courtesy of TESLA, INC.
|
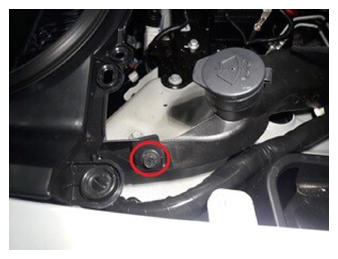
- Remove bolt securing the steering gear assembly to intermediate shaft assembly
NOTE:
1x bolt, 13mm, 18 N.m
 Courtesy of TESLA, INC. Courtesy of TESLA, INC.
|
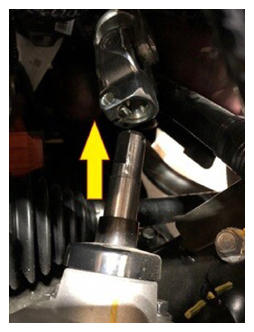
- Slide the electric steering column upward to remove it from the steering gear assembly
 Courtesy of TESLA, INC. Courtesy of TESLA, INC.
|
- Disconnect the steering gear assembly connectors
NOTE:
2x connectors, Two stage connectors, Slide red locking tab to unlock, then depress the connector release to disconnect
 Courtesy of TESLA, INC. Courtesy of TESLA, INC.
|
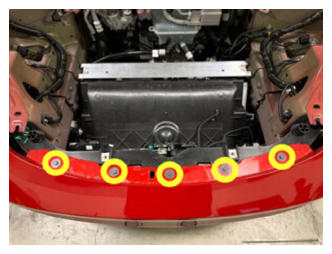
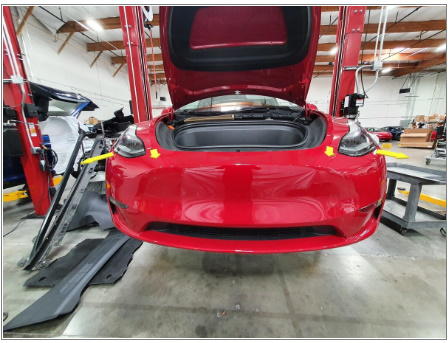
- Remove fasteners holding upper portion of front fascia to vehicle
NOTE:
5x bolts, 10mm, 4 N.m
 Courtesy of TESLA, INC. Courtesy of TESLA, INC.
|
- Remove LH front fender garnish
NOTE:
11x clips, 1x push clip, 3x tabs, Release from center of garnish and work your way outward towards both ends, Be cautious not to bend front tabs going into front fascia
 Courtesy of TESLA, INC. Courtesy of TESLA, INC.
|
 Courtesy of TESLA, INC. Courtesy of TESLA, INC.
|
 Courtesy of TESLA, INC. Courtesy of TESLA, INC.
|
 Courtesy of TESLA, INC. Courtesy of TESLA, INC.
|
- Remove LH front wheel cap
NOTE:
1x cap, Use both hands to gently pull the wheel cap to release the clips, Wheels may be equipped with center caps
- Loosen LH front wheel
NOTE:
5x nuts, 21mm, 175 N.m
- Remove RH front fender garnish
NOTE:
11x clips, 1x push clip, 3x tabs, Release from center of garnish and work your way outward towards both ends, Be cautious not to bend front tabs going into front fascia
 Courtesy of TESLA, INC. Courtesy of TESLA, INC.
|
 Courtesy of TESLA, INC. Courtesy of TESLA, INC.
|
 Courtesy of TESLA, INC. Courtesy of TESLA, INC.
|
 Courtesy of TESLA, INC. Courtesy of TESLA, INC.
|
- Remove RH front wheel cap
NOTE:
1x cap, Use both hands to gently pull the wheel cap to release the clips, Wheels may be equipped with center caps
- Loosen RH front wheel
NOTE:
5x nuts, 21mm, 175 N.m
- Raise vehicle fully and lower lift onto locks
NOTE:
Set vehicle to comfortable working height, Make sure there's an audible click of the locks on both sides before lowering, otherwise vehicle may tilt to the side
- Remove outer fasteners from front aero shield
NOTE:
7x bolts, 10mm, 5 N.m
 Courtesy of TESLA, INC. Courtesy of TESLA, INC.
|
- Remove remaining nuts and remove front aero shield from vehicle
NOTE:
2x nuts, 15mm, 5 N.m
 Courtesy of TESLA, INC. Courtesy of TESLA, INC.
|
- Lower vehicle partially and set lift onto locks
NOTE:
Raise lift off locks, then hold lock release lever to keep locks free while vehicle is lowered, Set vehicle to comfortable working height
- Remove LH front wheel
NOTE:
5x nuts, 21mm, 175 N.m
- Remove RH front wheel
NOTE:
5x nuts, 21mm, 175 N.m
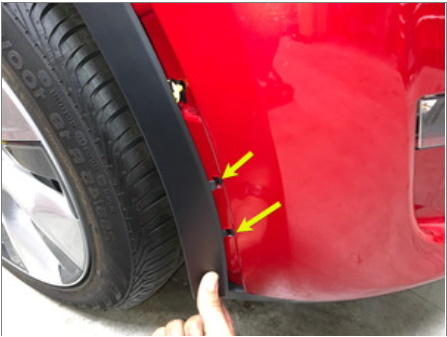
- Remove clips securing LH wheel liner to fascia
NOTE:
4x push clips, LH wheel removed for better visual
 Courtesy of TESLA, INC. Courtesy of TESLA, INC.
|
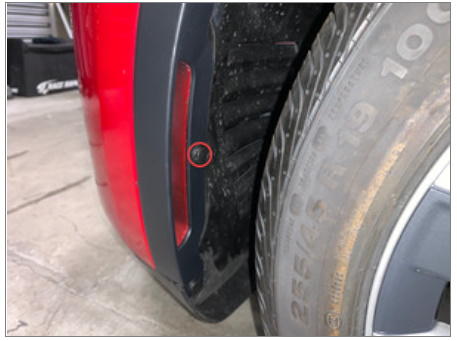
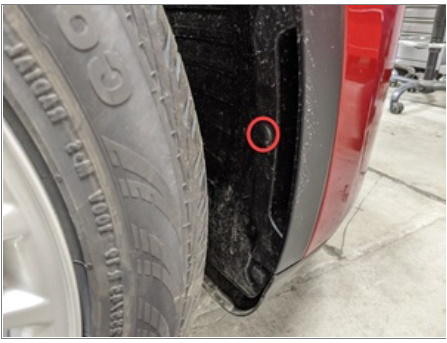
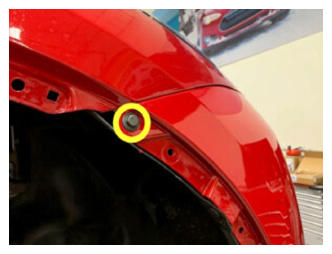
- Remove bolt securing LH side of fascia to fender
NOTE:
1x bolt, 10mm, 4 N.m
 Courtesy of TESLA, INC. Courtesy of TESLA, INC.
|
- Remove clips securing RH wheel liner to fascia and body
NOTE:
5x push clips
 Courtesy of TESLA, INC. Courtesy of TESLA, INC.
|
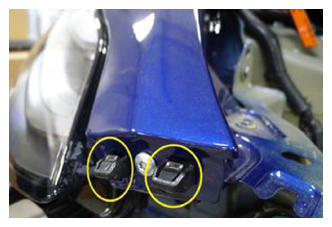
- Release connection for the front fascia
NOTE:
1x locking connector, Release red locking tab and disengage connector
 Courtesy of TESLA, INC. Courtesy of TESLA, INC.
|
 Courtesy of TESLA, INC. Courtesy of TESLA, INC.
|
- Release harness clip and connector to pedestrian warning speaker
NOTE:
1x locking connector, 1x clip, Pull tab to disengage lock, Pull again release from connector, Speaker is located behind RH wheel liner
 Courtesy of TESLA, INC. Courtesy of TESLA, INC.
|
- Remove bolt securing RH side of fascia to fender
NOTE:
1x bolt, 10mm, 4 N.m
 Courtesy of TESLA, INC. Courtesy of TESLA, INC.
|
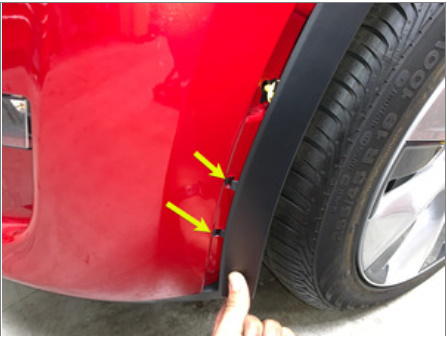
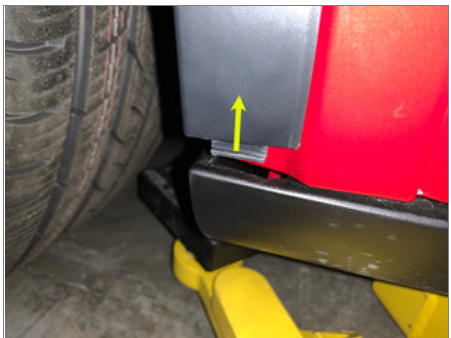
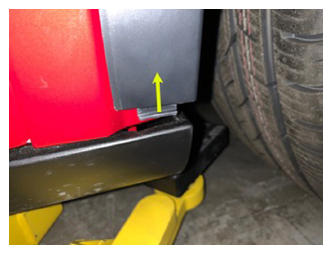
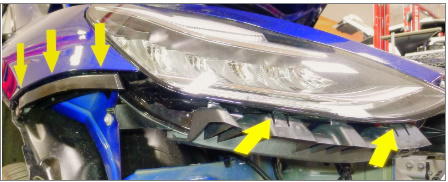
- Release both front corners then release front of front fascia by pulling upward and away from vehicle and place onto padded surface
NOTE:
8x clips, Recommend assistance, Use caution not to damage headlamp or fender during removal
 Courtesy of TESLA, INC. Courtesy of TESLA, INC.
|
 Courtesy of TESLA, INC. Courtesy of TESLA, INC.
|
 Courtesy of TESLA, INC. Courtesy of TESLA, INC.
|
 Courtesy of TESLA, INC. Courtesy of TESLA, INC.
|
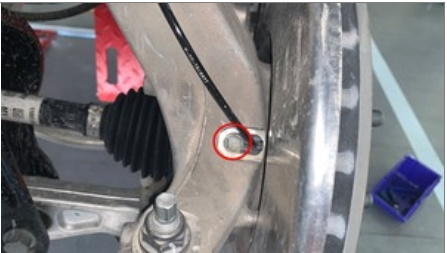
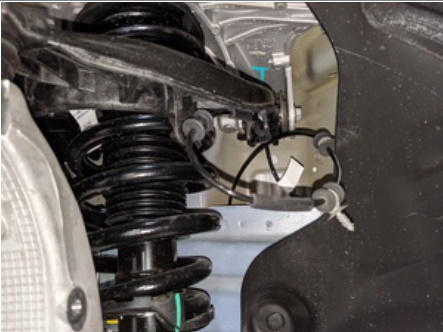
- Remove bolt securing LH front wheel speed sensor to knuckle
NOTE:
1x bolt, 10mm, 5 N.m
 Courtesy of TESLA, INC. Courtesy of TESLA, INC.
|
- Remove LH front wheel speed sensor harness from knuckle and move aside
NOTE:
2x harness clips
 Courtesy of TESLA, INC. Courtesy of TESLA, INC.
|
 Courtesy of TESLA, INC. Courtesy of TESLA, INC.
|
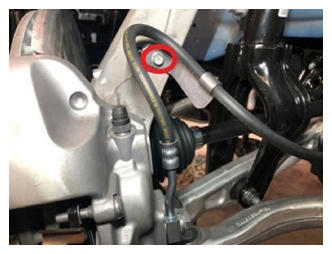
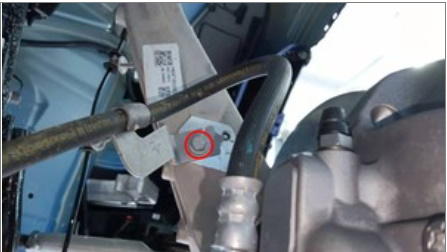
- Release bolt securing LH front brake hose bracket to knuckle
NOTE:
1x bolt, 10mm, 5 N.m
 Courtesy of TESLA, INC. Courtesy of TESLA, INC.
|
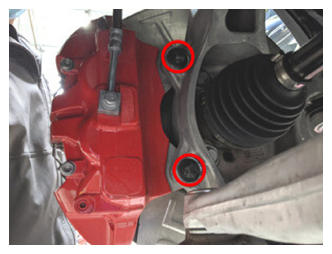
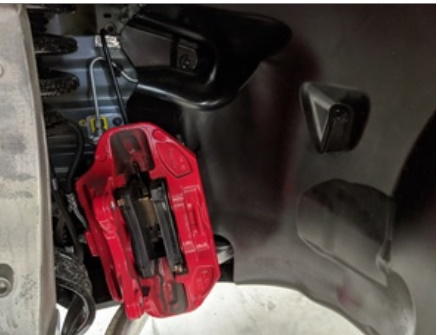
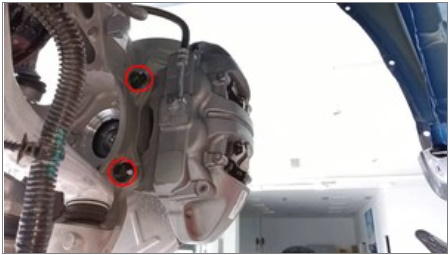
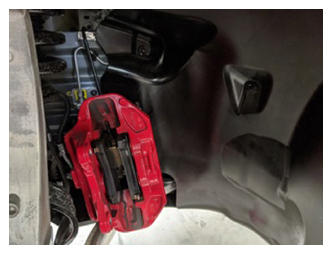
- Remove LH front brake caliper from LH front knuckle
NOTE:
2x bolts, E18, 94 N.m, Discard bolts after removal, Hang caliper off to the side with S-hook
 Courtesy of TESLA, INC. Courtesy of TESLA, INC.
|
 Courtesy of TESLA, INC. Courtesy of TESLA, INC.
|
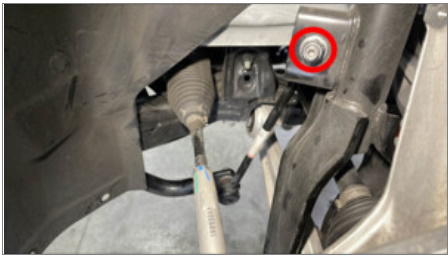
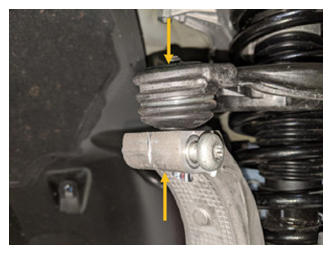
- Release nut securing front stabar end link to LH front strut and separate
NOTE:
1x nyloc nut, 18mm, 98 N.m, Counter hold ball joint with T40, Discard fastener after removal, Separate end link from the strut, If required a pry bar can be used to relieve tension
 Courtesy of TESLA, INC. Courtesy of TESLA, INC.
|
 Courtesy of TESLA, INC. Courtesy of TESLA, INC.
|
 Courtesy of TESLA, INC. Courtesy of TESLA, INC.
|
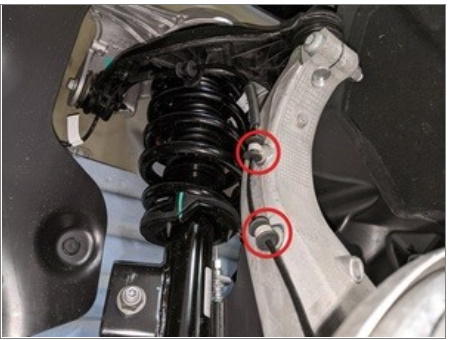
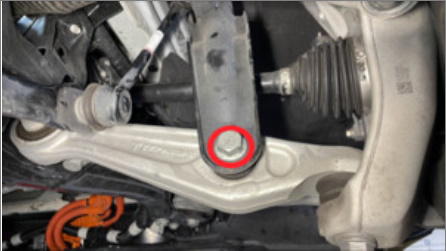
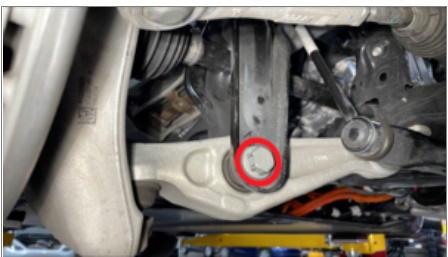
- Remove bolt and nut securing LH front upper control arm to knuckle
NOTE:
1x bolt, T50, 1x nyloc nut, 15mm, 56 N.m, Recommend assistance, Compress joint to remove bolt, Discard nut after removal
 Courtesy of TESLA, INC. Courtesy of TESLA, INC.
|
 Courtesy of TESLA, INC. Courtesy of TESLA, INC.
|
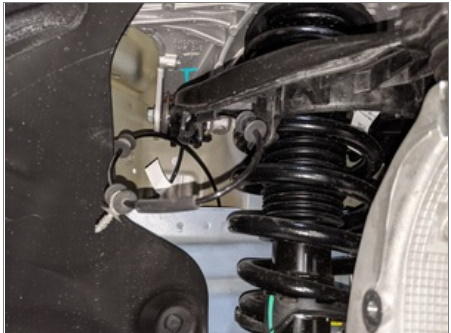
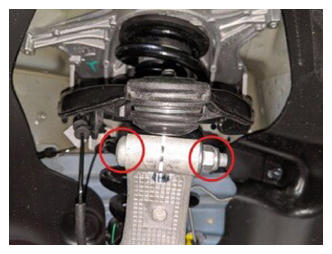
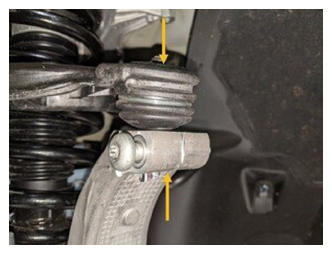
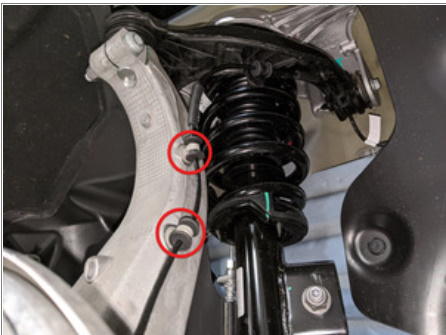
- Remove bolt and nut securing LH strut to LH front lower lateral link
NOTE:
1x bolt, 21mm, 1x nut, 21mm, 106 N.m
 Courtesy of TESLA, INC. Courtesy of TESLA, INC.
|
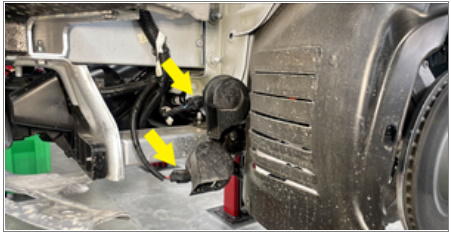
- Disconnect connectors from horn assembly
NOTE:
2x connectors, Take note of original routing
 Courtesy of TESLA, INC. Courtesy of TESLA, INC.
|
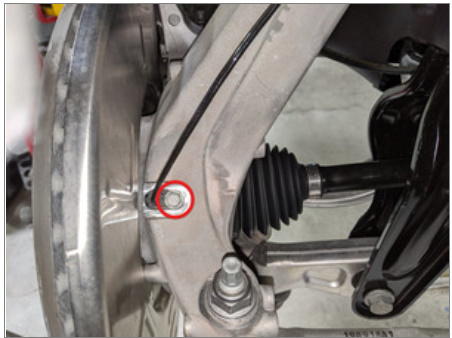
- Remove bolt securing RH front wheel speed sensor to knuckle
NOTE:
1x bolt, 10mm, 5 N.m
 Courtesy of TESLA, INC. Courtesy of TESLA, INC.
|
- Remove RH front wheel speed sensor harness from knuckle and move aside
NOTE:
2x harness clips
 Courtesy of TESLA, INC. Courtesy of TESLA, INC.
|
 Courtesy of TESLA, INC. Courtesy of TESLA, INC.
|
- Remove bolt securing RH front brake caliper hose to knuckle
NOTE:
1x bolt, 10mm, 5 N.m
 Courtesy of TESLA, INC. Courtesy of TESLA, INC.
|
- Remove RH front brake caliper from RH front knuckle
NOTE:
2x bolts, E18, 94 N.m, Discard bolts after removal, Hang caliper off to the side with S-hook
 Courtesy of TESLA, INC. Courtesy of TESLA, INC.
|
 Courtesy of TESLA, INC. Courtesy of TESLA, INC.
|
- Release nut securing front stabar end link to RH front strut and separate
NOTE:
1x nyloc nut, 18mm, 98 N.m, Counter hold ball joint with T40, Discard fastener after removal, Separate end link from the strut
 Courtesy of TESLA, INC. Courtesy of TESLA, INC.
|
 Courtesy of TESLA, INC. Courtesy of TESLA, INC.
|
 Courtesy of TESLA, INC. Courtesy of TESLA, INC.
|
- Remove bolt and nut securing RH front upper control arm to knuckle
NOTE:
1x bolt, T47IP, 1x nyloc nut, 15mm, 56 N.m, Compress joint to remove bolt, Discard after removal
 Courtesy of TESLA, INC. Courtesy of TESLA, INC.
|
 Courtesy of TESLA, INC. Courtesy of TESLA, INC.
|
- Remove bolt and nut securing RH strut to lower control arm and move the RH front lower lateral link aside
NOTE:
1x bolt, 21mm, 1x nut, 21mm, 106 N.m
 Courtesy of TESLA, INC. Courtesy of TESLA, INC.
|
- Raise vehicle fully and lower lift onto locks
NOTE:
Set vehicle to comfortable working height, Make sure there's an audible click of the locks on both sides before lowering, otherwise vehicle may tilt to the side
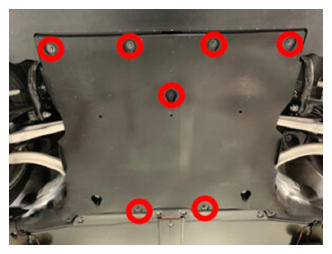
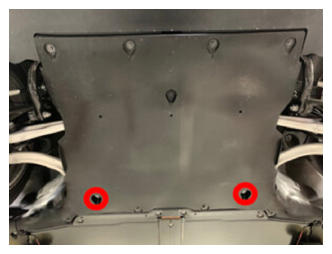
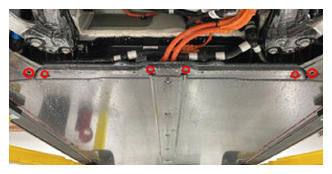
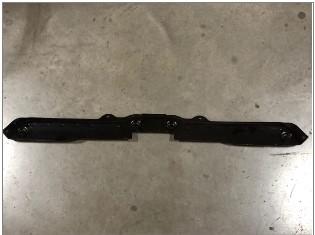
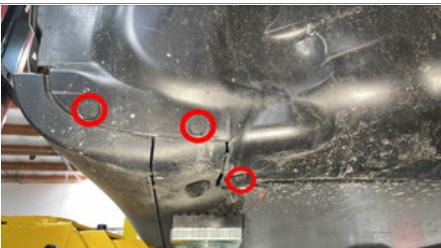
- Remove bolts securing front skid plate and remove from vehicle
NOTE:
4x bolts, EP10, 13 N.m, 2x bolts, 10mm, 5 N.m
 Courtesy of TESLA, INC. Courtesy of TESLA, INC.
|
 Courtesy of TESLA, INC. Courtesy of TESLA, INC.
|
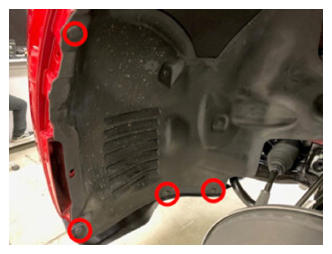
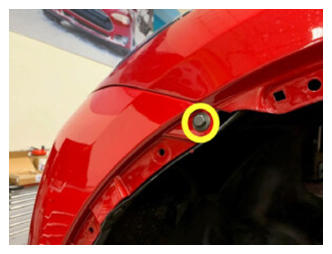
- Remove clips securing RH wheel liner to rocker cover
NOTE:
3x clips, Move aside for access
 Courtesy of TESLA, INC. Courtesy of TESLA, INC.
|
- Position coolant drain container underneath RH front of vehicle
NOTE:
Position to catch all coolant loss
 Courtesy of TESLA, INC. Courtesy of TESLA, INC.
|
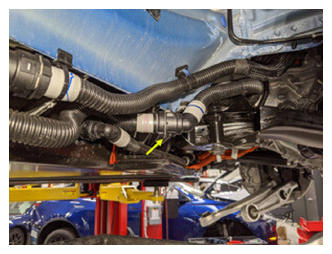
- Disconnect FDU coolant inlet hose at RH front of HV battery and plug both hose ends
NOTE:
1x spring clip
 Courtesy of TESLA, INC. Courtesy of TESLA, INC.
|
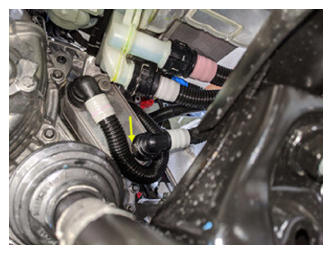
- Release supermanifold to heat exchanger coolant hose from heat exchanger
NOTE:
1x spring clip
 Courtesy of TESLA, INC. Courtesy of TESLA, INC.
|
- Install plugs to both open coolant hose connections
NOTE:
1x spring clip
 Courtesy of TESLA, INC. Courtesy of TESLA, INC.
|
- Remove coolant drain container from underneath vehicle
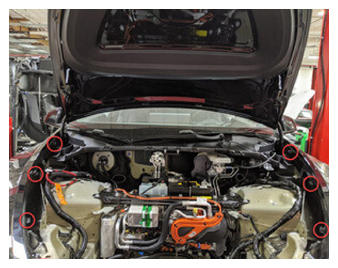
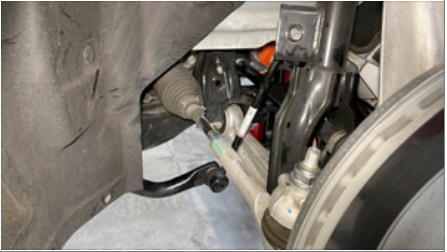
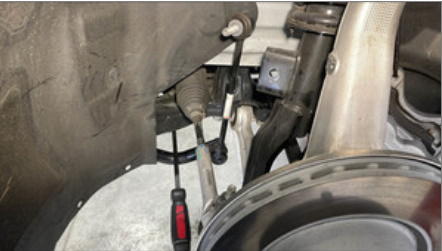
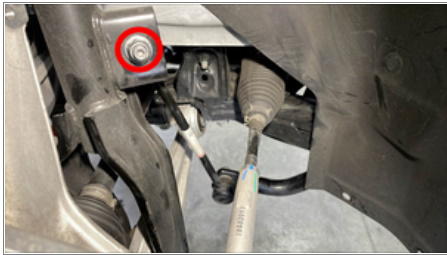
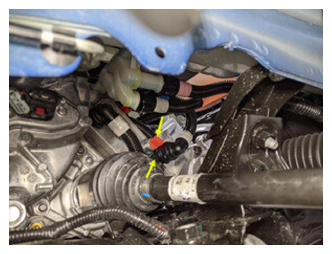
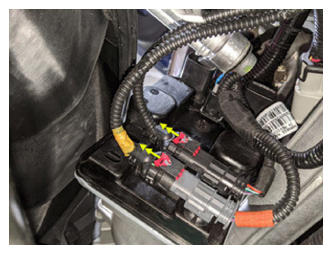
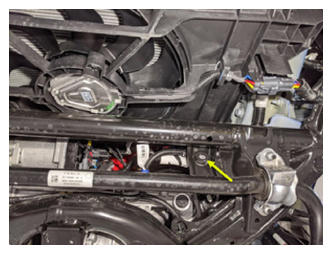
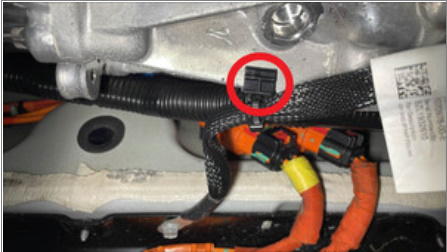
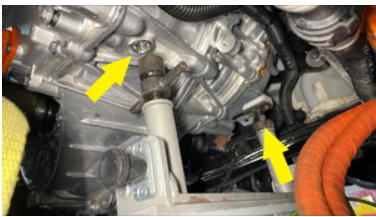
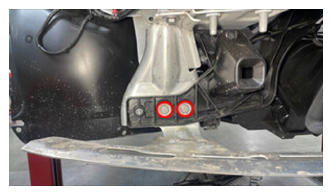
- Disconnect the logic connectors below steering gear
NOTE:
2x connectors, Do not push down on red tab, Pull red tab to disengage lock, Pull again to release connector, Image zoomed out for location reference
 Courtesy of TESLA, INC. Courtesy of TESLA, INC.
|
 Courtesy of TESLA, INC. Courtesy of TESLA, INC.
|
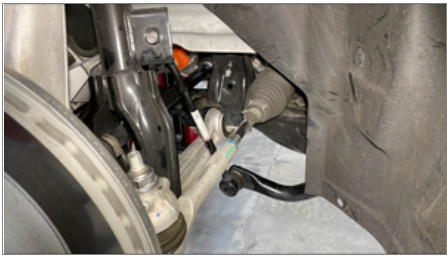
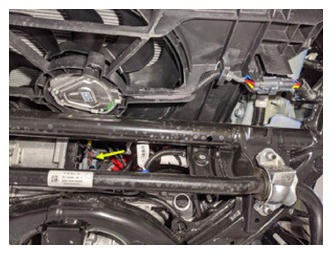
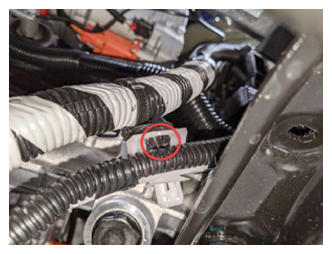
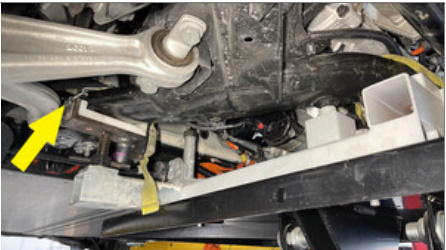
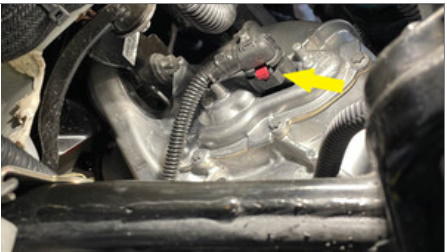
- Release harness clip from subframe assembly
NOTE:
1x clip, Image zoomed out for location reference
 Courtesy of TESLA, INC. Courtesy of TESLA, INC.
|
 Courtesy of TESLA, INC. Courtesy of TESLA, INC.
|
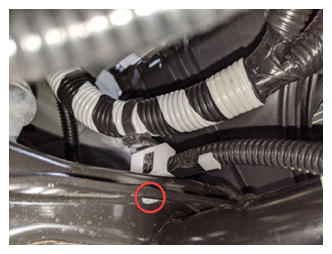
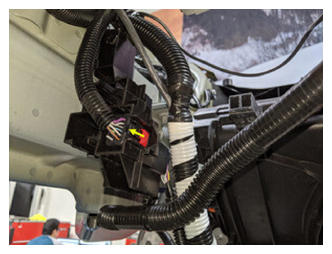
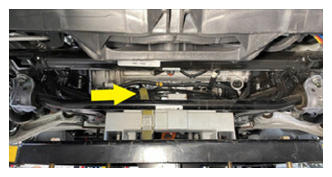
- Release harness clip from lower clip
NOTE:
1x clip
 Courtesy of TESLA, INC. Courtesy of TESLA, INC.
|
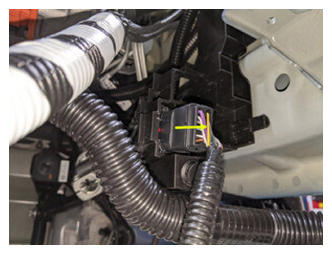
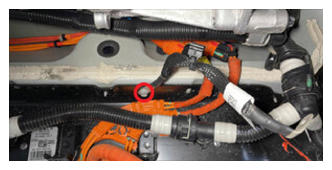
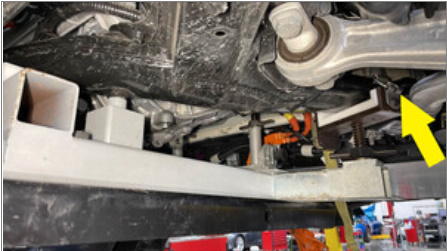
- Release connection for the front subframe harness
NOTE:
1x locking connector, Release red locking tab, Disengage connection and release
 Courtesy of TESLA, INC. Courtesy of TESLA, INC.
|
 Courtesy of TESLA, INC. Courtesy of TESLA, INC.
|
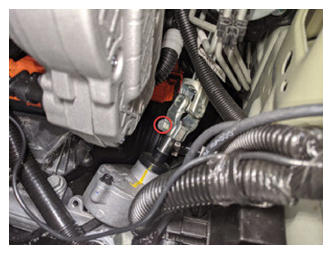
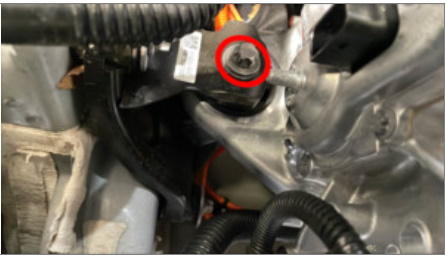
- Remove bolt securing FDU HV harness to the FDU
NOTE:
1x bolt, 10mm, 10 N.m
 Courtesy of TESLA, INC. Courtesy of TESLA, INC.
|
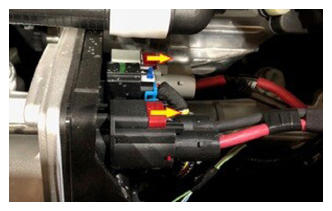
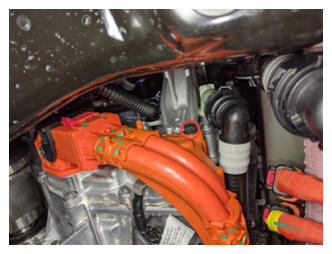
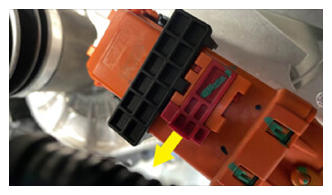
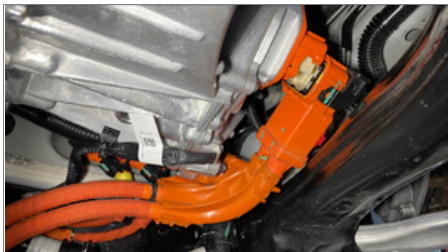
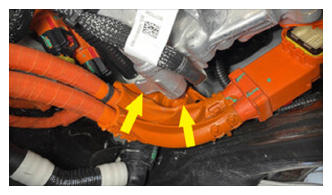
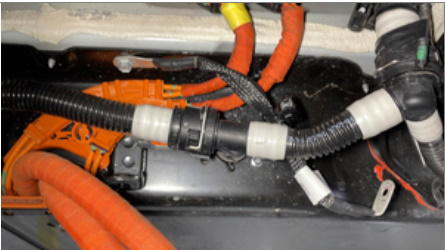
- Release FDU HV harness connection
NOTE:
1x locking connector. Release red locking tab and rotate the release lever up to disengage the connector, Do not force the release lever up, Ensure the alignment tabs on the FDU header are not damaged
 Courtesy of TESLA, INC. Courtesy of TESLA, INC.
|
 Courtesy of TESLA, INC. Courtesy of TESLA, INC.
|
 Courtesy of TESLA, INC. Courtesy of TESLA, INC.
|
 Courtesy of TESLA, INC. Courtesy of TESLA, INC.
|
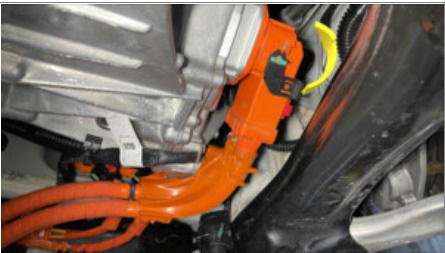
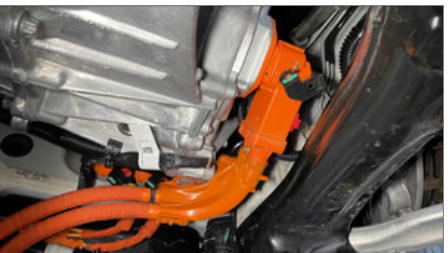
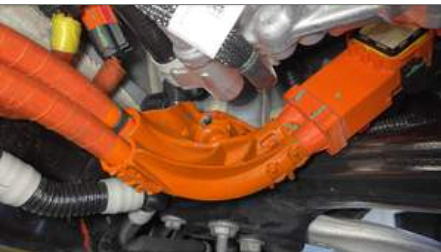
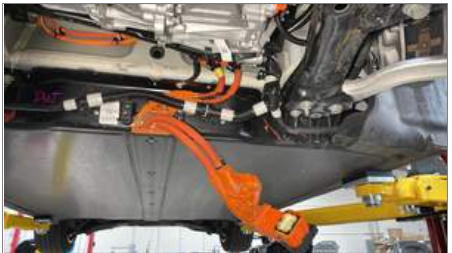
- Release FDU HV harness from casting and move aside
 Courtesy of TESLA, INC. Courtesy of TESLA, INC.
|
 Courtesy of TESLA, INC. Courtesy of TESLA, INC.
|
 Courtesy of TESLA, INC. Courtesy of TESLA, INC.
|
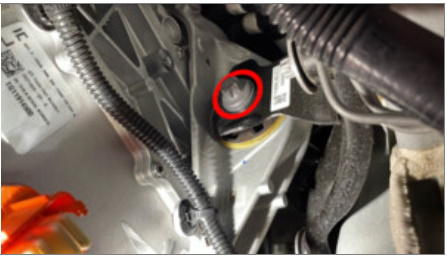
- Remove bolt securing FDU ground strap to FDU
NOTE:
1x bolt, 10mm, 6 N.m
 Courtesy of TESLA, INC. Courtesy of TESLA, INC.
|
- Remove FDU ground strap harness clip from FDU
NOTE:
1x clip
 Courtesy of TESLA, INC. Courtesy of TESLA, INC.
|
- Loosen bolt securing FDU ground strap to HV battery and move aside
NOTE:
1x bolt, 10mm, 10 N.m
 Courtesy of TESLA, INC. Courtesy of TESLA, INC.
|
 Courtesy of TESLA, INC. Courtesy of TESLA, INC.
|
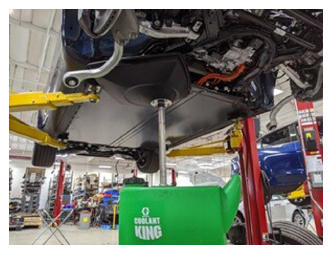
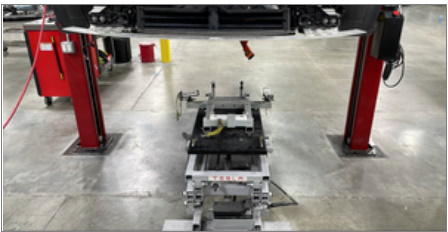
- Move the subframe lifting tool underneath the front subframe area
 Courtesy of TESLA, INC. Courtesy of TESLA, INC.
|
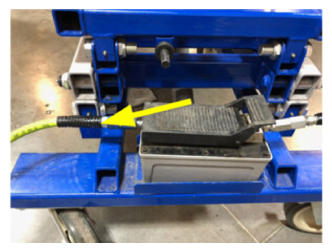
- Connect air supply to subframe lifting tool
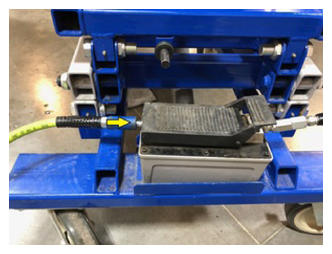 Courtesy of TESLA, INC. Courtesy of TESLA, INC.
|
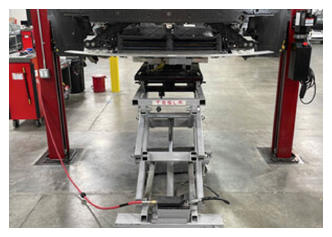
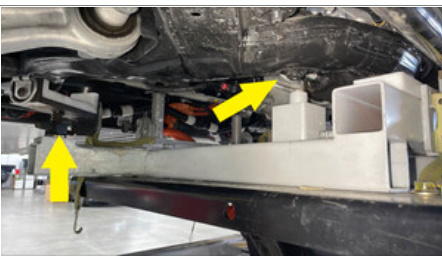
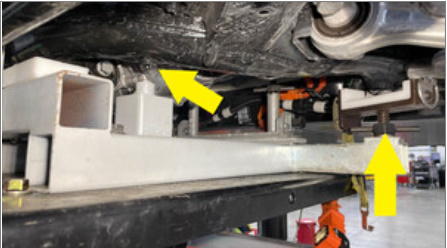
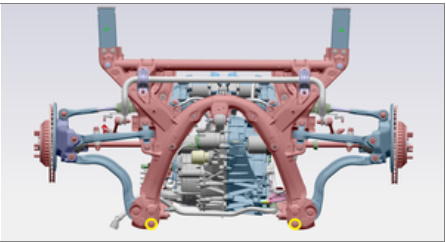
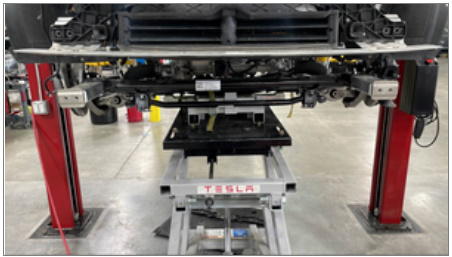
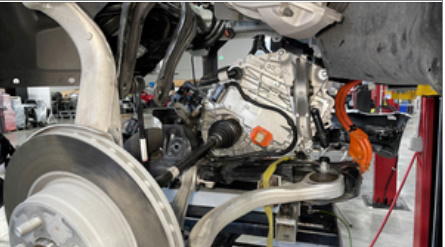
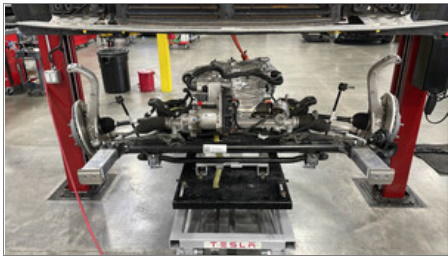
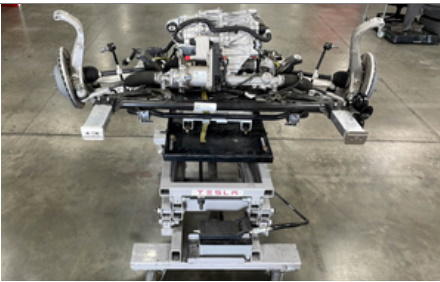
- Raise the powertrain table and subframe fixture into position
NOTE:
2x subframe datums, 1x FDU datum, Raise fixture until the front subframe is fully supported, Line up the two subframe datums and support arms, Continue to line up the FDU datum and FDU support arm, Raise and adjust arms as needed,
 Courtesy of TESLA, INC. Courtesy of TESLA, INC.
|
 Courtesy of TESLA, INC. Courtesy of TESLA, INC.
|
 Courtesy of TESLA, INC. Courtesy of TESLA, INC.
|
 Courtesy of TESLA, INC. Courtesy of TESLA, INC.
|
- Fully secure straps from fixture onto front subframe
 Courtesy of TESLA, INC. Courtesy of TESLA, INC.
|
 Courtesy of TESLA, INC. Courtesy of TESLA, INC.
|
 Courtesy of TESLA, INC. Courtesy of TESLA, INC.
|
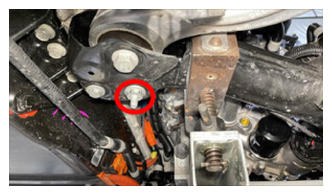
- Remove bolts securing front end carrier to LH front subframe crash can assembly
NOTE:
2x bolts, 13mm, 16 N.m
 Courtesy of TESLA, INC. Courtesy of TESLA, INC.
|
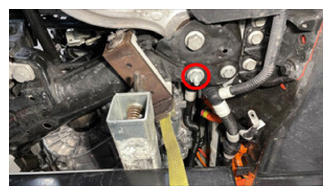
- Remove bolts securing front end carrier to RH front subframe crash can assembly
NOTE:
2x bolts, 13mm, 16 N.m
 Courtesy of TESLA, INC. Courtesy of TESLA, INC.
|
- Release FDU resolver connection
NOTE:
1x locking connector, Release red locking tab and then release connection
 Courtesy of TESLA, INC. Courtesy of TESLA, INC.
|
- Remove bolt securing the RH motor mount to the RH motor mount bracket
NOTE:
1x bolt, E18, 105 N.m
 Courtesy of TESLA, INC. Courtesy of TESLA, INC.
|
- Remove bolt securing the LH motor mount to the LH motor mount bracket
NOTE:
1x bolt, E18, 105 N.m
 Courtesy of TESLA, INC. Courtesy of TESLA, INC.
|
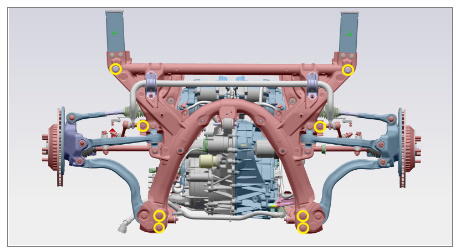
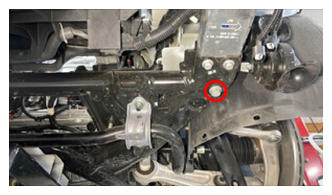
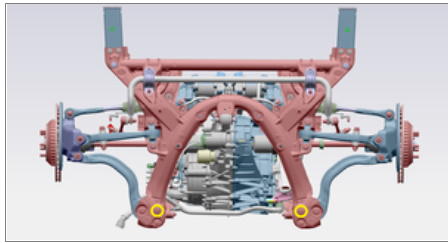
- Mark LH/RH bolts securing front subframe to vehicle frame
NOTE:
2x bolts, 21mm, 125 N.m, 2x bolts, 15mm, 50 N.m, 2x bolts, 18mm, 72 N.m, 2x bolts, 15mm, 50 N.m, Use a bright color paint marker to better visibility
 Courtesy of TESLA, INC. Courtesy of TESLA, INC.
|
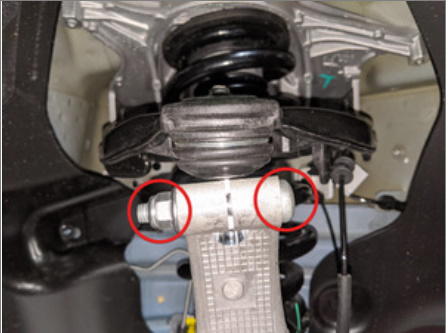
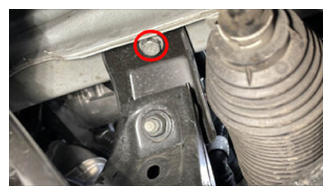
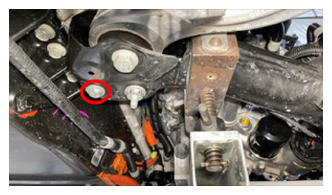
- Remove bolts securing front subframe mid mounts to body
NOTE:
2x bolts, 15mm, 50 N.m, Discard after removal
 Courtesy of TESLA, INC. Courtesy of TESLA, INC.
|
 Courtesy of TESLA, INC. Courtesy of TESLA, INC.
|
 Courtesy of TESLA, INC. Courtesy of TESLA, INC.
|
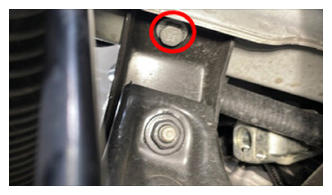
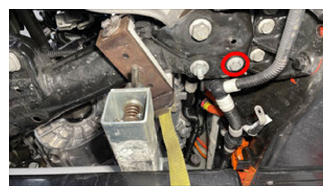
- Remove bolts securing the front portion of the front subframe to body
NOTE:
2x bolts, 18mm, 72 N.m, Discard after removal
 Courtesy of TESLA, INC. Courtesy of TESLA, INC.
|
 Courtesy of TESLA, INC. Courtesy of TESLA, INC.
|
 Courtesy of TESLA, INC. Courtesy of TESLA, INC.
|
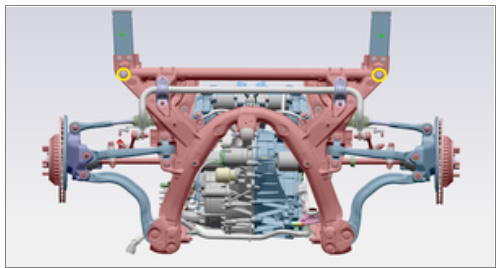
- Remove smaller bolts securing the rear portion of the front subframe to body
NOTE:
2x bolts, 15mm, 50 N.m, Discard after removal
 Courtesy of TESLA, INC. Courtesy of TESLA, INC.
|
 Courtesy of TESLA, INC. Courtesy of TESLA, INC.
|
 Courtesy of TESLA, INC. Courtesy of TESLA, INC.
|
- Remove larger bolts securing the rear portion of the front subframe to body
NOTE:
2x bolts, 21mm, 125 N.m, Discard after removal
 Courtesy of TESLA, INC. Courtesy of TESLA, INC.
|
 Courtesy of TESLA, INC. Courtesy of TESLA, INC.
|
 Courtesy of TESLA, INC. Courtesy of TESLA, INC.
|
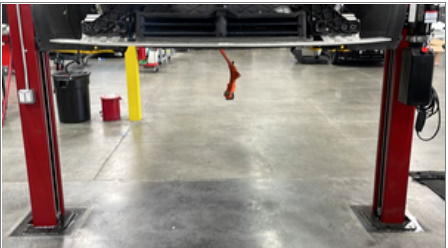
- Lower front subframe assembly from vehicle
NOTE:
Keep an eye out for any components that could get caught while lowering
 Courtesy of TESLA, INC. Courtesy of TESLA, INC.
|
 Courtesy of TESLA, INC. Courtesy of TESLA, INC.
|
 Courtesy of TESLA, INC. Courtesy of TESLA, INC.
|
- Disconnect air supply from subframe lifting tool
 Courtesy of TESLA, INC. Courtesy of TESLA, INC.
|
- Remove subframe lifting tool from under vehicle
 Courtesy of TESLA, INC. Courtesy of TESLA, INC.
|
 Courtesy of TESLA, INC. Courtesy of TESLA, INC.
|
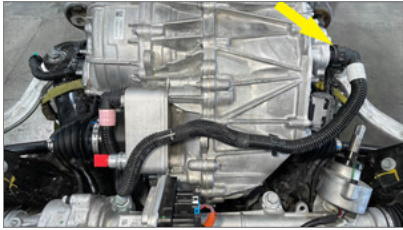
- Release the FDU inverter to oil cooler hose from the from inverter fluid coupling
NOTE:
1x hose clip, Use a foldable funnel as required
 Courtesy of TESLA, INC. Courtesy of TESLA, INC.
|
 Courtesy of TESLA, INC. Courtesy of TESLA, INC.
|
 Courtesy of TESLA, INC. Courtesy of TESLA, INC.
|
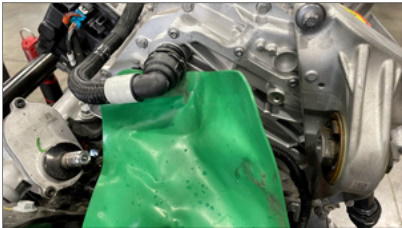
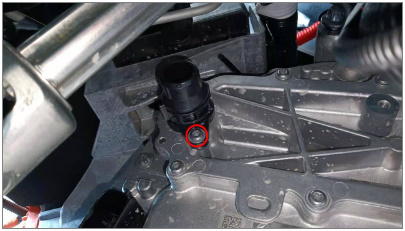
- Remove the fastener securing the straight fluid coupling to the front drive inverter
NOTE:
1x screw, T25, 6 N.m
 Courtesy of TESLA, INC. Courtesy of TESLA, INC.
|
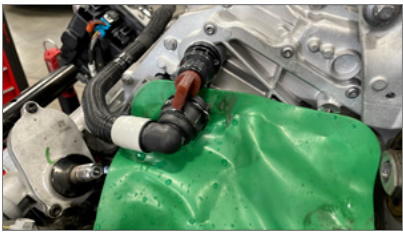
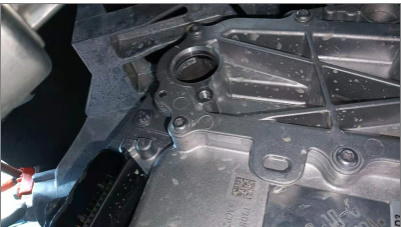
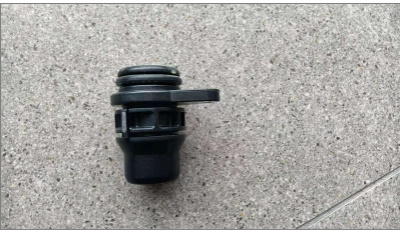
- Remove the straight fluid coupling from the front drive inverter and discard
 Courtesy of TESLA, INC. Courtesy of TESLA, INC.
|
 Courtesy of TESLA, INC. Courtesy of TESLA, INC.
|