- Open LH front door
- Lower LH and RH front windows
- Open RH front door
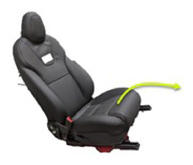
- Move RH front seat forward
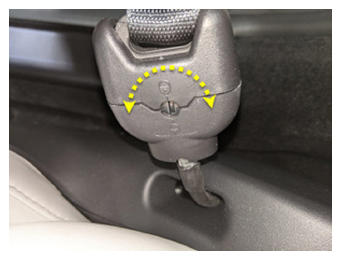
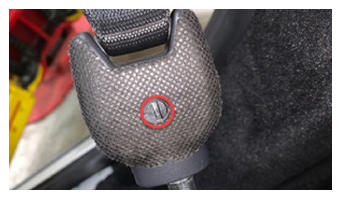
- Release RH front seat belt
NOTE:
Turn release mechanism counter clockwise, turn back clockwise after releasing
 Courtesy of TESLA, INC. Courtesy of TESLA, INC.
|
- Open RH falcon wing door
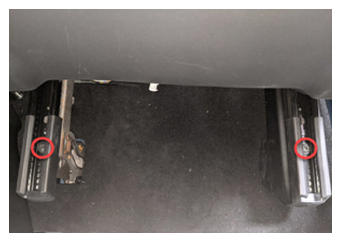
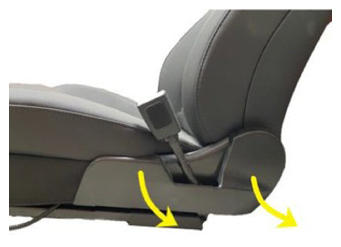
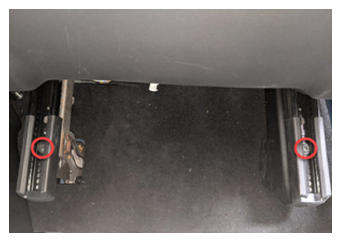
- Remove bolts securing rear of RH front seat tracks to the floor panel
NOTE:
2x patch bolts, T45P, 34 N.m, Discard after removal
 Courtesy of TESLA, INC. Courtesy of TESLA, INC.
|
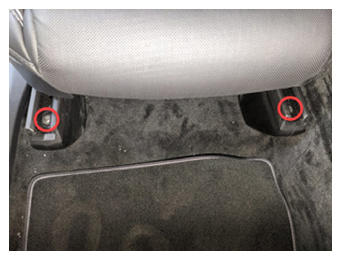
- Move RH front seat backward
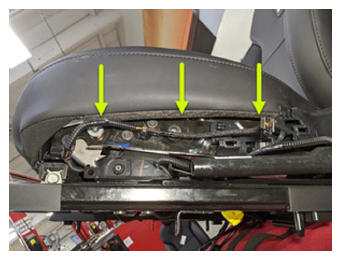
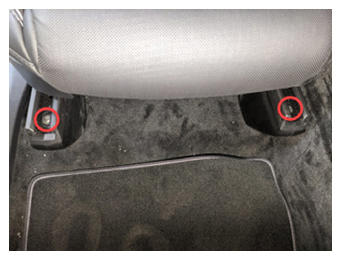
- Remove bolts securing front of RH front seat tracks to the floor panel
NOTE:
2x patch bolts, T45P, 34 N.m, Discard after removal
 Courtesy of TESLA, INC. Courtesy of TESLA, INC.
|
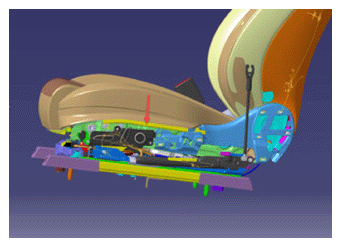
- Adjust position of RH front seat for easy removal
NOTE:
Move seat to middle of track at most upright position with seat fully up off floor
- Open hood
NOTE:
Via center display > Controls > Frunk Open
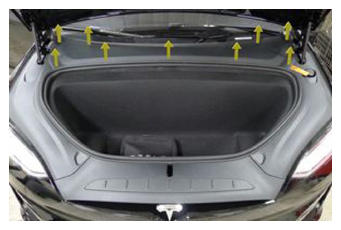
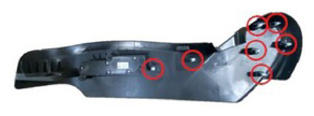
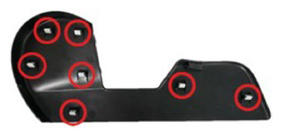
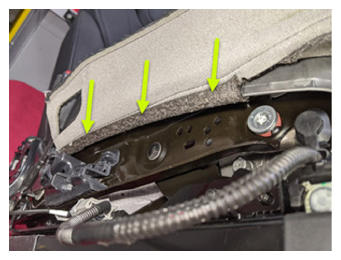
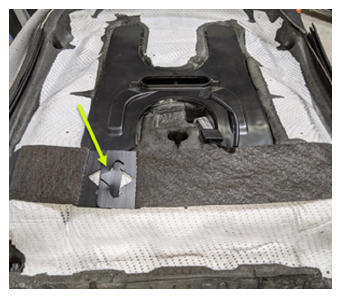
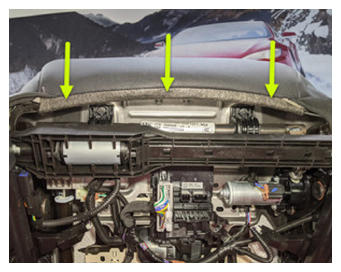
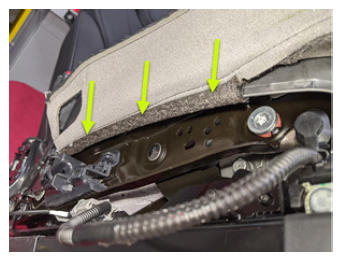
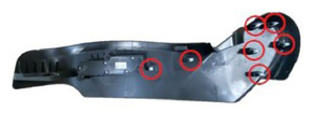
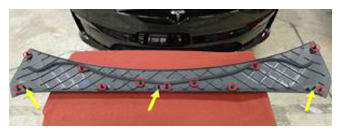
- Remove rear underhood apron
NOTE:
11x clips, 2x datums
 Courtesy of TESLA, INC. Courtesy of TESLA, INC.
|
 Courtesy of TESLA, INC. Courtesy of TESLA, INC.
|
- Power off vehicle via center display
NOTE:
Controls > Safety & Security > Power Off
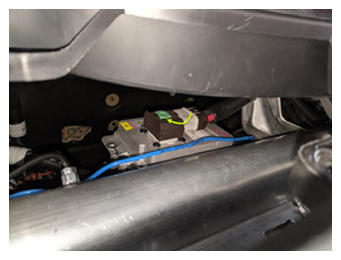
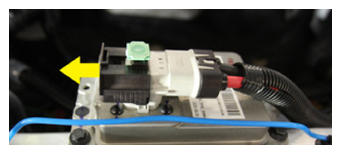
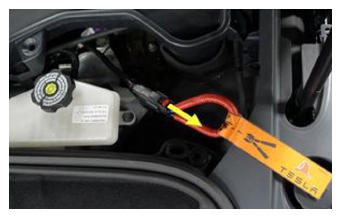
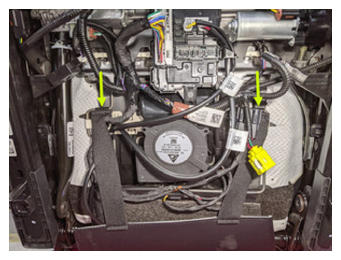
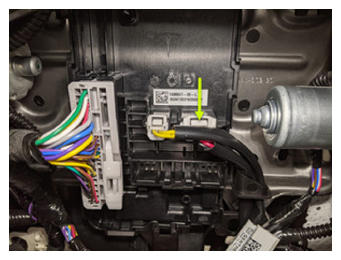
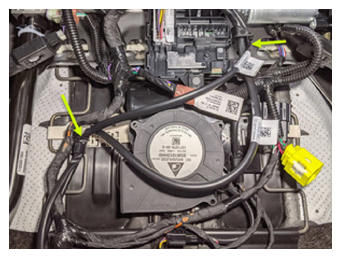
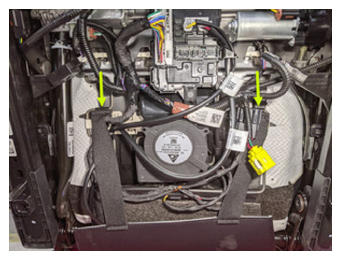
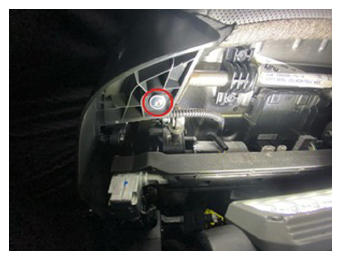
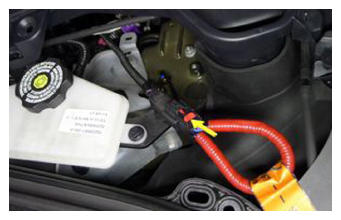
- Disconnect LV battery connector and First Responder Loop
NOTE:
2x connectors, Lift up and release green locking tab, Pull black connector lock outwards to release connection, Release red lock tab on FRL
 Courtesy of TESLA, INC. Courtesy of TESLA, INC.
|
 Courtesy of TESLA, INC. Courtesy of TESLA, INC.
|
 Courtesy of TESLA, INC. Courtesy of TESLA, INC.
|
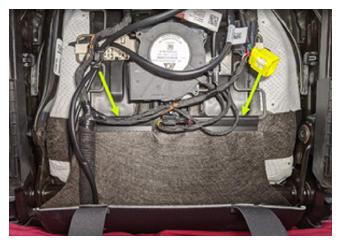
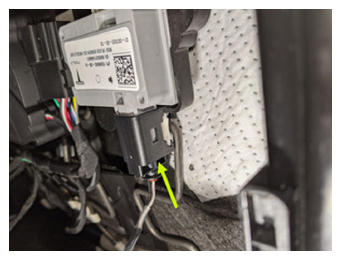
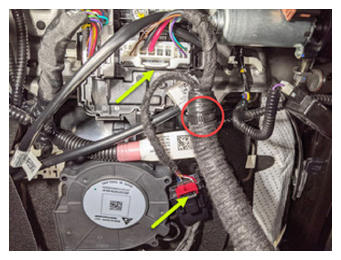
- Position chair to gain access below seat bottom and disconnect RH side body harness from seat controller
NOTE:
2x connectors, 1x clip, Release red locking tab on black connector
 Courtesy of TESLA, INC. Courtesy of TESLA, INC.
|
- Remove RH front seat from vehicle
NOTE:
Recommend assistance, Use caution to not damage other components
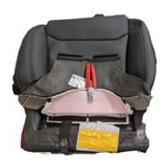
- Place front seat on a protected surface
NOTE:
Recommend assistance, Place seat so the underside of the seat can be accessed
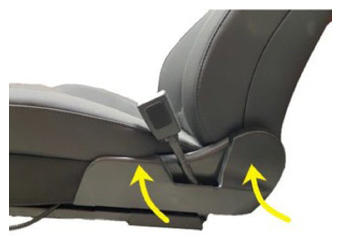
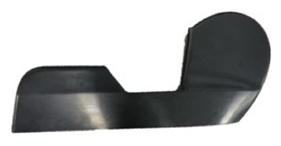
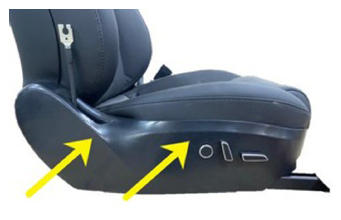
- Remove screw securing outer side cover from RH front seat
NOTE:
1x screw, T20, 4 N.m, Ensure the front of the seat is high enough to access the T20 screw
 Courtesy of TESLA, INC. Courtesy of TESLA, INC.
|
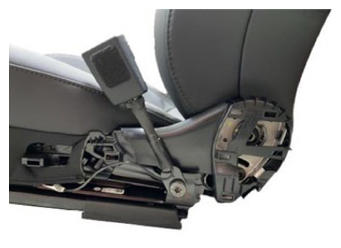
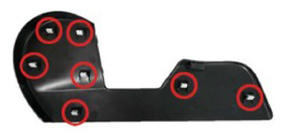
- Release RH outer side cover from seat assembly
NOTE:
7x clip, Carefully release outer side cover from seat, do not fully remove
 Courtesy of TESLA, INC. Courtesy of TESLA, INC.
|
 Courtesy of TESLA, INC. Courtesy of TESLA, INC.
|
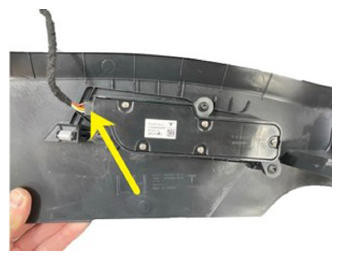
- Disconnect RH front seat switch connector
NOTE:
1x connector
 Courtesy of TESLA, INC. Courtesy of TESLA, INC.
|
- Remove inboard side shield from RH front seat
NOTE:
7x clips
 Courtesy of TESLA, INC. Courtesy of TESLA, INC.
|
 Courtesy of TESLA, INC. Courtesy of TESLA, INC.
|
 Courtesy of TESLA, INC. Courtesy of TESLA, INC.
|
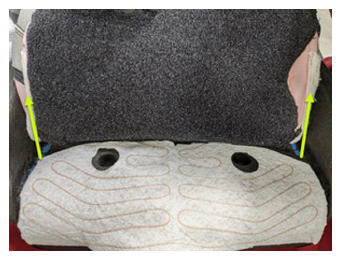
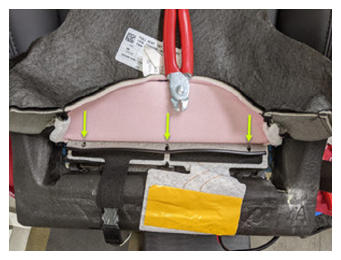
- Release seat back elastic straps from seat frame
NOTE:
2x straps
 Courtesy of TESLA, INC. Courtesy of TESLA, INC.
|
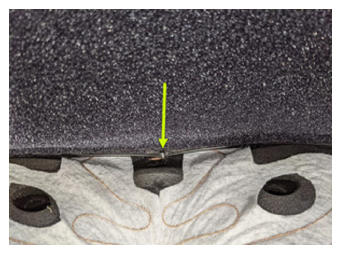
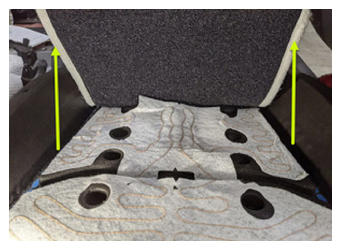
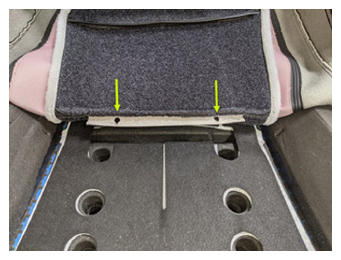
- Release soft trim retainers from seat frame
NOTE:
2x retainers
 Courtesy of TESLA, INC. Courtesy of TESLA, INC.
|
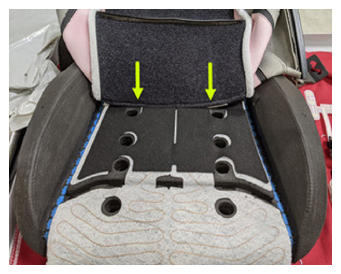
- Disconnect FSC vent heat pad from seat controller
NOTE:
1x connector
 Courtesy of TESLA, INC. Courtesy of TESLA, INC.
|
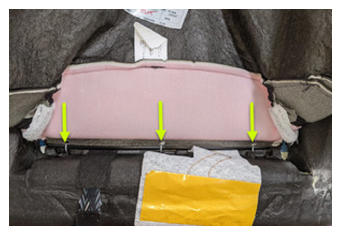
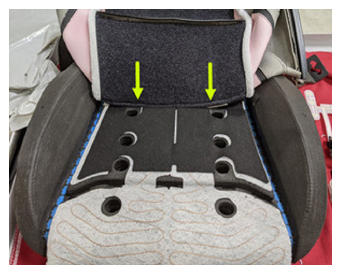
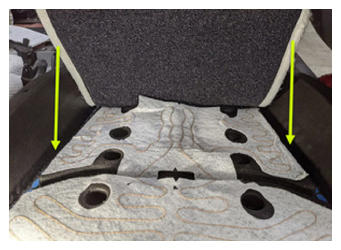
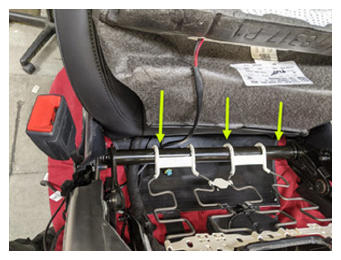
- Remove FSC/FSB vent heat pad harnesses from seat
NOTE:
1x clip, 1x bracket, Note one harness is for the seat cushion and the other is for the seat back. The upper bracket aids in routing while the lower clip secures them
 Courtesy of TESLA, INC. Courtesy of TESLA, INC.
|
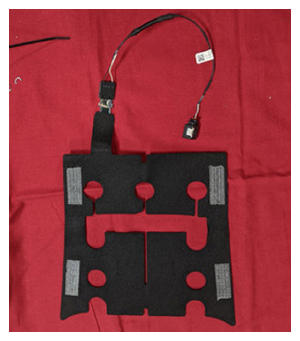
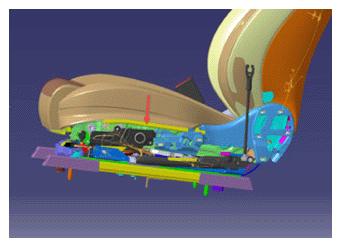
- Disconnect OCS sensor mat from OCS module
NOTE:
1x connector, Slide locking tab to the left of connector, Then release connector downward
 Courtesy of TESLA, INC. Courtesy of TESLA, INC.
|
- Release soft trim retainer from inboard side of seat frame
NOTE:
1x retainer
 Courtesy of TESLA, INC. Courtesy of TESLA, INC.
|
 Courtesy of TESLA, INC. Courtesy of TESLA, INC.
|
- Release soft trim retainer from outboard side of seat frame
NOTE:
1x retainer
 Courtesy of TESLA, INC. Courtesy of TESLA, INC.
|
 Courtesy of TESLA, INC. Courtesy of TESLA, INC.
|
- Release soft trim retainer from front end of seat frame
NOTE:
1x retainer
 Courtesy of TESLA, INC. Courtesy of TESLA, INC.
|
- Position seat upright
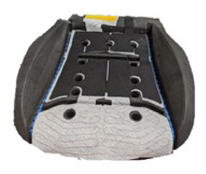
- Remove seat cushion from frame
 Courtesy of TESLA, INC. Courtesy of TESLA, INC.
|
- Release seat cushion trim from below seat foam
NOTE:
1x strap
 Courtesy of TESLA, INC. Courtesy of TESLA, INC.
|
- Release Velcro securing 40 seat cushion trim cover to foam pad
NOTE:
Fold back until you reach first row of hog rings
 Courtesy of TESLA, INC. Courtesy of TESLA, INC.
|
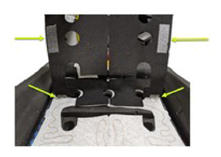
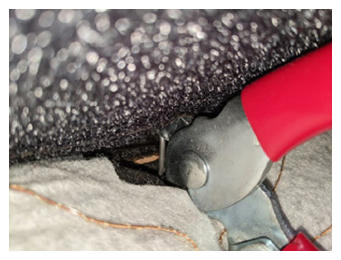
- Remove front hog rings securing seat cushion trim cover to foam pad
NOTE:
5x hog rings, Push down on foam to allow access to rings, Verify any excess pieces have been removed from foam
 Courtesy of TESLA, INC. Courtesy of TESLA, INC.
|
 Courtesy of TESLA, INC. Courtesy of TESLA, INC.
|
- Release remaining Velcro securing seat cushion trim cover to foam pad
NOTE:
Fold back until access to OCS is clear
 Courtesy of TESLA, INC. Courtesy of TESLA, INC.
|
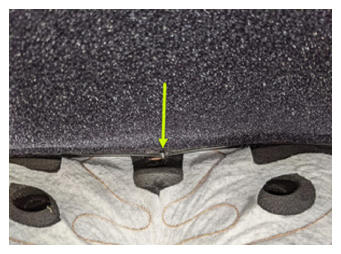
- Remove center hog rings securing seat cushion trim cover to foam pad
NOTE:
2x hog rings
 Courtesy of TESLA, INC. Courtesy of TESLA, INC.
|
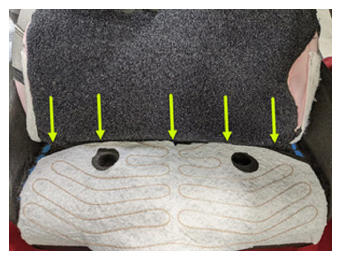
- Remove rear hog rings securing seat cushion trim cover to foam pad
NOTE:
3x hog rings
 Courtesy of TESLA, INC. Courtesy of TESLA, INC.
|
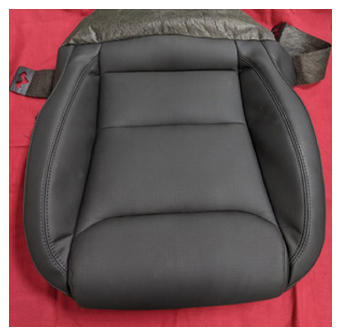
- Remove seat cushion trim cover from foam pad
 Courtesy of TESLA, INC. Courtesy of TESLA, INC.
|
 Courtesy of TESLA, INC. Courtesy of TESLA, INC.
|
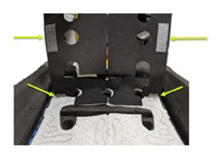
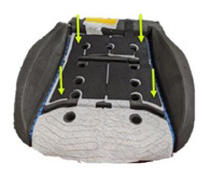
- Remove OCS sensor mat from FSC vent heat pad
NOTE:
4x adhesive strips, Mat is secured with adhesive at 4 locations, Be cautious when removing to avoid damage to head pad
 Courtesy of TESLA, INC. Courtesy of TESLA, INC.
|
 Courtesy of TESLA, INC. Courtesy of TESLA, INC.
|
 Courtesy of TESLA, INC. Courtesy of TESLA, INC.
|
- Install OCS sensor mat onto FSC vent heat pad
NOTE:
4x adhesive strips, Position mat in line with rear circle cutouts on foam pad, Verify all strips are fully secured to heat pad
 Courtesy of TESLA, INC. Courtesy of TESLA, INC.
|
 Courtesy of TESLA, INC. Courtesy of TESLA, INC.
|
- Position seat cushion trim cover onto foam pad for hog ring installation
 Courtesy of TESLA, INC. Courtesy of TESLA, INC.
|
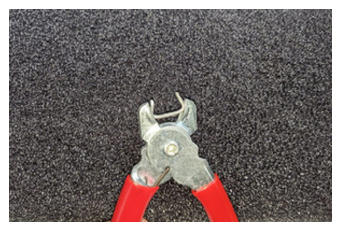
- Install rear hog rings securing seat cushion trim cover to foam pad
NOTE:
3x hog rings, Push down on foam to allow access, Place hog ring into pliers prior to installation, Start with center ring and work your way out
 Courtesy of TESLA, INC. Courtesy of TESLA, INC.
|
 Courtesy of TESLA, INC. Courtesy of TESLA, INC.
|
 Courtesy of TESLA, INC. Courtesy of TESLA, INC.
|
- Install center hog rings securing seat cushion trim cover to foam pad
NOTE:
2x hog rings, Push down on foam to allow access
 Courtesy of TESLA, INC. Courtesy of TESLA, INC.
|
 Courtesy of TESLA, INC. Courtesy of TESLA, INC.
|
- Secure Velcro to seat cushion bottom foam
NOTE:
Secure up to the section where hog rings will be installed
 Courtesy of TESLA, INC. Courtesy of TESLA, INC.
|
- Install hog rings securing seat cushion trim to foam
NOTE:
5x hog rings, Push down on foam to allow access, Place hog ring into pliers prior to installation, Start with center ring and work your way out
 Courtesy of TESLA, INC. Courtesy of TESLA, INC.
|
 Courtesy of TESLA, INC. Courtesy of TESLA, INC.
|
 Courtesy of TESLA, INC. Courtesy of TESLA, INC.
|
 Courtesy of TESLA, INC. Courtesy of TESLA, INC.
|
- Install remaining portion of Velcro securing cushion trim cover to foam pad
NOTE:
Wrap remaining portion of trim cover over foam pad
 Courtesy of TESLA, INC. Courtesy of TESLA, INC.
|
 Courtesy of TESLA, INC. Courtesy of TESLA, INC.
|
- Install seat bottom cushion onto seat frame
NOTE:
Feed trim between seat back and seat frame, Maneuver seat assembly as needed for access
 Courtesy of TESLA, INC. Courtesy of TESLA, INC.
|
 Courtesy of TESLA, INC. Courtesy of TESLA, INC.
|
- Rotate seat assembly onto seat back
NOTE:
Protect seat from damage
- Install soft trim retainer onto front end of seat frame
NOTE:
1x retainer
 Courtesy of TESLA, INC. Courtesy of TESLA, INC.
|
- Install soft trim retainer from outboard side of seat frame
NOTE:
1x retainer
 Courtesy of TESLA, INC. Courtesy of TESLA, INC.
|
 Courtesy of TESLA, INC. Courtesy of TESLA, INC.
|
- Install soft trim retainer from inboard side of seat frame
NOTE:
1x retainer
 Courtesy of TESLA, INC. Courtesy of TESLA, INC.
|
 Courtesy of TESLA, INC. Courtesy of TESLA, INC.
|
- Connect OCS mat to module
NOTE:
1x connector, Locking tab will engage once connector is fully seated
 Courtesy of TESLA, INC. Courtesy of TESLA, INC.
|
- Install soft trim retainers onto seat frame
NOTE:
2x retainers
 Courtesy of TESLA, INC. Courtesy of TESLA, INC.
|
- Install seat back elastic straps onto seat frame
NOTE:
2x straps
 Courtesy of TESLA, INC. Courtesy of TESLA, INC.
|
- Position seat upright
- Install inboard side shield onto RH front seat
NOTE:
7x clips, fully secure inboard side shield onto RH front seat
 Courtesy of TESLA, INC. Courtesy of TESLA, INC.
|
 Courtesy of TESLA, INC. Courtesy of TESLA, INC.
|
 Courtesy of TESLA, INC. Courtesy of TESLA, INC.
|
- Connect RH outer side cover
NOTE:
1x connector
 Courtesy of TESLA, INC. Courtesy of TESLA, INC.
|
- Install RH outer side cover onto seat assembly
NOTE:
7x clip, Apply pressure to the outer seat cover to fully seat trim clips, trim should sit flush against the seat cushion
 Courtesy of TESLA, INC. Courtesy of TESLA, INC.
|
 Courtesy of TESLA, INC. Courtesy of TESLA, INC.
|
- Install screw securing outer side cover to RH front seat assembly
NOTE:
1x screw, T20, 4 N.m, Maneuver seat assembly as needed for access
 Courtesy of TESLA, INC. Courtesy of TESLA, INC.
|
- Install RH front seat into vehicle
NOTE:
Recommend Assistance, Take care not to damage surrounding components while lifting the seat into the vehicle
- Position chair to gain access below seat bottom and connect RH side body harness to seat controller
NOTE:
2x connectors, 1x clip, Engage red locking tab on black connector, Recommend assistance
 Courtesy of TESLA, INC. Courtesy of TESLA, INC.
|
- Position RH front seat upright for bolt installation
NOTE:
Recommend assistance
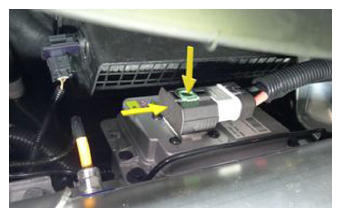
- Connect First Responder Loop and LV battery connector
NOTE:
2x connectors, Secure FRL first, Seat LV battery connection and push black connector lock inwards to secure, Engage upper locking tab when fully seated
 Courtesy of TESLA, INC. Courtesy of TESLA, INC.
|
 Courtesy of TESLA, INC. Courtesy of TESLA, INC.
|
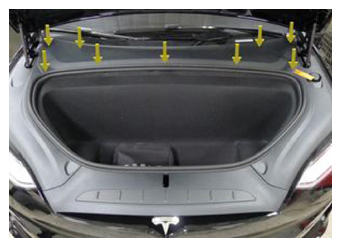
- Install rear underhood apron
NOTE:
11x clips, 2x datums
 Courtesy of TESLA, INC. Courtesy of TESLA, INC.
|
 Courtesy of TESLA, INC. Courtesy of TESLA, INC.
|
- Close hood
- Move RH front seat forward
- Secure RH front seat belt
 Courtesy of TESLA, INC. Courtesy of TESLA, INC.
|
- Install bolts securing RH front seat rear tracks to vehicle
NOTE:
2x patch bolts, T45P, 34 N.m, Install new bolts
 Courtesy of TESLA, INC. Courtesy of TESLA, INC.
|
- Move RH front seat backward
- Install bolts securing both RH front seat front tracks to vehicle
NOTE:
2x patch bolts, T45P, 34 N.m, Install new bolts
 Courtesy of TESLA, INC. Courtesy of TESLA, INC.
|
- Move RH front seat to original position
- Close RH front door
- Calibrate the rear doors.
NOTE:
If the "calibration Needed" message appears on the vehicle touchscreen, touch and hold Calibrate
to calibrate the rear doors.
- Using laptop connect to vehicle with ethernet diag kit and Toolbox 3
- Select 'Actions/Autodiag' and search for 'Service_Redeploy'
- Select 'UPDATE_SERVICE-REDEPLOY', click 'Run', and allow routine to complete
NOTE:
Select 'X' at top right of window to close once complete
- Select the clock on the center display, or go to the Software tab, then select install now and start firmware update
NOTE:
Select Install Now, Tap count down timer until clock runs down to 0, Check the center display and ensure the firmware package is installing
- Re-establish vehicle connection to Toolbox 3
- Select 'Actions/Autodiag' and search for 'Calibration'
- Select 'PROC_VCRIGHT_SEAT-CALIBRATE', click 'Run', and allow routine to complete
NOTE:
Verify no items on seat during this routine, Select 'X' at top right of window to close once complete
- Disconnect Toolbox 3 from vehicle and remove laptop and ethernet diag kit
- Raise LH and RH front windows
- Close LH front door