Air Suction System: Testing: Pickup
- Check condition of all hoses and tubes. Disconnect air suction hose from air cleaner and start cold engine. Listen at air suction hose. As engine warms up, a "bubbling" noise should be heard at idle. No noise should be heard when engine is cold.
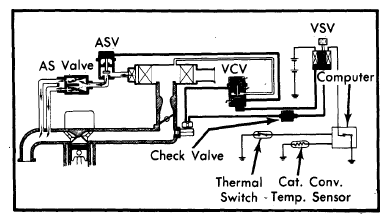
- Disconnect and plug vacuum hose located between check valve and vacuum pipe bracket at check valve. "Bubbling" noise should still be heard. Race engine and quickly close throttle. "Bubbling" noise should stop.
- With engine running at idle, connect a jumper wire to both terminals of the catalytic converter temperature sensor. "Bubbling" noise should stop. Disconnect wire. If system performed correctly, testing is complete. If not, test individual components in steps in that follow.
 Courtesy of © TOYOTA, LICENSE AGREEMENT TMS1002
- Remove air suction (AS) valve. Blow air into pipe(s) on each side of valve checking that air flows from air cleaner side to outlet side and does not flow from outlet side to air cleaner side.
- Remove air switching valve (ASV). Apply vacuum to ASV diaphragm. Blow into upper valve pipe checking that air flows out lower pipe. Remove vacuum from diaphragm while blowing. Air flow should stop.
- Remove check valve and blow air into each pipe. Air should flow from Orange pipe to Black pipe, but not from Black pipe to Orange pipe. Replace or reinstall valves as necessary.
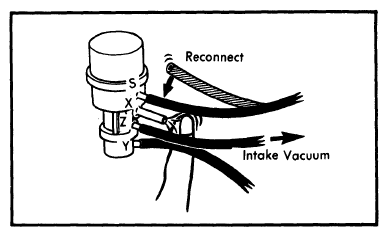
- Check vacuum control valve by disconnecting vacuum hose from port "Z". Using another hose, connect port "Z" to intake manifold. Disconnect vacuum hose from port "S" and "X". See Fig 2.
 Courtesy of © TOYOTA, LICENSE AGREEMENT TMS1002
- Run engine at idle. Plug port "X" with finger checking that no vacuum is felt. Reconnect hose to port "S". Vacuum should be felt momentarily. Replace or reinstall valve as necessary.
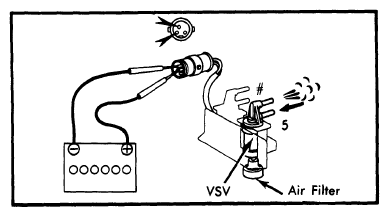
- Remove vacuum switching valve (VSV). Connect valve to battery as shown in Fig 3. Blow into pipe "5", checking that air comes out pipe "#". Disconnect battery. Blow into pipe "5", checking that air comes out air filter.
 Courtesy of © TOYOTA, LICENSE AGREEMENT TMS1002
- Using an ohmmeter, check that there is no continuity between positive terminal and VSV body. Measure resistance between positive terminal and other terminals. Resistance should be 38-43 ohms. Replace or reinstall valve as necessary.
- Drain coolant from radiator. Remove thermal switch from intake manifold. Cool switch in ice water to below 43°F (6°C). Using an ohmmeter, check that there is continuity between switch connector tab and switch body.
- Using hot oil, heat switch to 64-208°F (18-98°C). Check that there is no continuity. Continue heating switch to above 230°F (110°C). Check that continuity returns. Replace or reinstall switch as necessary. Refill radiator.
- Unplug catalytic converter temperature sensor under driver's seat. Insert ohmmeter probe from REAR side of connector only and measure resistance while running engine at idle. Resistance should measure 2, 000-200, 000 ohms. Replace or reinstall sensor as necessary. Check for loose connections.