October 30: LEMON manuals on a temporary server, it is slow and having issues, download the manuals you need! Later in November we will switch back to the fast server.
Fuel Injector, Intake Manifold: Removal
- PREVENT GASOLINE FROM SPILLING OUT
- DISCONNECT BATTERY NEGATIVE TERMINAL
- DRAIN ENGINE COOLANT
(See
REPLACEMENT
)
- REMOVE WINDSHIELD WIPER ARM AND BLADE ASSEMBLY LH
(See
REMOVAL
)
- REMOVE WINDSHIELD WIPER ARM AND BLADE ASSEMBLY RH
(See
REMOVAL
)
- REMOVE COWL TOP VENTILATOR LOUVER RH
(See
REMOVAL
)
- REMOVE WINDSHIELD WIPER MOTOR & LINK ASSEMBLY
(See
REMOVAL
)
- REMOVE COWL TOP PANEL OUTER
(See
REMOVAL
)
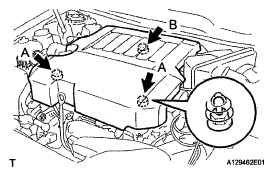
- REMOVE V-BANK COVER SUB-ASSEMBLY
- Disengage the 3 clips and remove the V-bank cover.
NOTE:
Be sure to disengage the clips in the order from A to B.
 Courtesy of © TOYOTA, LICENSE AGREEMENT TMS1002
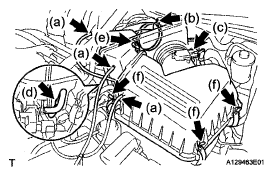
- REMOVE AIR CLEANER CAP WITH AIR CLEANER HOSE
- Disconnect the 3 vacuum hoses.
- Disconnect the ventilation hose No. 1.
- Disconnect the air flow meter connector.
- Separate the fuel vapor feed hose No. 1.
- Loosen the hose clamp bolt.
- Remove the 3 clamps and air cleaner cap with air cleaner hose.
 Courtesy of © TOYOTA, LICENSE AGREEMENT TMS1002
- REMOVE INTAKE AIR SURGE TANK
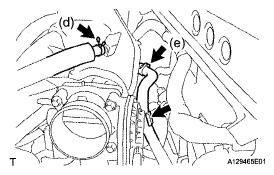
- Disconnect the 2 water by-pass hoses from the throttle with motor body assembly.
- Disconnect the vapor feed hose.
- Disconnect the throttle with motor body assembly connector and clamp.
 Courtesy of © TOYOTA, LICENSE AGREEMENT TMS1002
- Disconnect the ventilation hose No. 2.
- Disconnect the union to check valve hose.
 Courtesy of © TOYOTA, LICENSE AGREEMENT TMS1002
- Remove the bolt and vacuum hose clamp.
 Courtesy of © TOYOTA, LICENSE AGREEMENT TMS1002
- Disconnect the connector.
 Courtesy of © TOYOTA, LICENSE AGREEMENT TMS1002
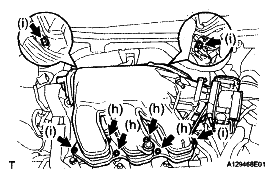
- Using a 5 mm socket hexagon wrench, remove the 4 bolts.
- Remove the 2 nuts, 2 bolts and intake air surge tank.
- Remove the gasket from the intake air surge tank.
 Courtesy of © TOYOTA, LICENSE AGREEMENT TMS1002
- DISCONNECT FUEL TUBE SUB-ASSEMBLY
- Remove the fuel pipe clamp No. 2.
- Pinch the tube connector and then pull out the fuel pipe.
NOTE:
- Check that there is no dirt or other foreign objects around the connector before this operation and clean the connector as necessary.
- It is necessary to prevent mud or dirt from entering the connector. If mud or dirt gets in the connector, the O-rings may not seal properly.
- Do not use any tools in this operation.
- Do not bend, kink or twist the nylon tube. Protect the connector by covering it with a plastic bag.
- When the pipe and the connector are stuck, push and pull the connector to release and pull the connector out carefully.
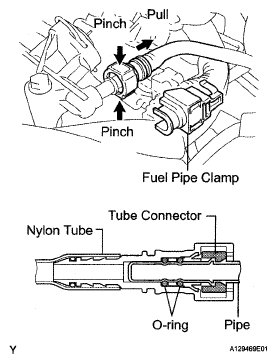 Courtesy of © TOYOTA, LICENSE AGREEMENT TMS1002
- REMOVE FUEL INJECTOR ASSEMBLY
- Disconnect the 6 fuel injector connectors.
 Courtesy of © TOYOTA, LICENSE AGREEMENT TMS1002
- Remove the 5 bolts and fuel delivery pipe together with the 6 fuel injectors.
NOTE:
Be careful not to drop the fuel injectors when removing the fuel delivery pipe.
 Courtesy of © TOYOTA, LICENSE AGREEMENT TMS1002
- Remove the 6 insulators from the intake manifold.
 Courtesy of © TOYOTA, LICENSE AGREEMENT TMS1002
- Pull out the fuel injector from the fuel delivery pipe.
 Courtesy of © TOYOTA, LICENSE AGREEMENT TMS1002