Fuel Pressure Test
- Disconnect negative battery cable. Release fuel pressure. See FUEL PRESSURE RELEASE
under FUEL SYSTEM.
- Disconnect chassis fuel supply line from fuel line at front of fuel rail. To disconnect chassis fuel supply line, squeeze retaining tabs together on fuel line quick-connector fitting, and pull fuel line quick-connector fitting from fuel supply line.
- Connect Fuel Pressure Gauge (C-4799) to Adapter (6539). Install fuel pressure gauge and adapter between chassis fuel supply line and fuel line at front of fuel rail. Ensure all fitting are securely connected.
- Connect scan tool to Data Link Connector (DLC), located below driver's side of instrument panel. See Fig 1
. Turn ignition on.
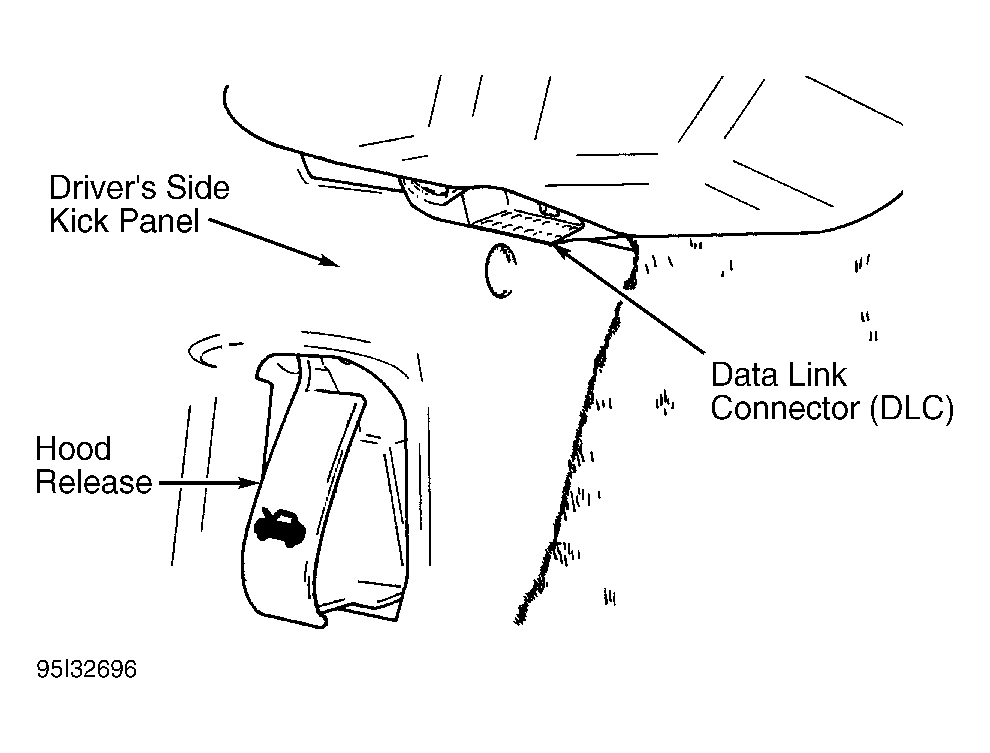 Courtesy of CHRYSLER CORP.
- Using scan tool, actuate ASD fuel system test to activate fuel pump and pressurize fuel system. Note fuel pressure. Fuel pressure should be within specs. See FUEL PRESSURE SPECIFICATIONS
table. If no fuel pressure exists, fuel pump relay and control circuit may be defective. See FUEL PUMP RELAY
under FUEL SYSTEM. If fuel pressure is correct, go to step 14).
- If fuel pressure is less than specified, go to step 7). If fuel pressure exceeds specification, check for kinked or restricted fuel return line from fuel filter to fuel pump module. Fuel filter is mounted on the frame, above rear of fuel tank, near fuel pump module on top of fuel tank. If fuel return line is not kinked or restricted, replace fuel pressure regulator. Fuel pressure regulator is mounted inside fuel tank, on fuel pump module. See procedures in the REMOVE/INSTALL/OVERHAUL
article. Go to step 14).
- If fuel pressure is less than specified, release fuel pressure. Install Adapter (6539) and fuel pressure gauge between fuel filter outlet line and chassis fuel supply line. Fuel filter is mounted on the frame, above rear of fuel tank, near fuel pump module on top of fuel tank. Turn ignition on. Using scan tool, actuate ASD fuel system test. Note fuel pressure.
- If fuel pressure is now within specification, check for kinked or restricted chassis fuel supply line, and then go to step 14). If fuel pressure is still less than specified, go to next step.
- Release fuel pressure. Remove fuel pressure gauge and adapter from between fuel filter outlet line and chassis fuel supply line. Reconnect chassis fuel supply line to fuel filter. Install adapter and fuel pressure gauge between fuel pump module and fuel supply line to fuel filter.
- Turn ignition on. Using scan tool, actuate ASD fuel system test. Note fuel pressure. If fuel pressure is within specification, replace fuel filter along with fuel lines. Fuel lines are permanently attached to fuel filter. Go to step 14). If fuel pressure is still less than specified, go to next step.
- Release fuel pressure. Check for restriction in fuel supply line between fuel pump module and fuel filter. If restriction exists, replace fuel filter along with fuel lines, as fuel lines are permanently attached to fuel filter. Go to step 14).
- If no restriction exists, check for restricted fuel pump inlet strainer. Fuel pump inlet strainer located inside fuel tank, on bottom of fuel pump module. See REMOVE/INSTALL/OVERHAUL
article for fuel pump module removal procedure.
- If fuel pump inlet strainer is restricted, replace fuel pump inlet strainer, and go to step 14). If fuel pump inlet strainer is not restricted, fuel pressure regulator or fuel pump are defective. Fuel pressure regulator and fuel pump are mounted inside fuel tank, on the fuel pump module. See the REMOVE/INSTALL/OVERHAUL
article. Go to step 14).
CAUTION:
After installing chassis fuel supply line on fuel line at front of fuel rail, ensure chassis fuel supply line is secured in place by pulling on chassis fuel supply line. If chassis fuel supply line is fully seated and secured in place, tabs on side of connector will be visible in each opening on side of the connector.
- Release fuel pressure. Remove test equipment. Before reinstalling chassis fuel supply line on fuel line at front of fuel rail, ensure fuel line and fittings are clean. Apply engine oil to fitting before installing fuel lines. Install chassis fuel supply line until click sound is heard. Pull on chassis fuel supply line to ensure fuel line is secured in place. Ensure tabs are fully seated and visible in openings on the side of the connector.
FUEL PRESSURE SPECIFICATIONS
| Application |
psi (kg/cm2
) |
| Convertible |
47-51 (3.3-3.6) |