Dust and Pollen Filter Replacement
- Turn the ignition switch to LOCK (0).
- Open the glove box. While holding the glove box, release the glove box stops on each side from the dashboard by pushing them in, then lower the glove box (see step 1 on GLOVE BOX STRIKER REPLACEMENT
).
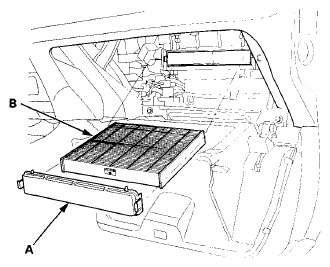
- Remove the lid (A) from the blower unit.
 Courtesy of AMERICAN HONDA MOTOR CO., INC.
- Pull out the dust and pollen filter (B).
- Install the filter in the reverse order of removal. Make sure that there is no air leaking out of the blower unit.
- If the Maintenance Minder required replacing the dust and pollen filter, reset the Maintenance Minder (see
MAINTENANCE MINDER™
), and this procedure is complete. If the Maintenance Minder did not require the dust and pollen filter replacement, go to step 7.
- Turn the ignition switch to LOCK (0).
- Connect the HDS to the DLC (see step 2 on HOW TO USE THE HDS (HONDA DIAGNOSTIC SYSTEM)
).
- Turn the ignition switch to ON (II).
- Make sure the HDS communicates with the vehicle and PCM. If it does not communicate, troubleshoot the DLC circuit (see
DLC CIRCUIT TROUBLESHOOTING
).
- Go to the Individual Maintenance Item Reset (see
RESETTING THE MAINTENANCE MINDER
), and do the MAINTENANCE SUB ITEM 2 RESET.