Line Pressure Switch Replacement
- Remove the air intake scoop (see step 5
).
- Do the battery removal procedure (see
BATTERY REMOVAL AND INSTALLATION
).
- Remove the air cleaner (see
AIR CLEANER ELEMENT INSPECTION/REPLACEMENT
).
- Remove the intake air duct (see step 10
).
- Remove the main under-hood fuse box (see step 11
).
- Remove the battery base (see step 12
).
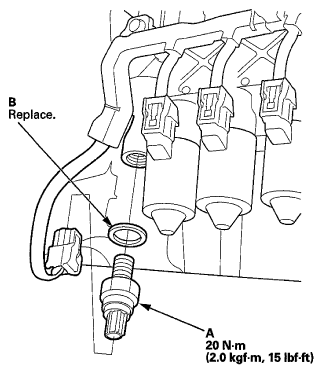
- Disconnect the line pressure switch connector, and remove the line pressure switch (A) and the sealing washer (B).
 Courtesy of AMERICAN HONDA MOTOR CO., INC.
- Install a new line pressure switch with a new sealing washer, and tighten the switch.
- Check the connector for corrosion, dirt, or oil, and clean or repair if necessary, then connect the connector securely.
- Install the battery base (see step 58
).
- Install the main under-hood fuse box (see step 59
).
- Install the intake air duct (see step 60
).
- Install the air cleaner (see
AIR CLEANER ELEMENT INSPECTION/REPLACEMENT
).
- Do the battery installation procedure (see
BATTERY REMOVAL AND INSTALLATION
).
- Install the air intake scoop (see step 66
).