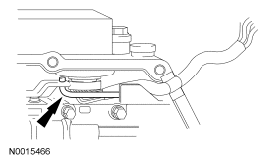
- Connect the manual valve link and position the main control valve body in place.
NOTE:
When installing the main control valve body, place the wire harness in the open space of the separate plate, being careful not to pinch the harness. Damage to the harness will occur.
 Courtesy of FORD MOTOR CO.
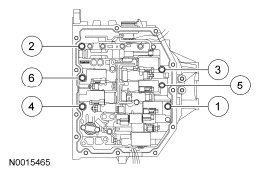
- Loosely install the 6 main control valve body bolts in the sequence shown below.
 Courtesy of FORD MOTOR CO.
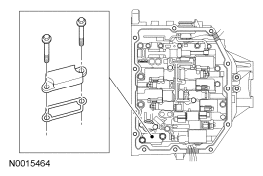
- Install the suction cover gasket, cover and loosely install the 2 bolts.
 Courtesy of FORD MOTOR CO.
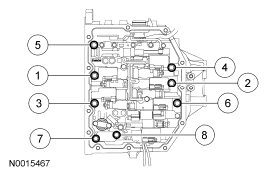
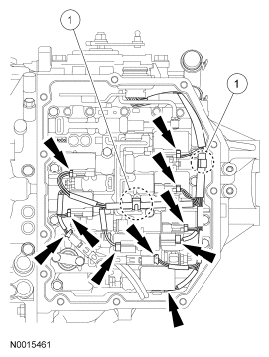
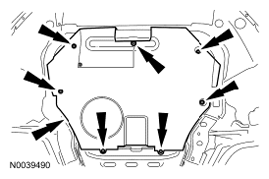
- Tighten the 8 bolts to 10 Nm (89 lb-in) in the sequence shown below.
 Courtesy of FORD MOTOR CO.
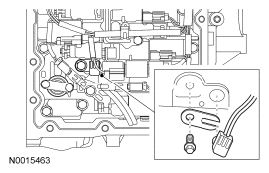
- Lubricate the O-ring with clean automatic transmission fluid and install the TFT
sensor.
- Tighten to 10 Nm (89 lb-in).
 Courtesy of FORD MOTOR CO.
- Connect the 2 speed sensor wires.
 Courtesy of FORD MOTOR CO.
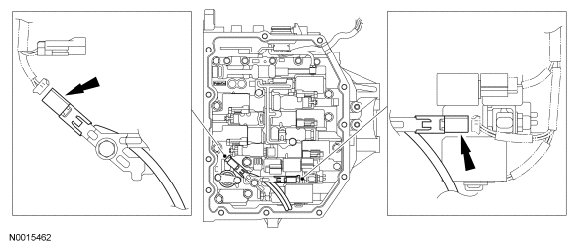
- Connect the wire harness to the solenoids.
- Install the wire harness into the clamps.
- Connect the 8 solenoid connectors and the 2 speed sensor connectors.
 Courtesy of FORD MOTOR CO.
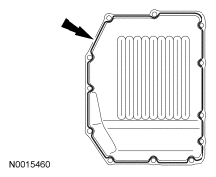
- Install a bead of sealer to the fluid pan.
 Courtesy of FORD MOTOR CO.
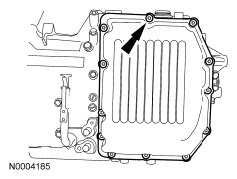
- Using new pan bolts, install the fluid pan.
- Tighten to 13 Nm (115 lb-in).
 Courtesy of FORD MOTOR CO.
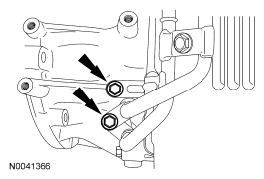
- Connect the transmission fluid cooler tubes to the transaxle.
- Tighten to 10 Nm (89 lb-in).
NOTE:
Lubricate the new O-rings with clean automatic transmission fluid and install them onto the transmission fluid cooler tubes.
 Courtesy of FORD MOTOR CO.
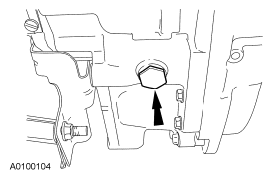
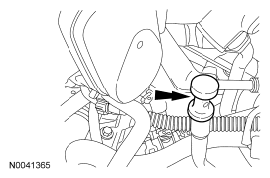
- Install the transmission fluid drain plug.
- Tighten to 47 Nm (35 lb-ft).
 Courtesy of FORD MOTOR CO.
- Install the underbody cover and the screws.
 Courtesy of FORD MOTOR CO.
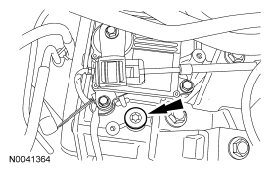
- Remove the transmission fluid fill plug.
 Courtesy of FORD MOTOR CO.
- Fill the transaxle with approximately 4.7L (5 qt) of clean transmission fluid.
- Install the transmission fluid fill plug.
- Tighten to 39 Nm (29 lb-ft).
Courtesy of FORD MOTOR CO.
- With the transaxle in PARK, the vehicle on a level surface, the engine at idle (680-780 rpm) and foot pressed on the brake, move the selector lever through each gear and allow engagement of each gear. Place the selector lever back in the PARK position.
- Wipe the transmission fluid level indicator cap and remove the transmission fluid level indicator.
- Wipe the transmission fluid level indicator with a clean cloth.
- If transmission fluid needs to be added, add transmission fluid in 0.25L (1/2 pt) increments through the transmission fluid fill plug located on the top of the transaxle near the transmission fluid level indicator. Do not overfill the transmission fluid. Install the transmission fluid level indicator back in the transmission fluid filler tube until it is fully seated, then remove the transmission fluid level indicator. The transmission fluid level should be at the upper most mark on the transmission fluid level indicator. Only fill to the upper most mark on the transmission fluid level indicator. Do not overfill. Damage to the transaxle will occur.
NOTE:
In order to get an accurate transmission fluid level reading, the vehicle should be on a level surface. Idle the engine to reach the normal operating temperature. Using the scan tool, verify that the transaxle is at normal operating temperature 60°C-70°C (140°F-158°F), prior to adjusting the transmission fluid level.
 Courtesy of FORD MOTOR CO.
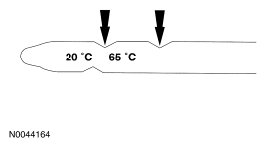
- Fill the transaxle to the correct transmission fluid level.
NOTE:
The correct transmission fluid level at normal operating temperature of 60°C-70°C (140°F-158°F) is between the top 2 marks on the transmission fluid level indicator.
 Courtesy of FORD MOTOR CO.
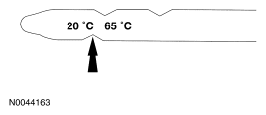
- If the TFT
is low, fill the transaxle with transmission fluid to the cold range on the transmission fluid level indicator. Recheck the transmission fluid level when the transaxle has reached the normal operating temperature.
NOTE:
The correct transmission fluid level at cool operating temperature of 15°C-25°C (59°F-77°F), is at the bottom mark on the transmission fluid level indicator.
 Courtesy of FORD MOTOR CO.